带你学zabbix 5.0
1:什么是监控?
2:常见的linux监控命令
3:使用shell脚本来监控服务器
4: zabbix的基础服务架构
5: zabbix生产环境安装
5.1:安装php运行环境
5.2:安装数据库
5.3:安装zabbix-server
5.4: 安装zabbix-web
6∶监控一台服务器主机
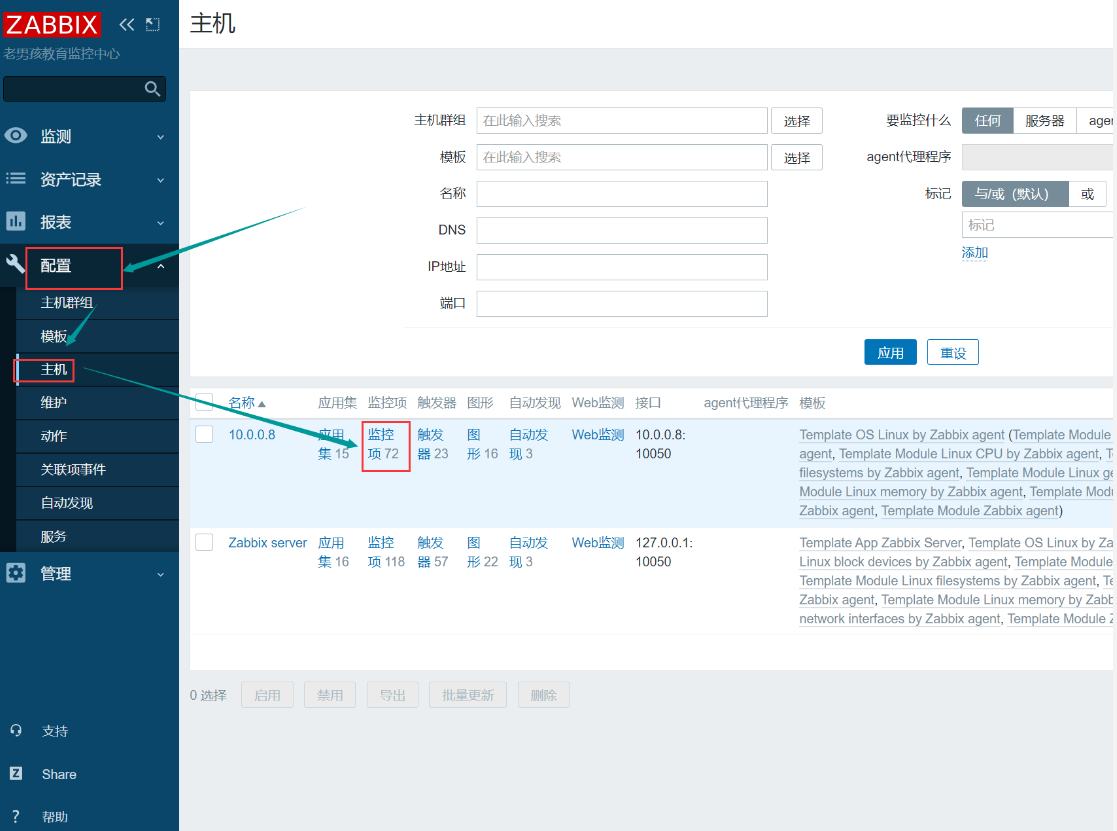
7∶自定义监控项
7.1:什么是监控项
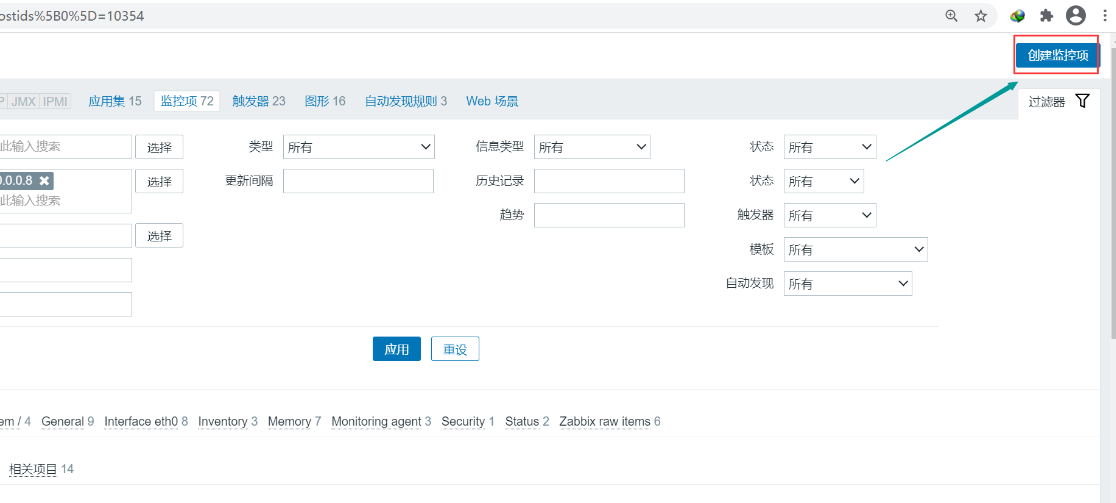
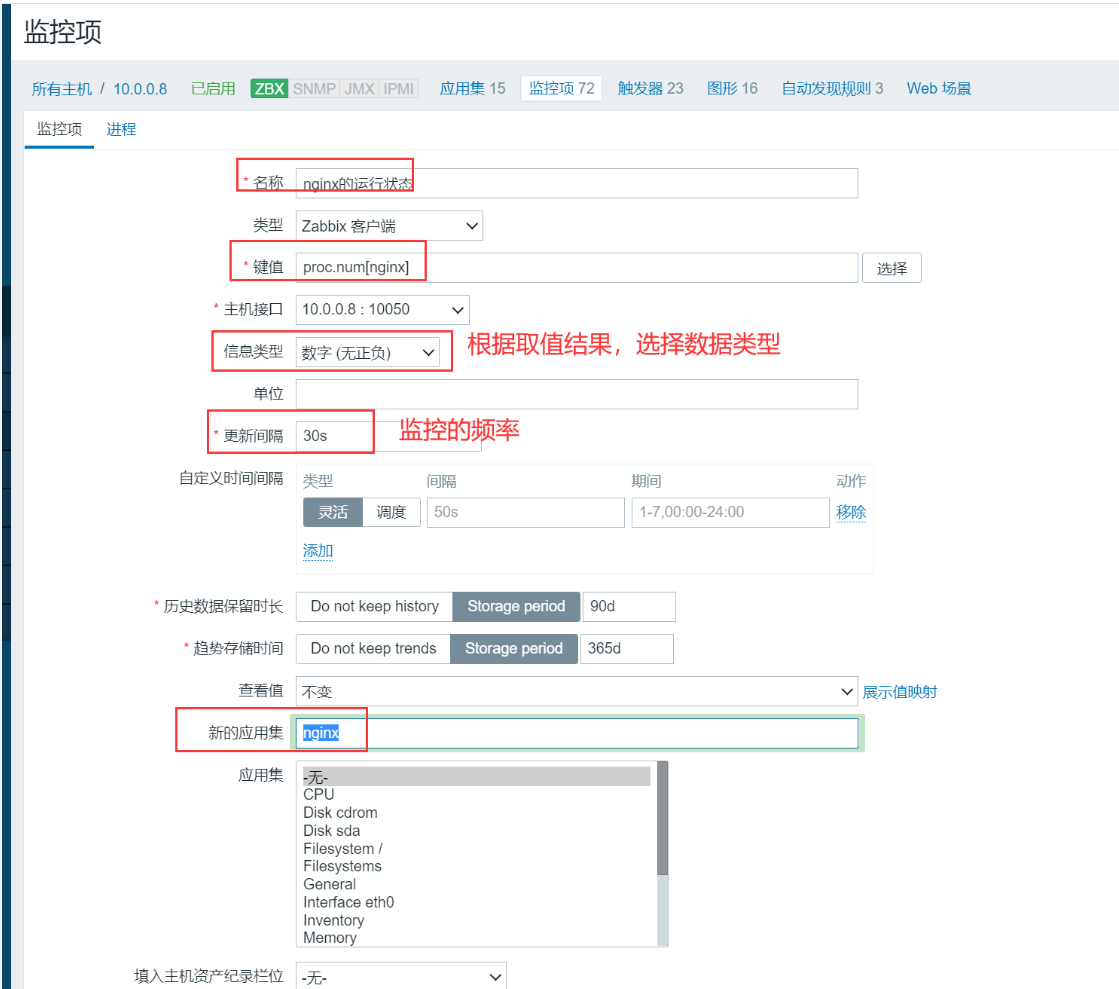
7.2 使用内置key监控nginx的状态
7.3 使用自定义的监控项来监控nginx
7.4 自定义带参数的监控项
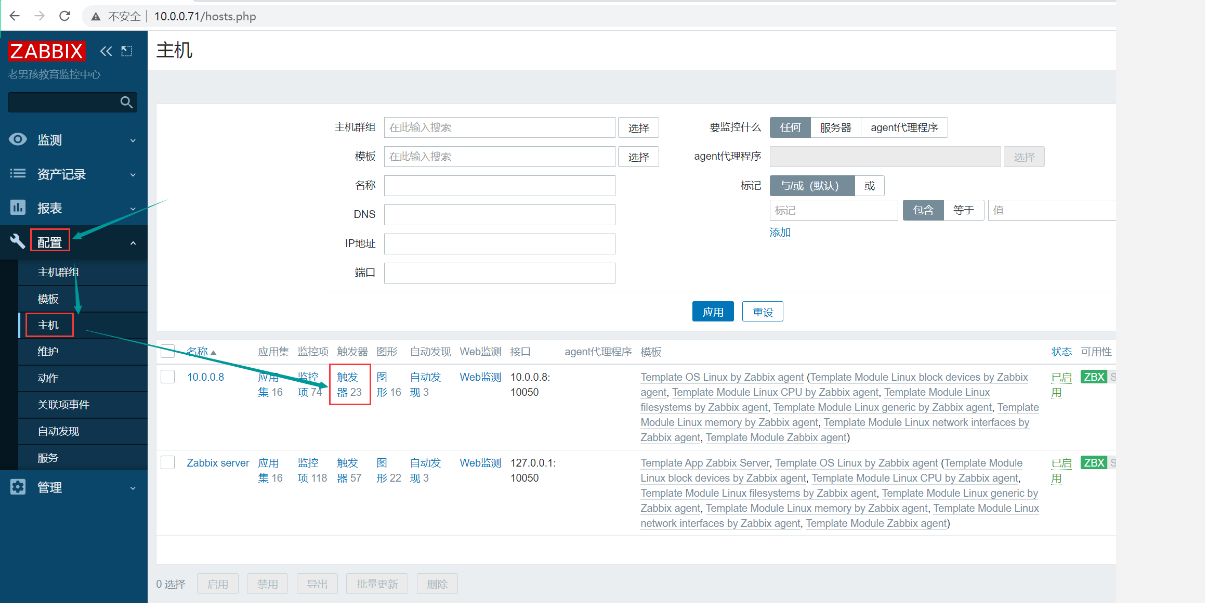
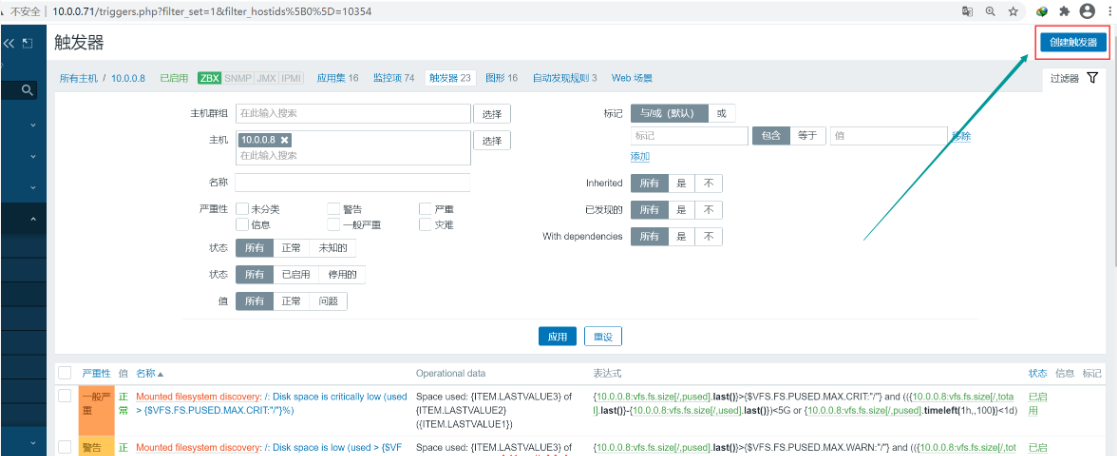
8∶自定义触发器
9:自定义报警
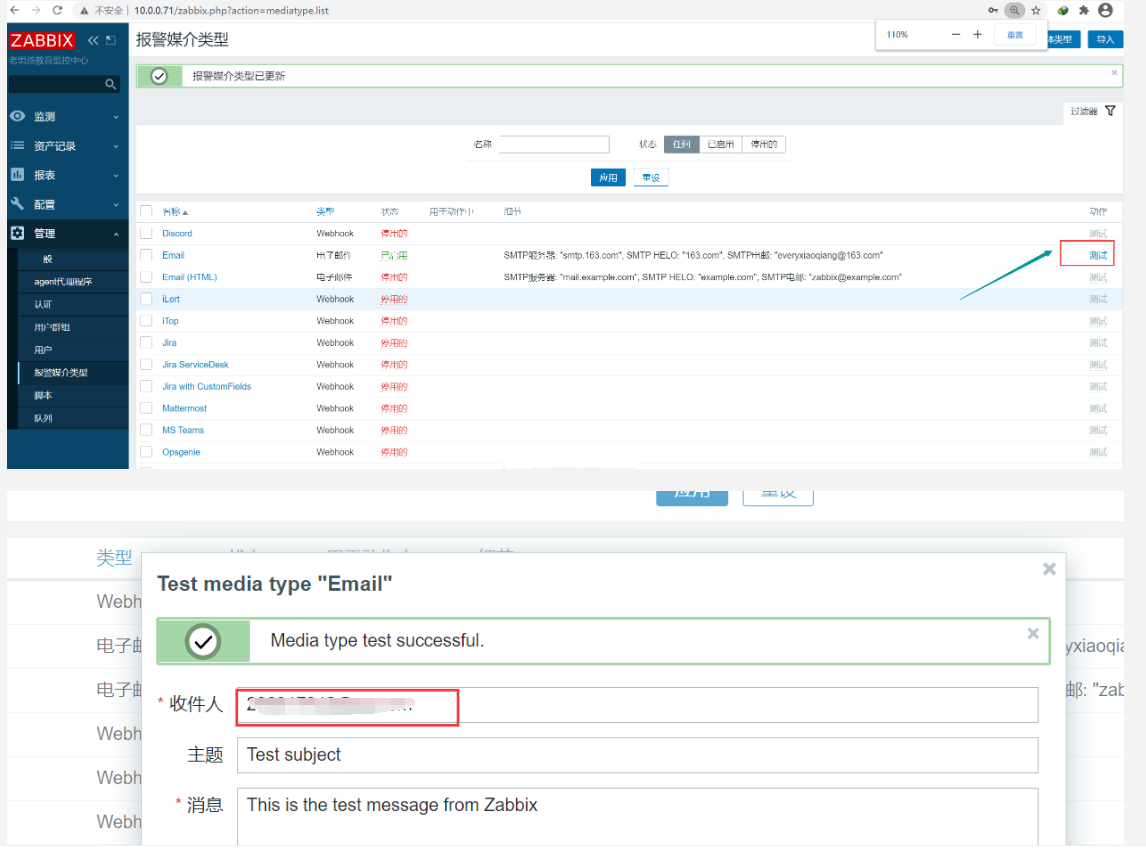
9.1 邮件报警
9.2 微信报警(自定义脚本报警)
9.3 报警升级
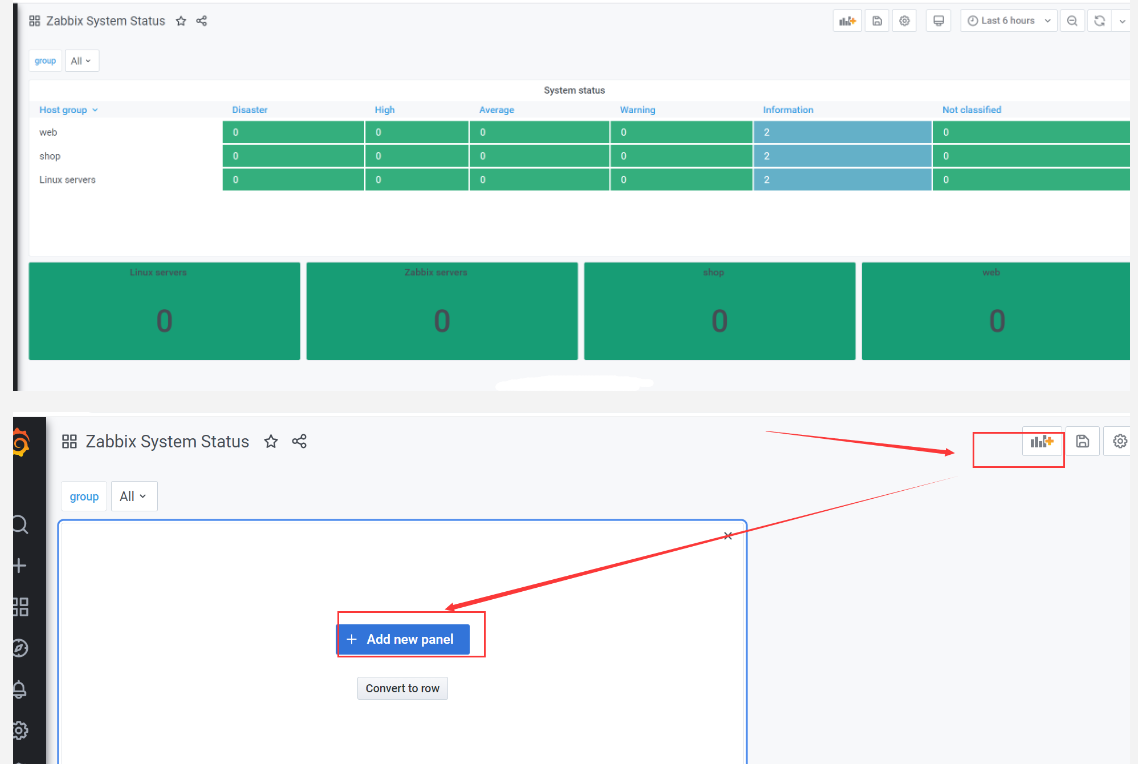
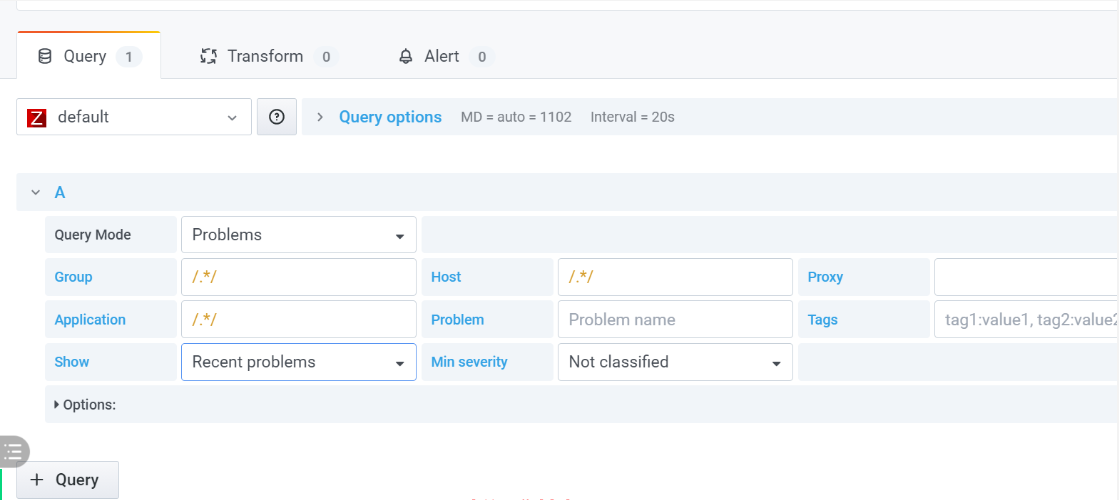
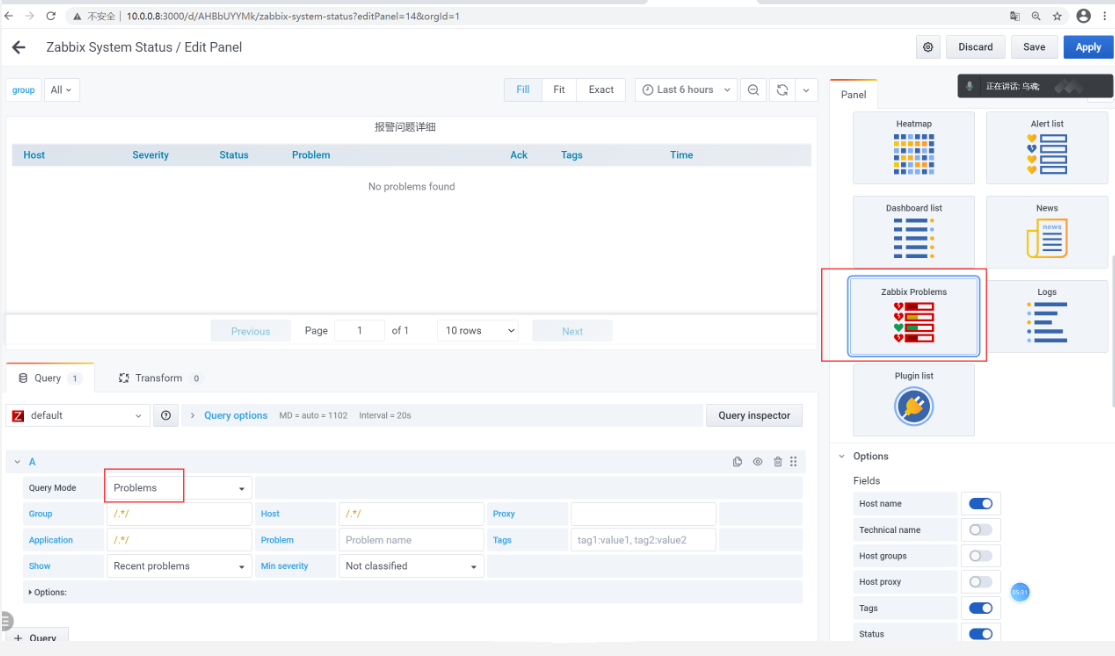
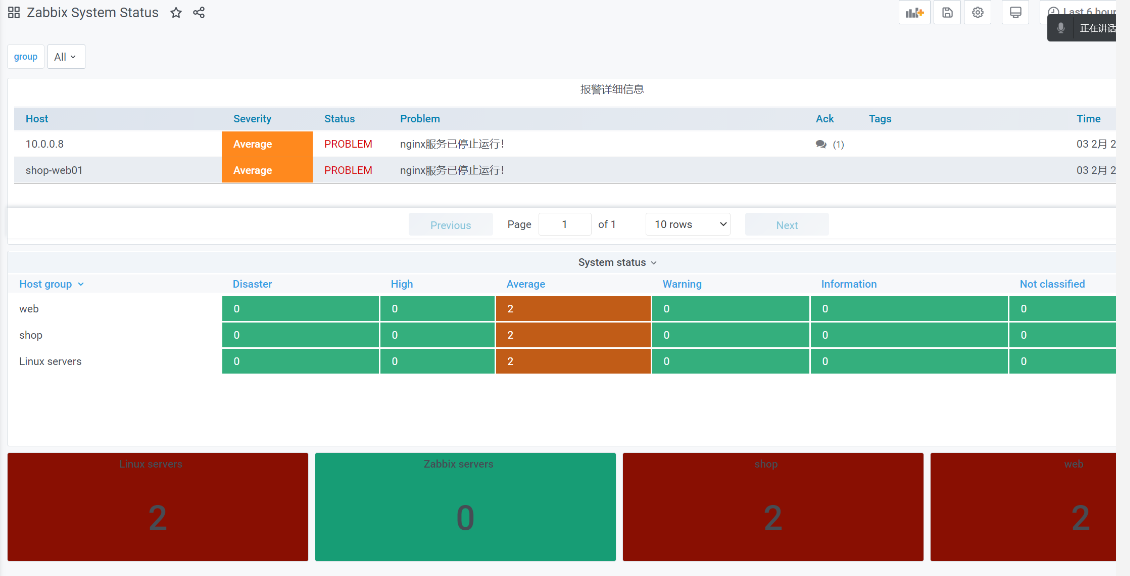
10:自定义图形和grafana出图
11∶自定义监控模板
12:zabbix监控角度总结
13: 用户访问量监控
14:使用percona插件监控mysql
15: snmp监控window和Linux
16: zabbix自动发现和自动注册(主动)
17: zabbix-agent主动和被动的区别
18: zabbix版本升级
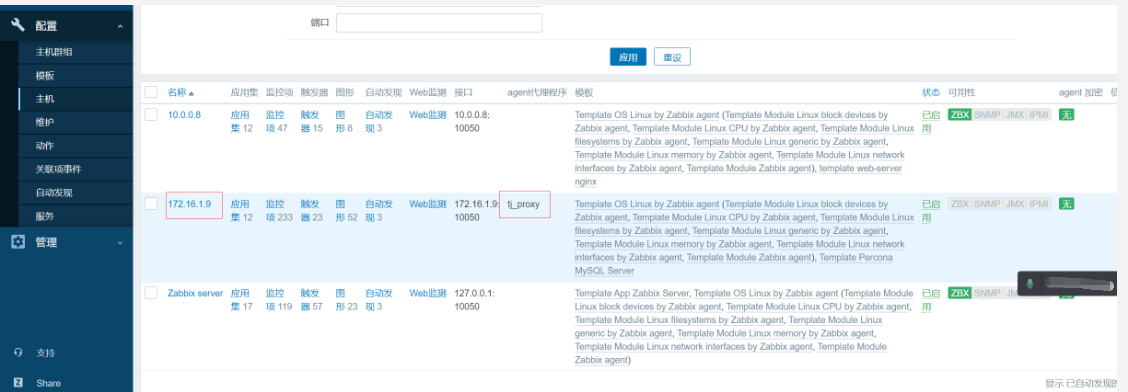
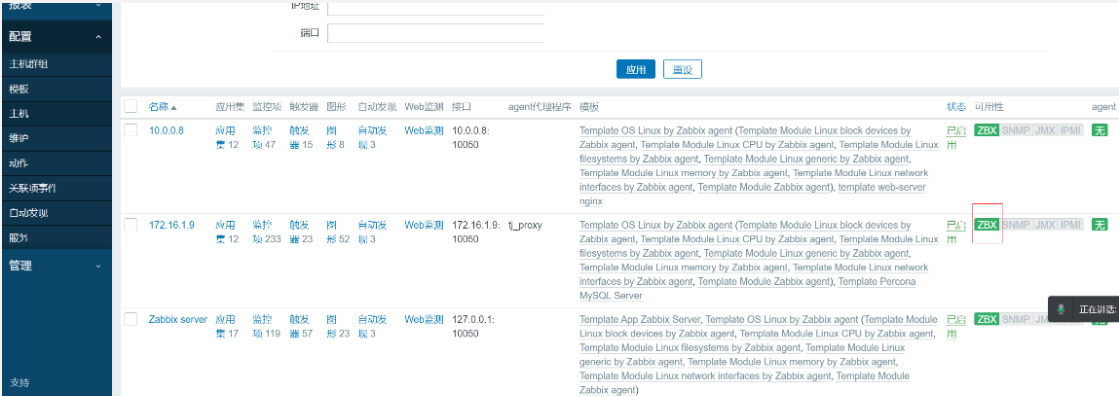
19: zabbix分布式监控proxy
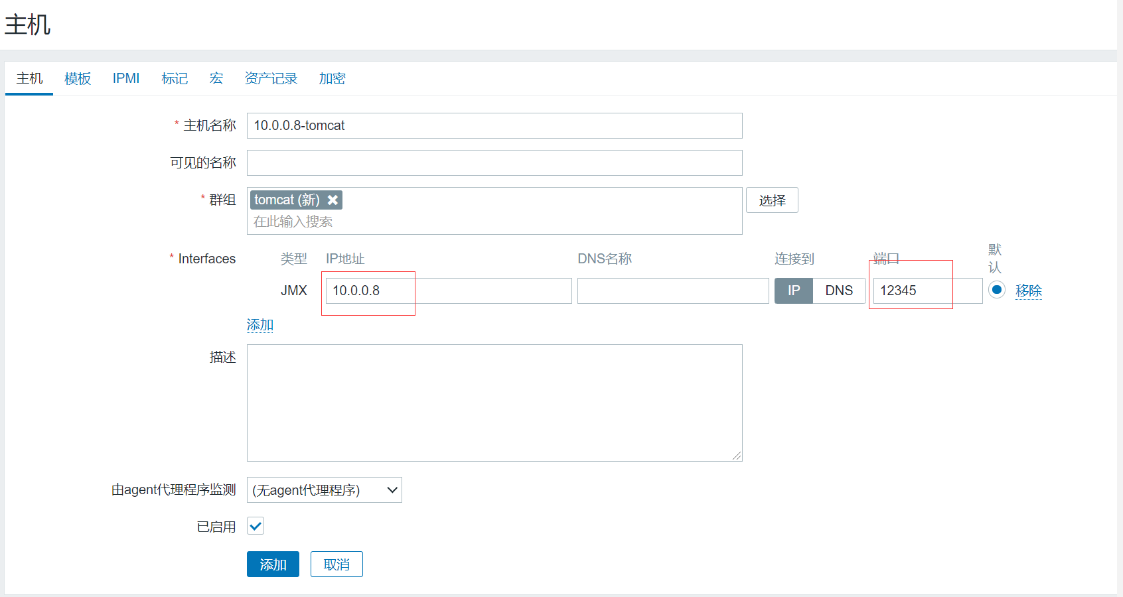
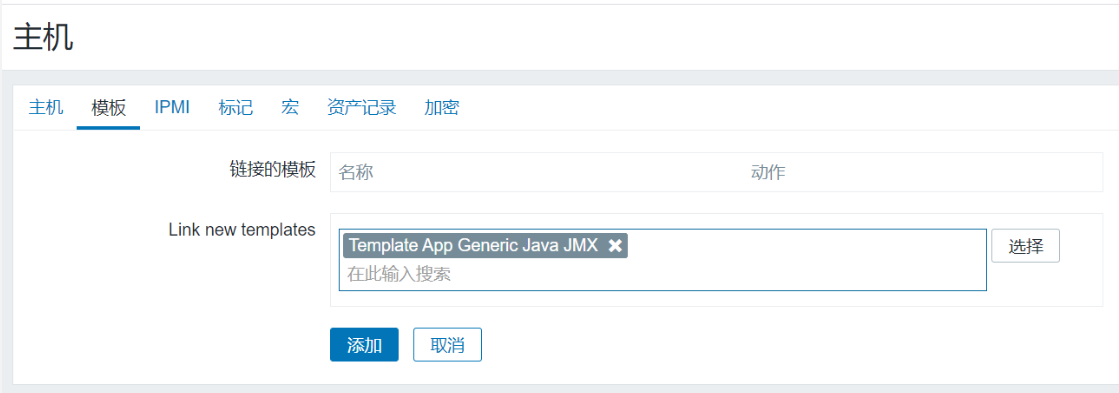
20: zabbix监控java jvm原理
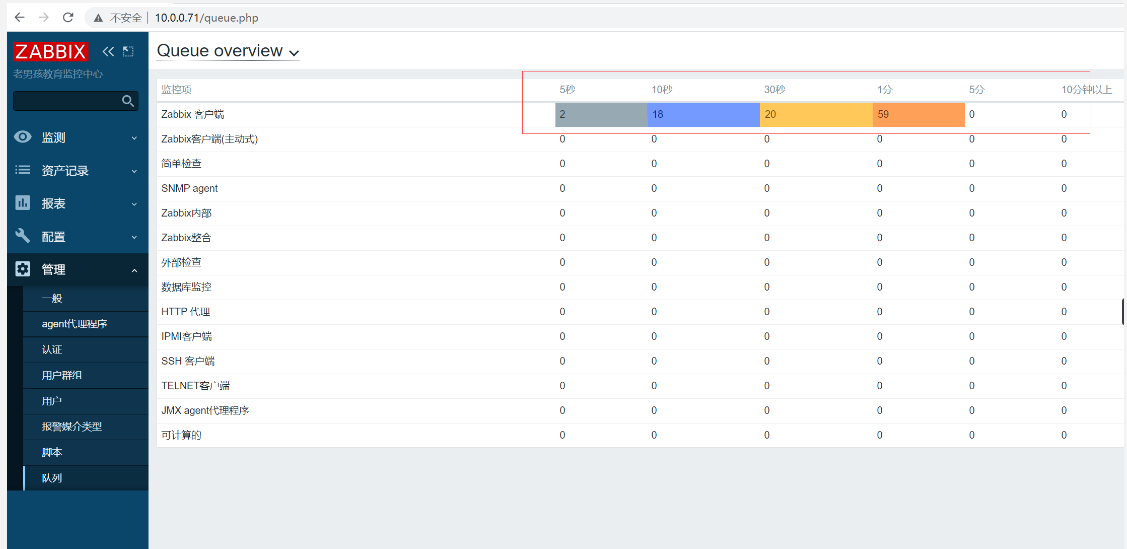
21: zabbix性能优化
22: zabbix低级自动发现
23: zabbix api
1:什么是监控?
监视和控制,
生活中的监控:事后追责
运维中的监控:事后追责,事前预警,性能分析,实时报警
2:常见的linux监控命令
cpu,内存,磁盘,网络
top
htop
uptime
free
vmstat
iostat
df
iftop
nethogs
3:使用shell脚本来监控服务器
没有监控工具的时候,shell脚本+定时任务 监控服务器
[root@m01 ~]# cat mem_alter.sh
#!/bin/bash

MEM=`free -m|awk 'NR==2{print $NF}'`
if [ $MEM -lt 100 ];then
  echo "web服务器 192.168.2.104 可用内存不足,当前可用内存$MEM"  | mail -s "web服务器内存不足" 296917342@qq.com
fi
缺点:效率低,不能实现集中报警,不能分析历史数据
我只有一台云主机需要监控,适合shell脚本+定时任务
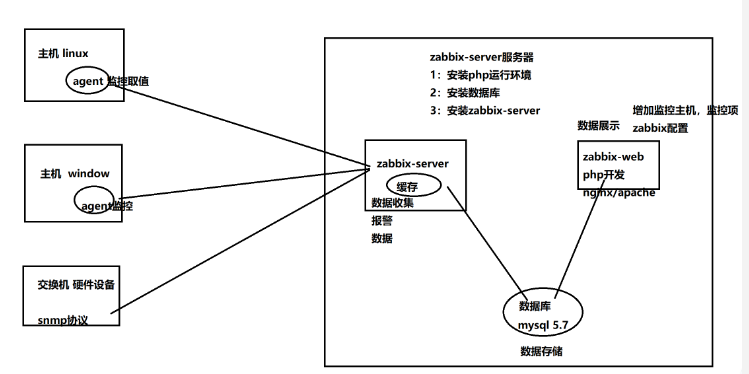
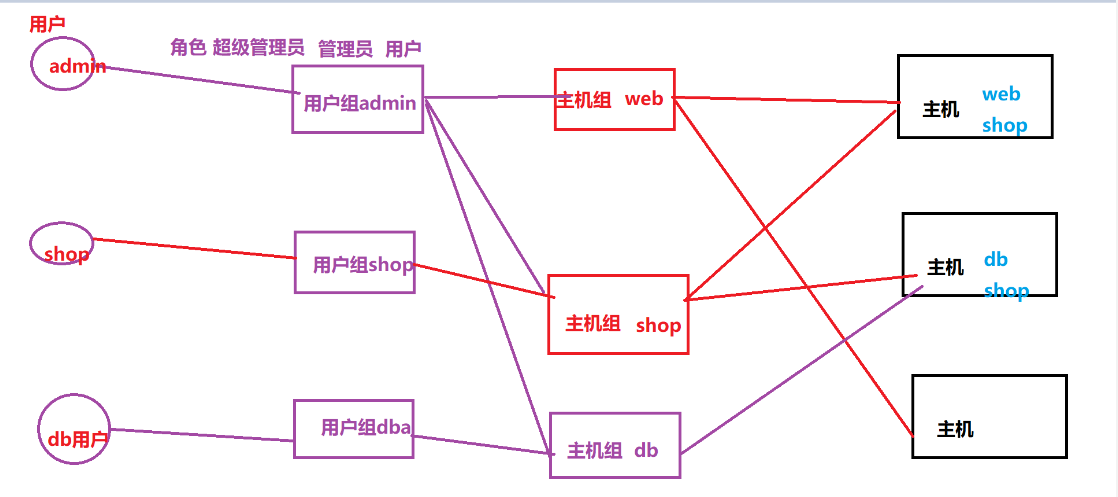
4: zabbix的基础服务架构
5: zabbix生产环境安装
主机 :zabbix-server
ip地址: 10.0.0.61
操作系统版本: centos 7.9
5.1:安装nginx、php运行环境
安装nginx
[root@m01 ~]$vi /etc/yum.repos.d/nginx.repo
[nginx-stable]
name=nginx stable repo
baseurl=http://nginx.org/packages/centos/$releasever/$basearch/
gpgcheck=1
enabled=1
gpgkey=https://nginx.org/keys/nginx_signing.key
module_hotfixes=true

[nginx-mainline]
name=nginx mainline repo
baseurl=http://nginx.org/packages/mainline/centos/$releasever/$basearch/
gpgcheck=1
enabled=0
gpgkey=https://nginx.org/keys/nginx_signing.key
module_hotfixes=true
priority=1


[root@m01 ~]$yum install yum-plugin-priorities
[root@m01 ~]$yum -y install nginx

[root@m01 ~]$systemctl enable nginx
Created symlink from /etc/systemd/system/multi-user.target.wants/nginx.service to /usr/lib/systemd/system/nginx.service.
[root@m01 ~]$systemctl start nginx
要求php版本 7.2以上+
安装php第三方源
yum install epel-release -y
rpm -Uvh https://mirror.webtatic.com/yum/el7/webtatic-release.rpm
yum install php72w-cli php72w-fpm php72w-gd php72w-bcmath php72w-xml php72w-mbstring php72w-ldap php72w-mysqlnd -y

vi /etc/php-fpm.d/www.conf
user = nginx
group = nginx

[root@m01 conf.d]$systemctl enable php-fpm
Created symlink from /etc/systemd/system/multi-user.target.wants/php-fpm.service to /usr/lib/systemd/system/php-fpm.service.
[root@m01 conf.d]$systemctl start php-fpm
配置zabbix.conf文件
[root@m01 conf.d]$cat /etc/nginx/conf.d/zabbix.conf
server {
    listen 80;
    server_name zabbix.yunweitest.com;
    root /data/zabbix;
    index index.php index.html;

    location ~ \.php$ {
        fastcgi_pass    127.0.0.1:9000;
        fastcgi_index    index.php;
        fastcgi_param    SCRIPT_FILENAME $document_root$fastcgi_script_name;
        include    fastcgi_params;
    }
}

nginx -t
systemctl restart nginx
准备zabbix-web的php代码
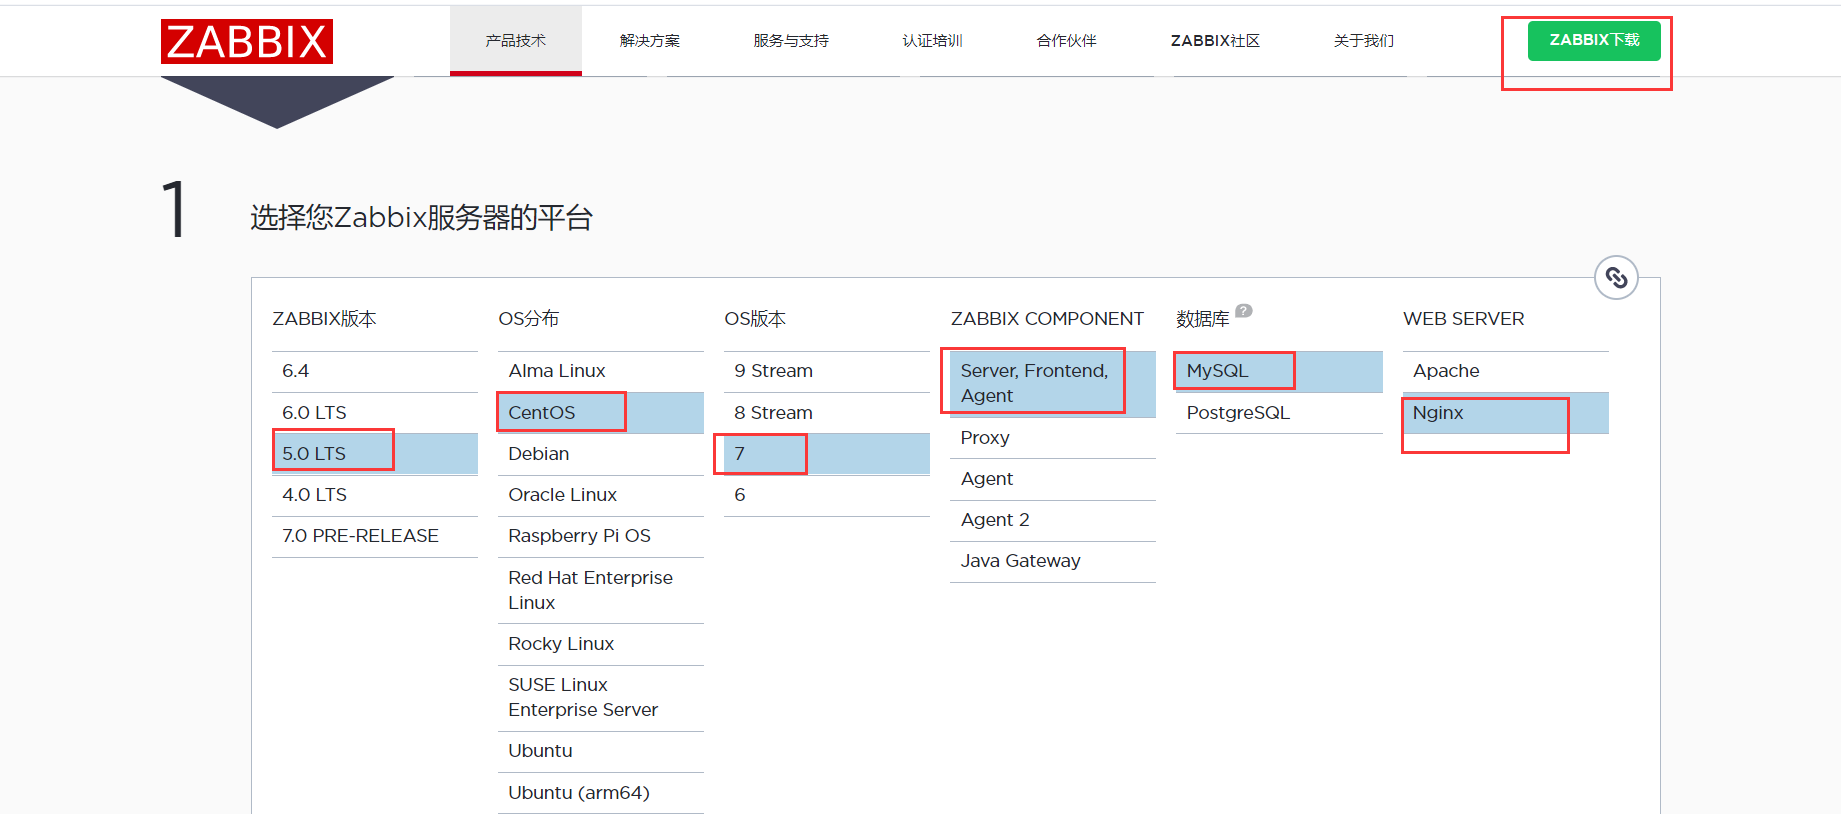
zabbix网站:https://www.zabbix.com/cn/
https://mirrors.tuna.tsinghua.edu.cn/zabbix/zabbix/5.0/rhel/7/x86_64/
下载地址:https://www.zabbix.com/cn/download_sources#50LTS
[root@m01 ~]$wget https://cdn.zabbix.com/zabbix/sources/stable/5.0/zabbix-5.0.36.tar.gz
rz上传,解压
[root@m01 ~]$tar xf zabbix-5.0.36.tar.gz
[root@m01 ~]$mkdir -p /data/zabbix/
[root@m01 zabbix-5.0.36]$cd zabbix-5.0.36/
[root@m01 zabbix-5.0.36]$cp -r ui/* /data/zabbix/
[root@m01 zabbix-5.0.36]$chown -R nginx.nginx /data/zabbix/
[root@m01 zabbix-5.0.36]$ll -d /data/zabbix/
drwxr-xr-x 12 nginx nginx 4096 Jun 18 23:02 /data/zabbix/


添加本地hosts解析
10.0.0.61 zabbix.yunweitest.org
打开浏览器,输入
http://zabbix.yunweitest.org/

点击Next step

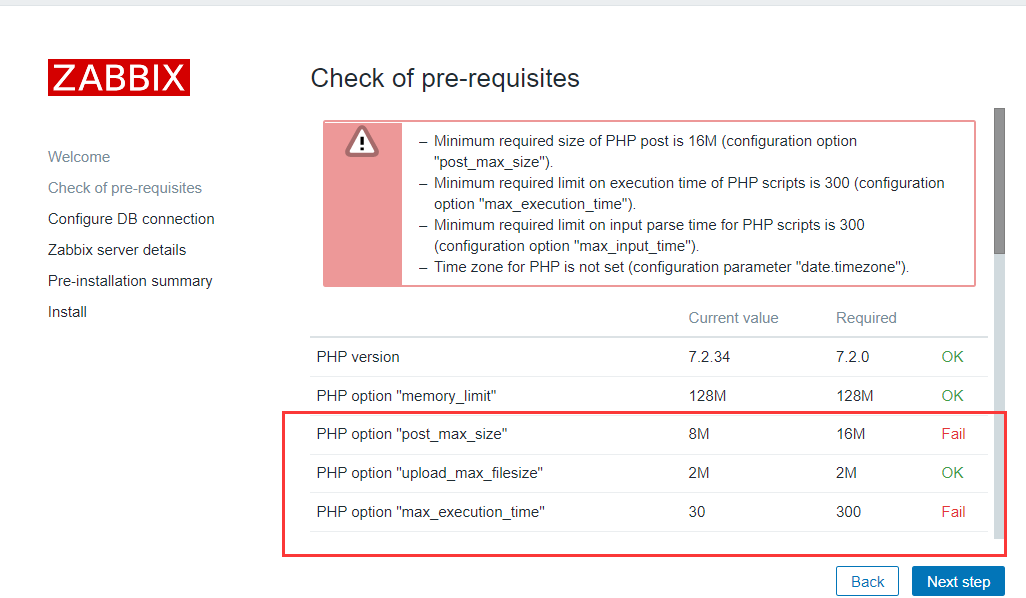
#解决首次访问 zabbix-web安装界面 error 500的错误
mkdir /var/lib/php/session
chown -R nginx:nginx /var/lib/php/session/
上面报错修改php配置文件
[root@m01 ~]$vim /etc/php.ini
post_max_size = 80M
max_execution_time = 300
max_input_time = 600
date.timezone = Asia/Shanghai
[root@m01 ~]$egrep '^max|^date.time|^post' /etc/php.ini
max_execution_time = 300
max_input_time = 600
post_max_size = 80M
max_file_uploads = 20
date.timezone = Asia/Shanghai
[root@m01 ~]$systemctl restart php-fpm.service
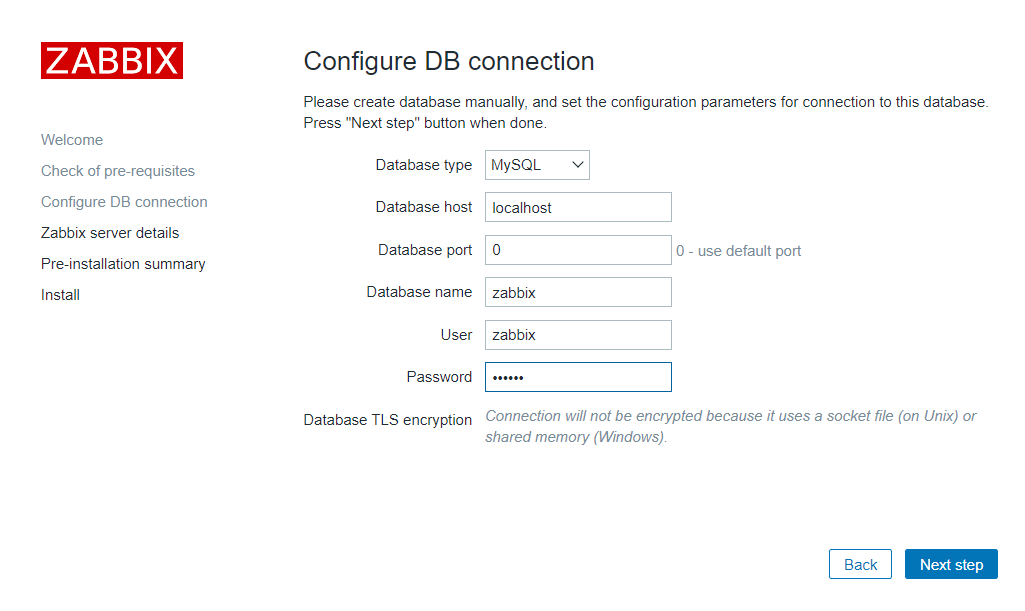
刷新浏览器,点击Next step,输入mysql密码5.2:安装数据库和zabbix-server
[root@m01 ~]$rpm -Uvh https://repo.zabbix.com/zabbix/5.0/rhel/7/x86_64/zabbix-release-5.0-1.el7.noarch.rpm

[root@m01 ~]$sed -i 's#http://repo.zabbix.com/zabbix/5.0/rhel/7/$basearch/#https://mirrors.tuna.tsinghua.edu.cn/zabbix/zabbix/5.0/rhel/7/x86_64/#g' /etc/yum.repos.d/zabbix.repo

[root@m01 ~]$ yum clean all

[root@m01 ~]$yum install mariadb-server zabbix-server-mysql zabbix-agent2  -y
[root@m01 ~]$systemctl enable mariadb.service zabbix-server.service zabbix-agent2.service
[root@m01 ~]$systemctl start mariadb.service
[root@m01 ~]$mysql_secure_installation
回车
n
y
y
y
y

[root@m01 ~]$mysql -uroot -p123456
Welcome to the MariaDB monitor.  Commands end with ; or \g.
Your MariaDB connection id is 10
Server version: 5.5.68-MariaDB MariaDB Server

Copyright (c) 2000, 2018, Oracle, MariaDB Corporation Ab and others.

Type 'help;' or '\h' for help. Type '\c' to clear the current input statement.

MariaDB [(none)]> create database zabbix character set utf8 collate utf8_bin;
MariaDB [(none)]> grant all on zabbix.* to 'zabbix'@'localhost' identified by '123456';

[root@m01 ~]$rpm -ql zabbix-server-mysql
[root@m01 ~]$zcat /usr/share/doc/zabbix-server-mysql-5.0.36/create.sql.gz | mysql -uzabbix -p123456 zabbix
配置zabbix-server
[root@m01 ~]$grep '^[a-Z]' /etc/zabbix/zabbix_server.conf
LogFile=/var/log/zabbix/zabbix_server.log
LogFileSize=0
PidFile=/var/run/zabbix/zabbix_server.pid
SocketDir=/var/run/zabbix
DBName=zabbix
DBUser=zabbix
SNMPTrapperFile=/var/log/snmptrap/snmptrap.log
Timeout=4
AlertScriptsPath=/usr/lib/zabbix/alertscripts
ExternalScripts=/usr/lib/zabbix/externalscripts
LogSlowQueries=3000
StatsAllowedIP=127.0.0.1
[root@m01 ~]$vim /etc/zabbix/zabbix_server.conf
DBHost=localhost #去掉#号
DBPassword=123456 #去掉#号,添加密码
其他不用动
[root@m01 ~]$grep '^[a-Z]' /etc/zabbix/zabbix_server.conf
LogFile=/var/log/zabbix/zabbix_server.log
LogFileSize=0
PidFile=/var/run/zabbix/zabbix_server.pid
SocketDir=/var/run/zabbix
DBHost=localhost
DBName=zabbix
DBUser=zabbix
DBPassword=123456
DBSocket= /tmp/mysql.sock #如果MySQL是编译安装,需要打开,yum安装不用
SNMPTrapperFile=/var/log/snmptrap/snmptrap.log
Timeout=4
AlertScriptsPath=/usr/lib/zabbix/alertscripts
ExternalScripts=/usr/lib/zabbix/externalscripts
LogSlowQueries=3000
StatsAllowedIP=127.0.0.1
[root@m01 ~]$systemctl restart zabbix-server.service
一直下一步
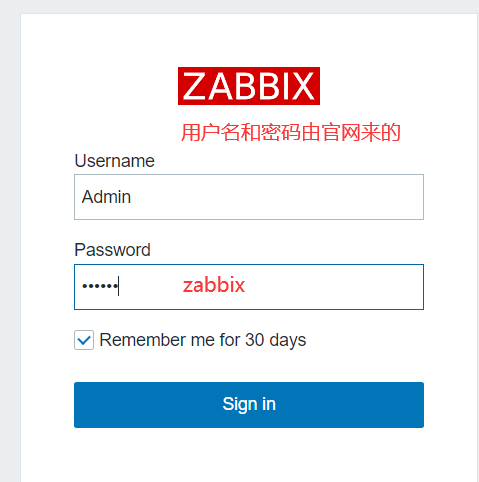
登录zabbix
用户名: Admin
默认密码:zabbix
调整语言为中文,左边栏目选择User settings ,选择Chinese
6∶监控一台服务器主机
6.1 监控zabbix-server
[root@m01 ~]$grep '^[a-Z]' /etc/zabbix/zabbix_agent2.conf
PidFile=/var/run/zabbix/zabbix_agent2.pid
LogFile=/var/log/zabbix/zabbix_agent2.log
LogFileSize=0
Server=127.0.0.1    #客户端只需要修改这个,以为本机,不用修改
ServerActive=127.0.0.1
Hostname=Zabbix server
Include=/etc/zabbix/zabbix_agent2.d/*.conf
ControlSocket=/tmp/agent.sock


[root@m01 ~]$systemctl enable zabbix-server.service zabbix-agent2.service
[root@m01 ~]$systemctl start zabbix-agent2.service
检查
[root@m01 ~]$ss -lntup|grep zabbix_agent2
6.2 监控其他linux主机
添加监控前准备
Zabbix Agent2 监控流程
1、安装:在客户端安装zabbix-agent2
2、配置:修改配置文件,指定Server为zabbix服务端
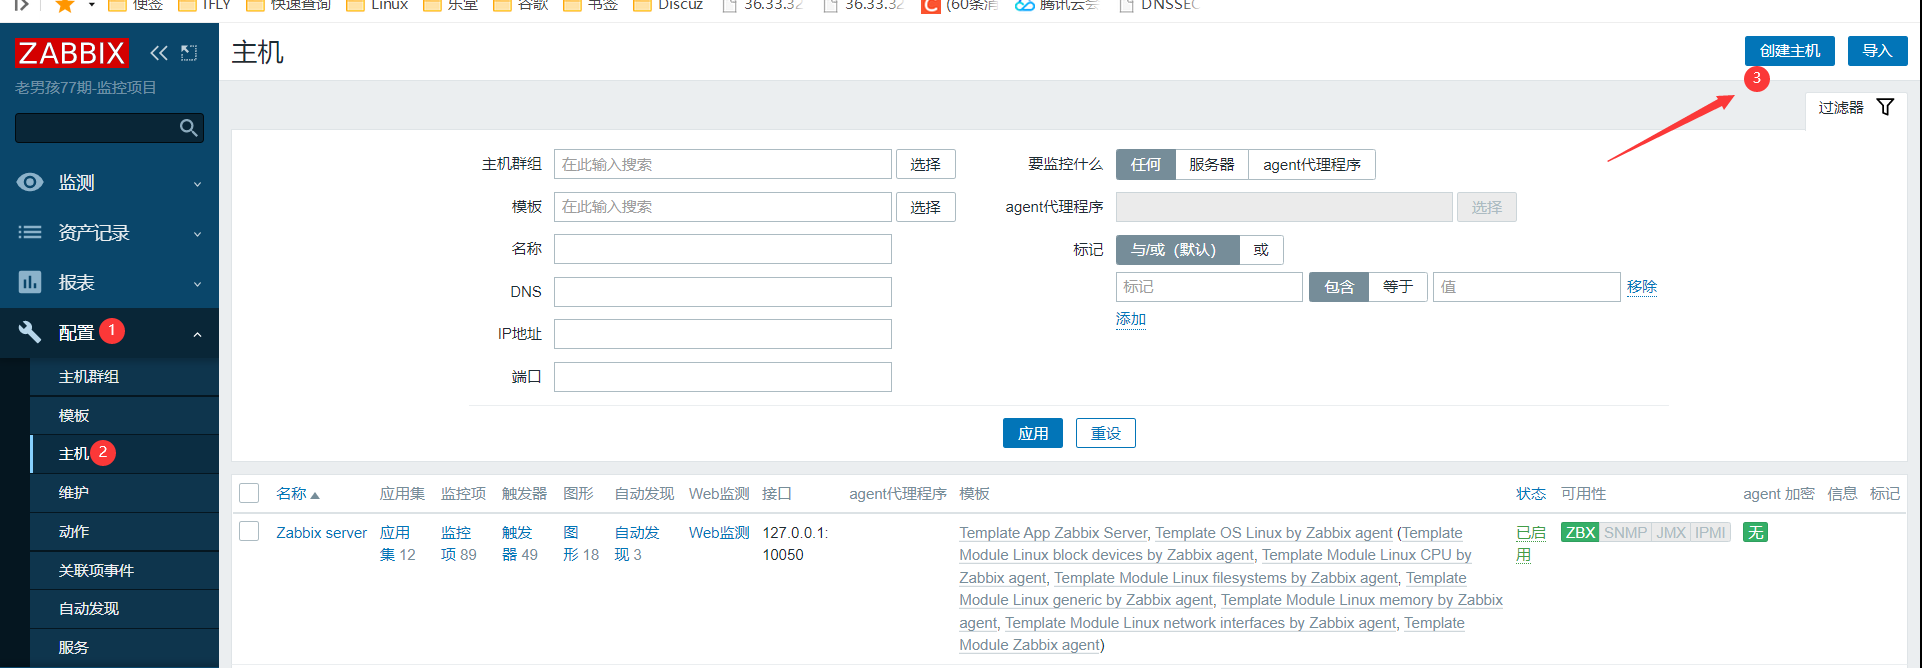
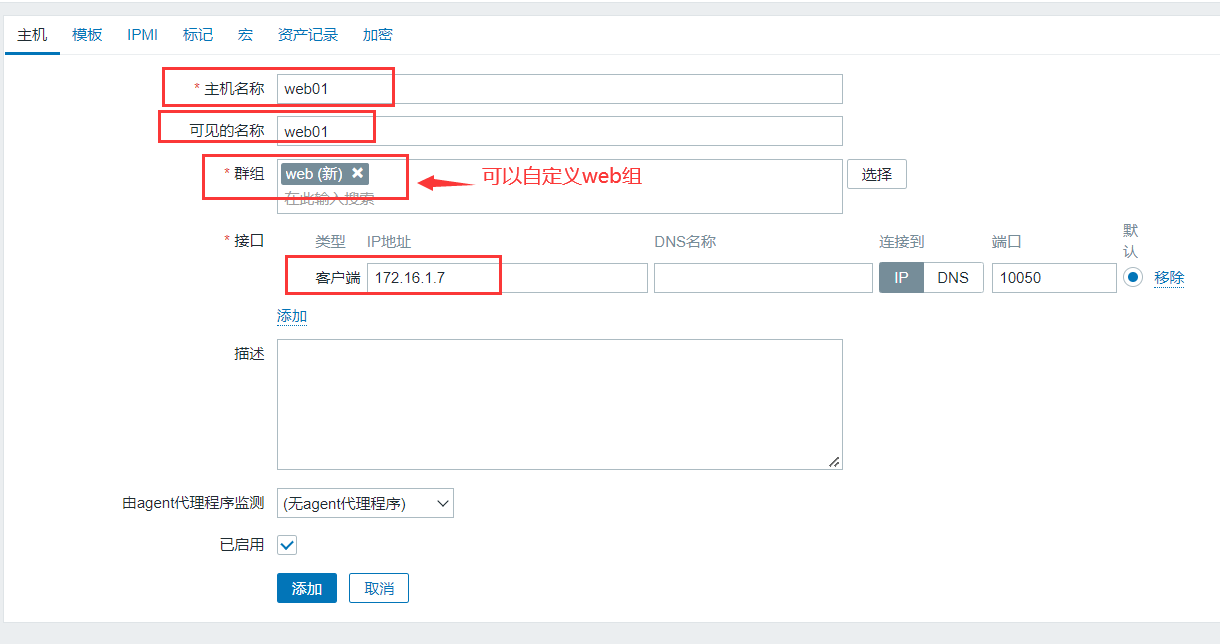
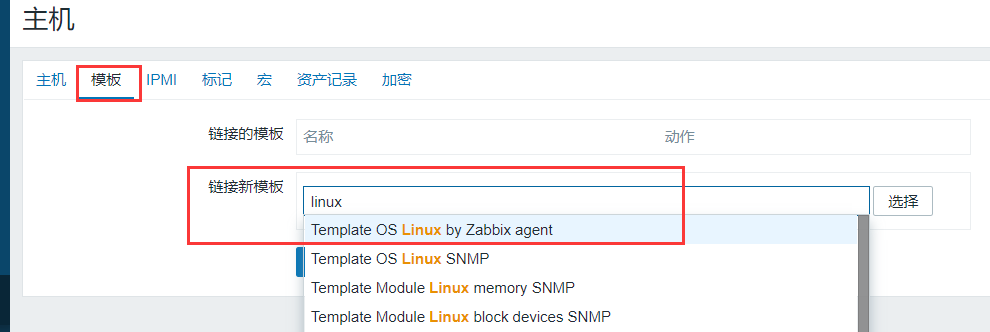
3、web页面配置--》主机中--》添加主机与模版关联
4、添加后检测与检查数据
客户端
第一种:https://www.zabbix.com/cn/download_agents下载对应的客户端
第二种:rpm -ivh https://mirrors.tuna.tsinghua.edu.cn/zabbix/zabbix/5.0/rhel/7/x86_64/zabbix-agent2-5.0.36-1.el7.x86_64.rpm
注:查看zabbix服务端版本,然后在找到对应agent2下载
[root@m01 ~]$zabbix_server -V
zabbix_server (Zabbix) 5.0.36
......
在其他主机上安装客户端
#配置web01
[root@web01 ~]$ rpm -ivh https://mirrors.tuna.tsinghua.edu.cn/zabbix/zabbix/5.0/rhel/7/x86_64/zabbix-agent2-5.0.36-1.el7.x86_64.rpm
[root@web01 ~]$ vi /etc/zabbix/zabbix_agent2.conf
Server=172.16.1.61
#快速替换
[root@web01 ~]$ sed -i 's#Server=127.0.0.1#Server=172.16.1.61#g' /etc/zabbix/zabbix_agent2.conf
[root@web01 ~]$ grep '^Server=' /etc/zabbix/zabbix_agent2.conf
Server=172.16.1.61
#启动&检查
[root@web01 ~]$ systemctl enable zabbix-agent2.service
Created symlink from /etc/systemd/system/multi-user.target.wants/zabbix-agent2.service to /usr/lib/systemd/system/zabbix-agent2.service.
[root@web01 ~]$ systemctl start zabbix-agent2.service
[root@web01 ~]$ netstat -lntup|grep zabbix
tcp6 0 0 :::10050 :::* LISTEN 1851/zabbix_agent2 web页面添加主机
7∶自定义监控项
7.1:什么是监控项
监控项:就是我们想要监控的指标,例如剩余内存,磁盘空间,服务的状态等等
每一个监控项,都有一个唯一的key,简洁明了(相当于shell脚本的变量名)
只需要安装zabbix-agent,默认就支持大量的监控项,但是linux模板并没有使用所有监控项 Template OS Linux by Zabbix agent主要监控了cpu,内存,磁盘,网卡,安全,它们都属于通用监控
应用集是监控项的分组
7.2 使用内置key监控nginx的状态
注意:添加监控项之前最好使用zabbix-get测试取值
#只在zabbix-server上安装
yum install zabbix-get -y

zabbix_get -s 127.0.0.1 -k proc.num[nginx]
#注释
-s 被监控主机的ip地址
-p 端口
-k 指定监控项的key
7.3 使用自定义的监控项来监控nginx
修改agent配置文件
#zabbix-agent
vim /etc/zabbix/zabbix_agentd.conf

#zabbix-agent2
vim /etc/zabbix/zabbix_agent2.conf

#增加一行
UserParameter=nginx_status,netstat -lntp|grep -c nginx
重启agent生效
systemctl restart zabbix-agent2.service使用zabbix-get测试取值
#只能在zabbix-server上执行
zabbix_get -s 10.0.0.8 -k nginx_status
注意 zabbix-agent 取值的时候权限不足解决方法:
1:使用sudo来执行
2:使用suid来执行
3:使用root用户来运行zabbix-agent
web界面添加监控项过程,同上
7.4 自定义带参数的监控项
建议把agent自定义监控项独立成一个配置文件
vim /etc/zabbix/zabbix_agent2.d/zbx_nginx.conf
UserParameter=nginx_status,netstat -lntp|grep -c nginx
好处:可以复用,管理更方便
对应有规律的监控项:
UserParameter=mysql_Uptime,echo 'show status;'|mysql -uroot|grep -w 'Uptime'|awk '{print $2}'
UserParameter=mysql_Com_select,echo 'show status;'|mysql -uroot|grep -w 'Com_select'|awk '{print $2}'
UserParameter=mysql_Com_delete,echo 'show status;'|mysql -uroot|grep -w 'Com_delete'|awk '{print $2}'
适合使用带参考的自定义监控项
UserParameter=mysql_define[*],echo 'show status;'|mysql -uroot|grep -w "$1"|awk '{print $$2}'取值效果
[root@zabbix-server ~]# zabbix_get -s 10.0.0.8 -k mysql_define[Uptime]
827
[root@zabbix-server ~]# zabbix_get -s 10.0.0.8 -k mysql_define[Com_select]
1
[root@zabbix-server ~]# zabbix_get -s 10.0.0.8 -k mysql_define[Com_insert]
0
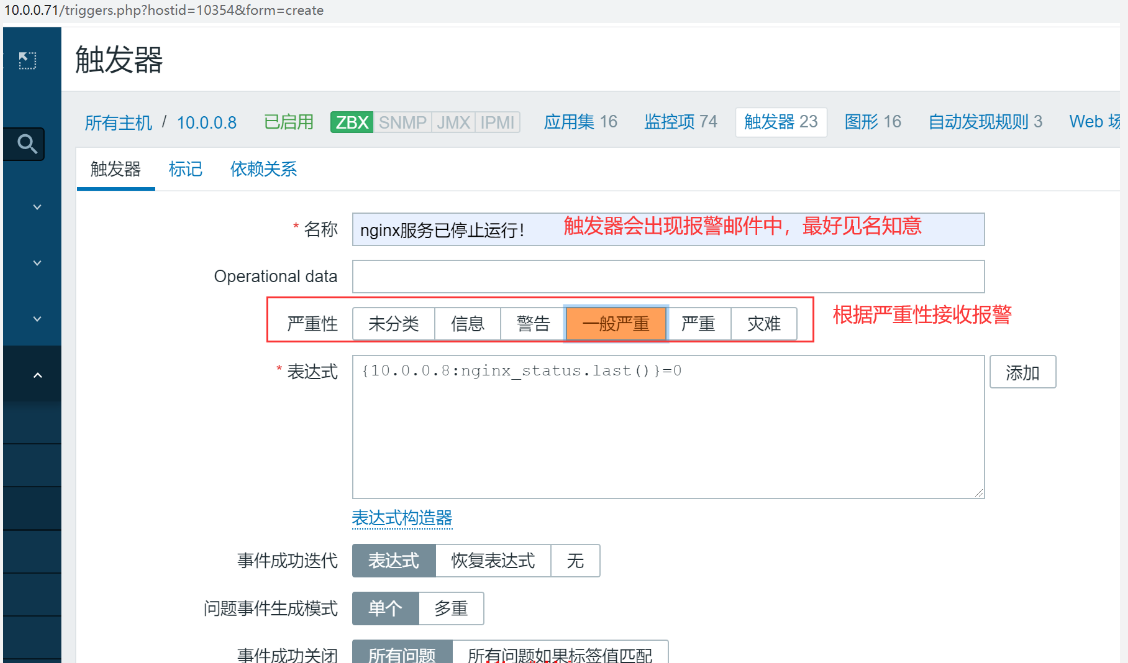
8∶自定义触发器
触发器:设置一个报警条件
一个触发器至少对应一个监控项
触发器表达式的格式
例子1:
{10.0.0.8:vfs.file.cksum[/etc/passwd].diff()}>0
主机:10.0.0.8
key值:vfs.file.cksum[/etc/passwd]
函数方法:diff() 对比两次监控项的值
例子2:
{10.0.0.8:proc.num.last()}/{10.0.0.8:kernel.maxproc.last()}*100>80
10.0.0.8:proc.num:当前运行进程
10.0.0.8:kernel.maxproc 系统最大允许进程的数量
函数方法:last() 最新值
例子3:
{10.0.0.8:vm.memory.size[available].min(5m)}<{$MEMORY.AVAILABLE.MIN} and {10.0.0.8:vm.memory.size[total].last()}>0

函数方法 mim(5m),max(5m),avg(5m)
{$MEMORY.AVAILABLE.MIN}=20m
and 同时
10.0.0.8:vm.memory.size[total] 最新的总内存大小
自定义触发器表达
单条件
{10.0.0.8:nginx_status.last()}=0多条件
{10.0.0.8:disk_free.last()}<100M and {10.0.0.8:disk_free_per.last()}<39:自定义报警
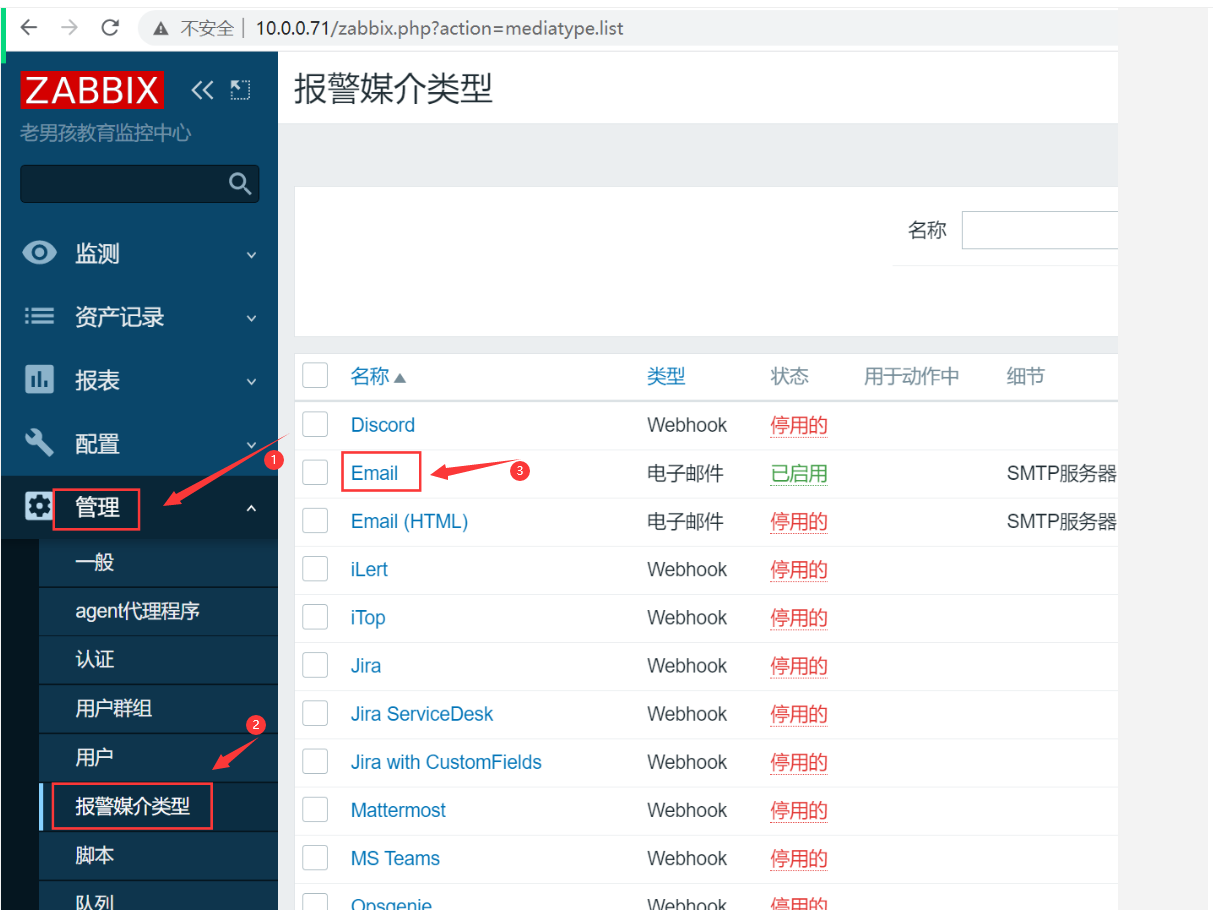
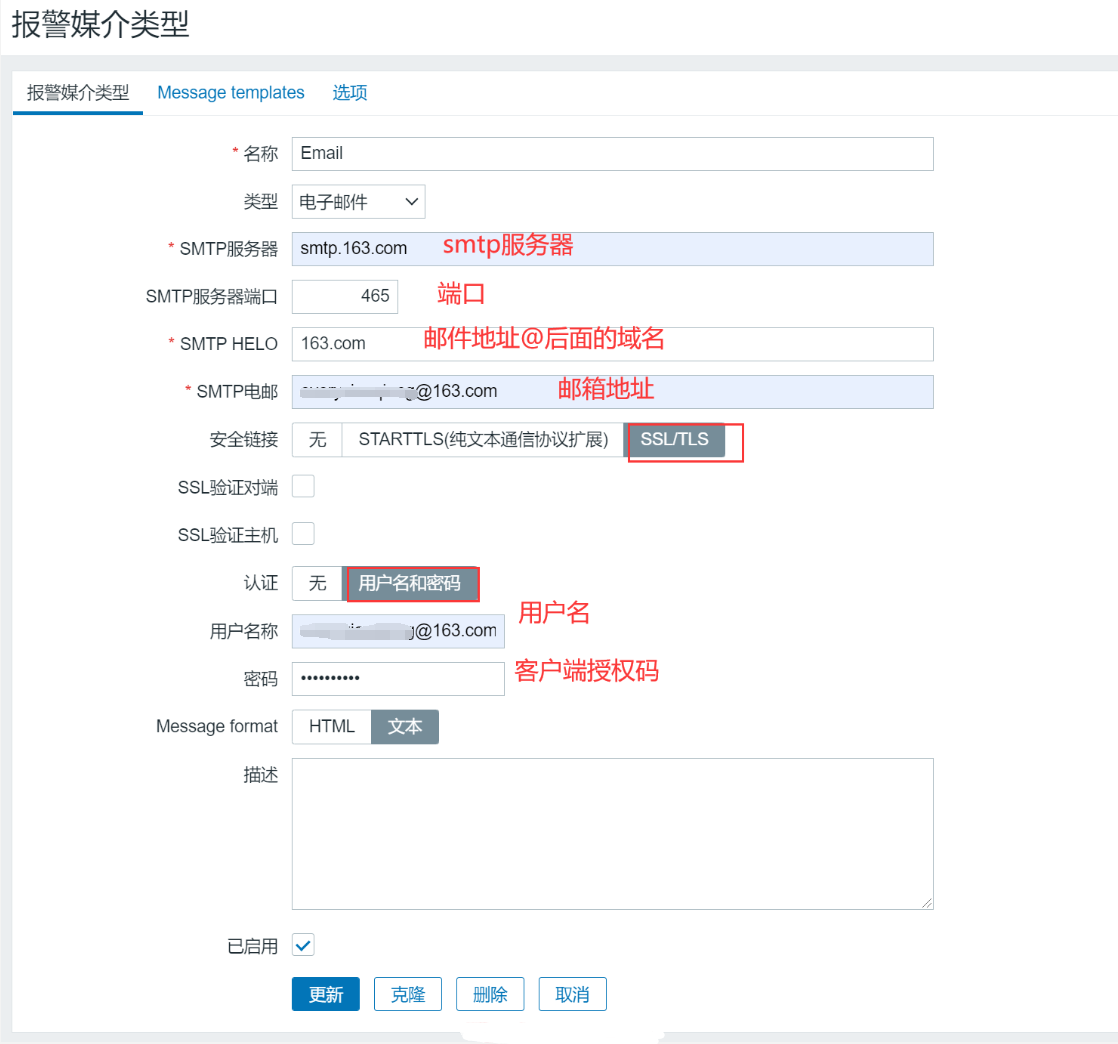
9.1 邮件报警
配置发件人
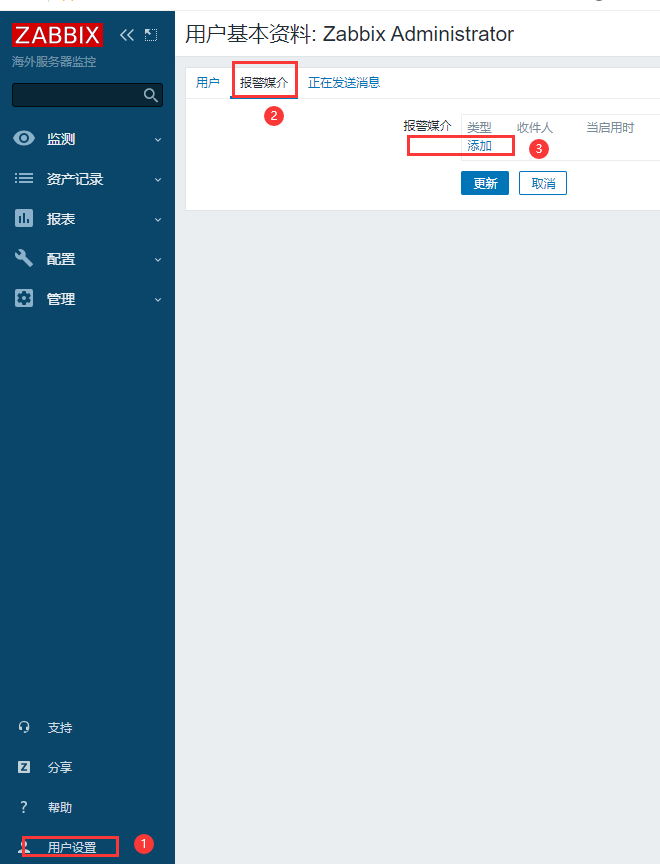
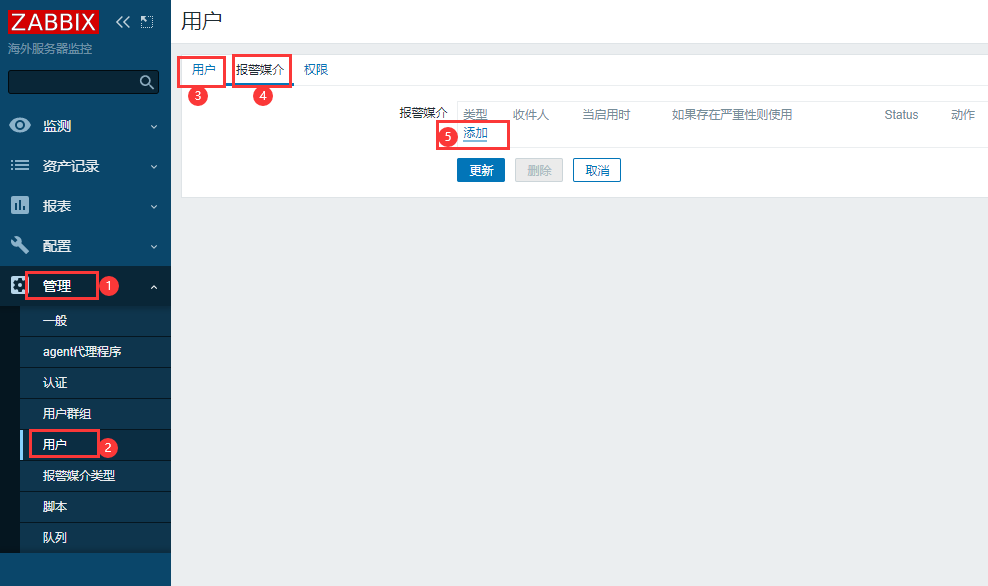
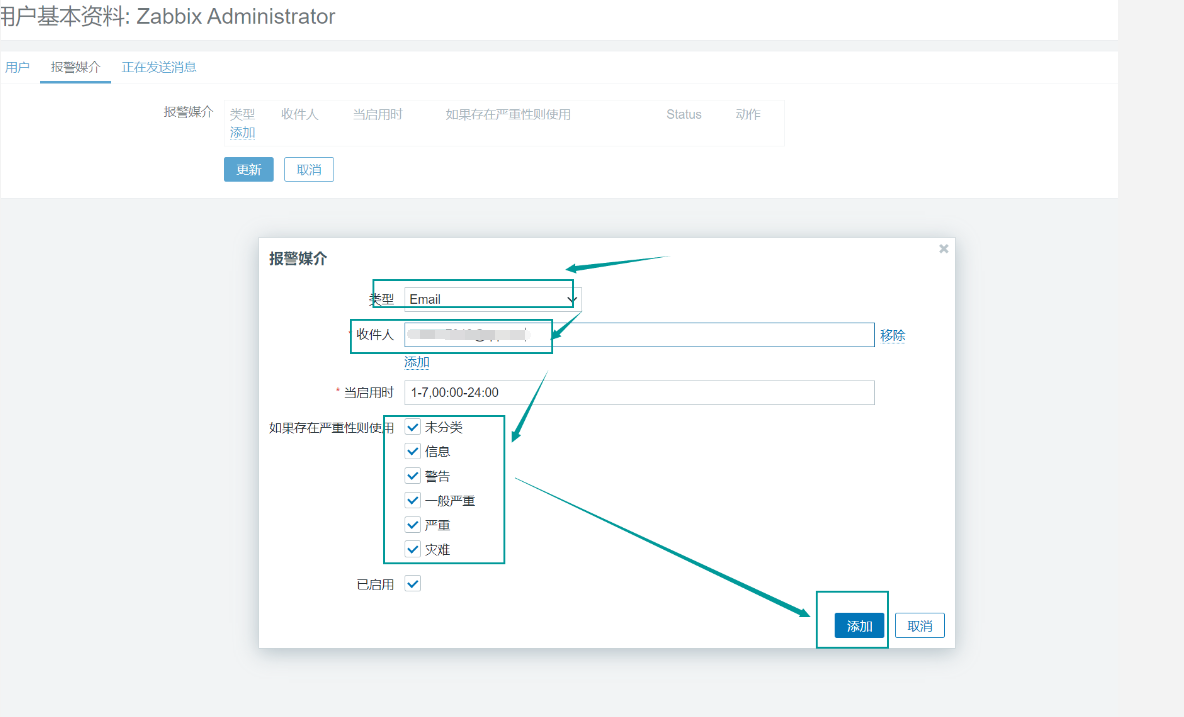
配置收件人
也可以管理-用户-点击Admin-报警媒介添加,添加的都是同一个地方
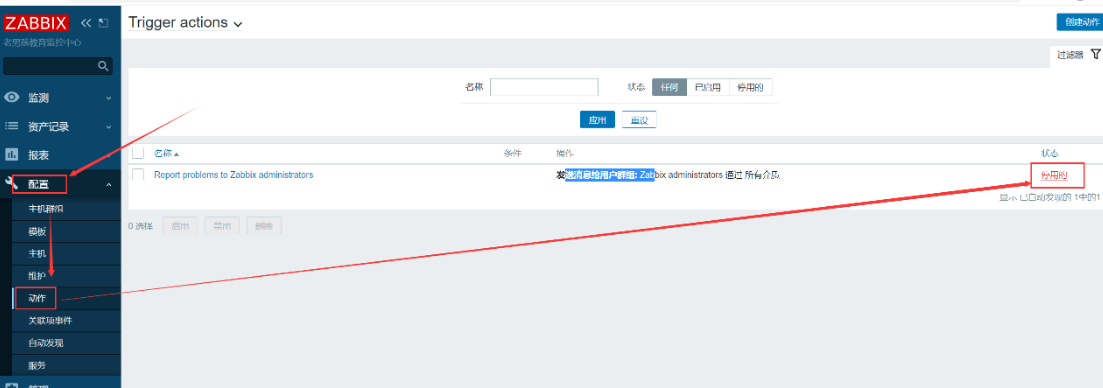
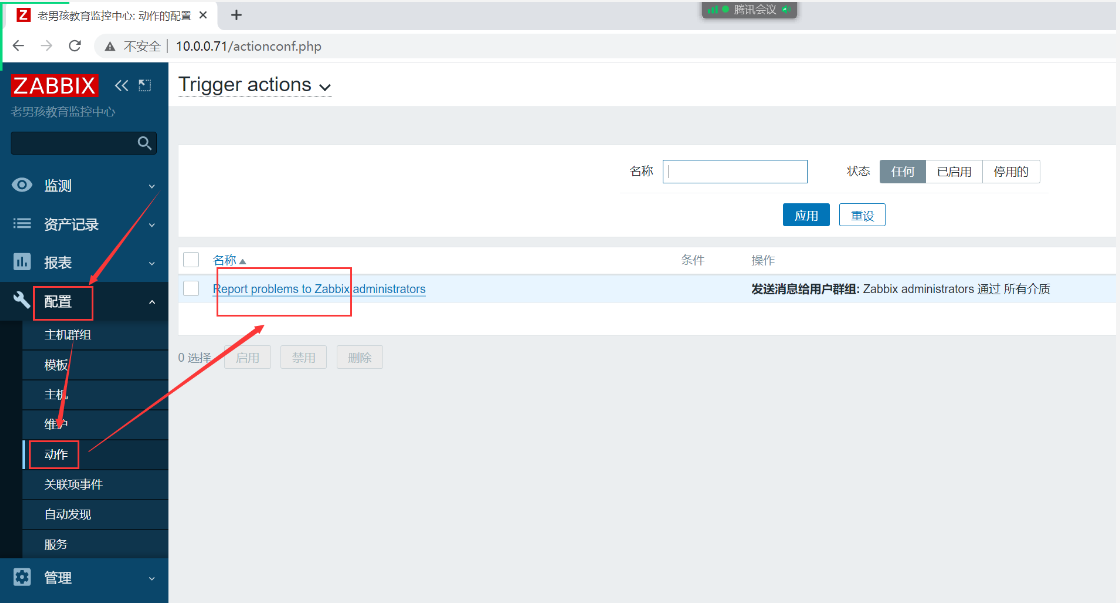
配置触发器动作,改为启用
触发报警
systemctl stop nginx.service效果,等待报警通知
9.2 微信报警(自定义脚本报警)
准备好企业微信号,自行百度
测试微信报警脚本
#修改脚本
[root@m01 /usr/lib/zabbix/alertscripts]# cat weixin.py
#!/usr/bin/env python

import requests
import sys
import os
import json
import logging

logging.basicConfig(level = logging.DEBUG, format = '%(asctime)s, %(filename)s, %(levelname)s, %(message)s',
                datefmt = '%a, %d %b %Y %H:%M:%S',
                filename = os.path.join('/tmp','weixin.log'),
                filemode = 'a')
corpid='wwd26fdfb9940e7efa'
appsecret='Btg89FnZfMu0k7l6b4iagmAR5Z9TCgKknYbx-SMQvmg'
agentid=1000005

token_url='https://qyapi.weixin.qq.com/cgi-bin/gettoken?corpid=' + corpid + '&corpsecret=' + appsecret
req=requests.get(token_url)
accesstoken=req.json()['access_token']

msgsend_url='https://qyapi.weixin.qq.com/cgi-bin/message/send?access_token=' + accesstoken

touser=sys.argv[1]
#toparty=sys.argv[1] 发全组,默认注释
subject=sys.argv[2]
message=sys.argv[2] + "\n\n" +sys.argv[3]

params={
        "touser": touser,
        #"toparty": toparty,
        "msgtype": "text",
        "agentid": agentid,
        "text": {
                "content": message
        },
        "safe":0
}

req=requests.post(msgsend_url, data=json.dumps(params))

logging.info('sendto:' + touser + ';;subject:' + subject + ';;message:' + message)


#安装python模板
yum install python-pip -y
pip install requests -i https://pypi.tuna.tsinghua.edu.cn/simple

#测试发送微信消息
python weixin.py '用户名称' '测试主题'  '测试内容!'
#第一个参数,企业微信的用户
#第二个参数,报警标题
#第三个参数,报警内容
将脚本放在指定的位置
#查看报警脚本路径
grep -Ev '^$|#' /etc/zabbix/zabbix_server.conf
AlertScriptsPath=/usr/lib/zabbix/alertscripts

mv weixin.py /usr/lib/zabbix/alertscripts/
chmod +x /usr/lib/zabbix/alertscripts/weixin.py
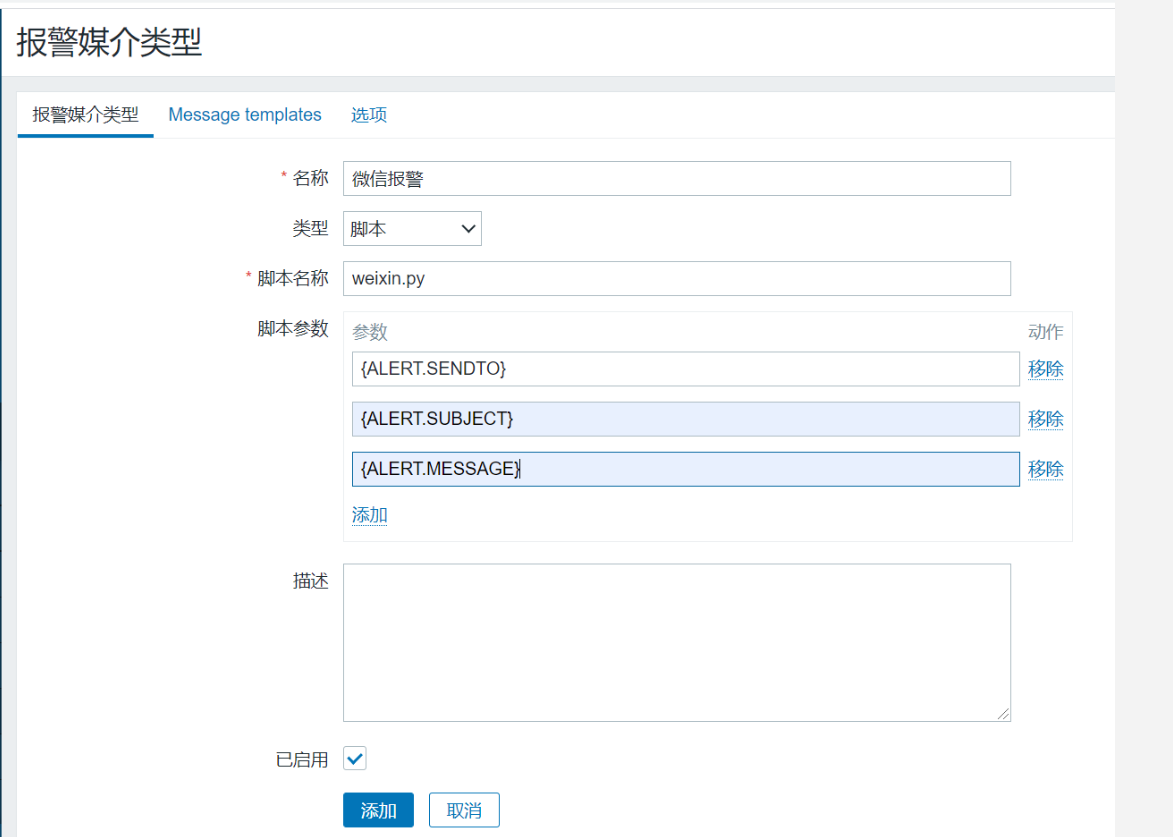
配置发件人
{ALERT.SENDTO}
{ALERT.SUBJECT}
{ALERT.MESSAGE}
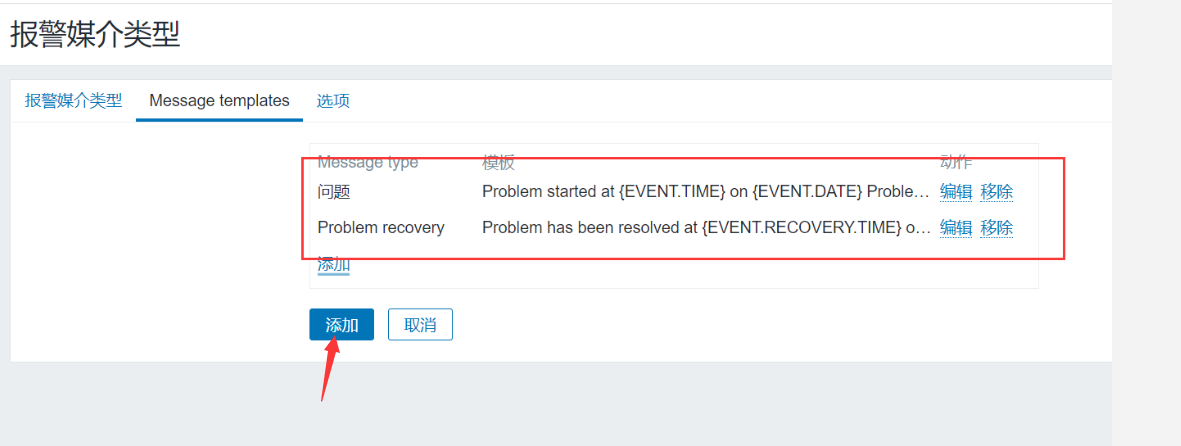
问题
主题
故障{TRIGGER.STATUS},服务器:{HOSTNAME1}发生: {TRIGGER.NAME}故障!
消息
告警主机:{HOSTNAME1}
告警时间:{EVENT.DATE} {EVENT.TIME}
告警等级:{TRIGGER.SEVERITY}
告警信息: {TRIGGER.NAME}
告警项目:{TRIGGER.KEY1}
问题详情:{ITEM.NAME}:{ITEM.VALUE}
当前状态:{TRIGGER.STATUS}:{ITEM.VALUE1}
事件ID:{EVENT.ID}问题恢复
主题
恢复{TRIGGER.STATUS}, 服务器:{HOSTNAME1}: {TRIGGER.NAME}已恢复!
消息
告警主机:{HOSTNAME1}
告警时间:{EVENT.DATE} {EVENT.TIME}
告警等级:{TRIGGER.SEVERITY}
告警信息: {TRIGGER.NAME}
告警项目:{TRIGGER.KEY1}
问题详情:{ITEM.NAME}:{ITEM.VALUE}
当前状态:{TRIGGER.STATUS}:{ITEM.VALUE1}
事件ID:{EVENT.ID}配置收件人
重新触发报警
systemctl stop nginx.service注意权限问题
9.3 报警升级
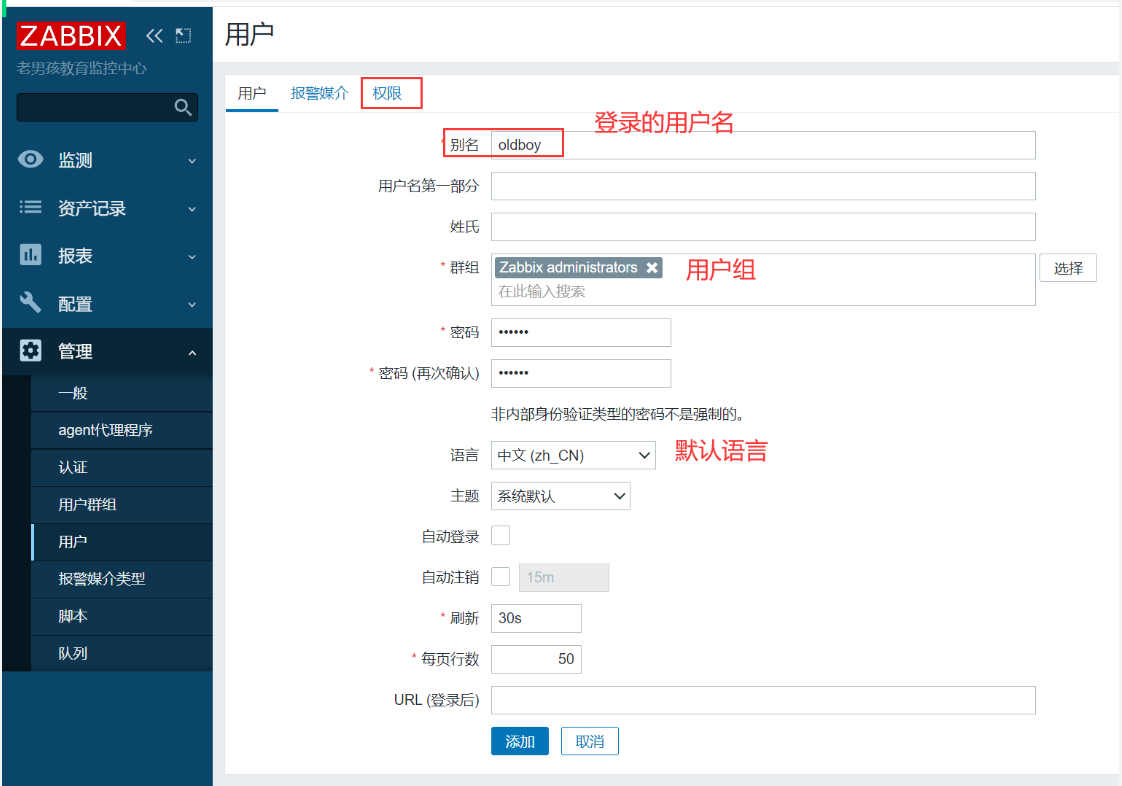
增加一个用户
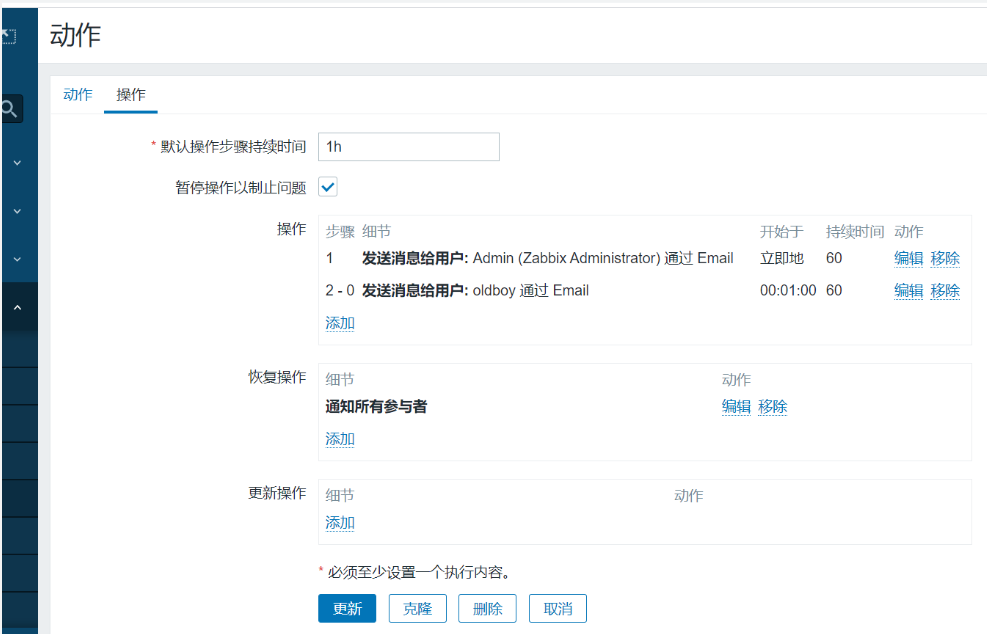
分别为oldboy和admin配置不同的收件人
报警升级设置
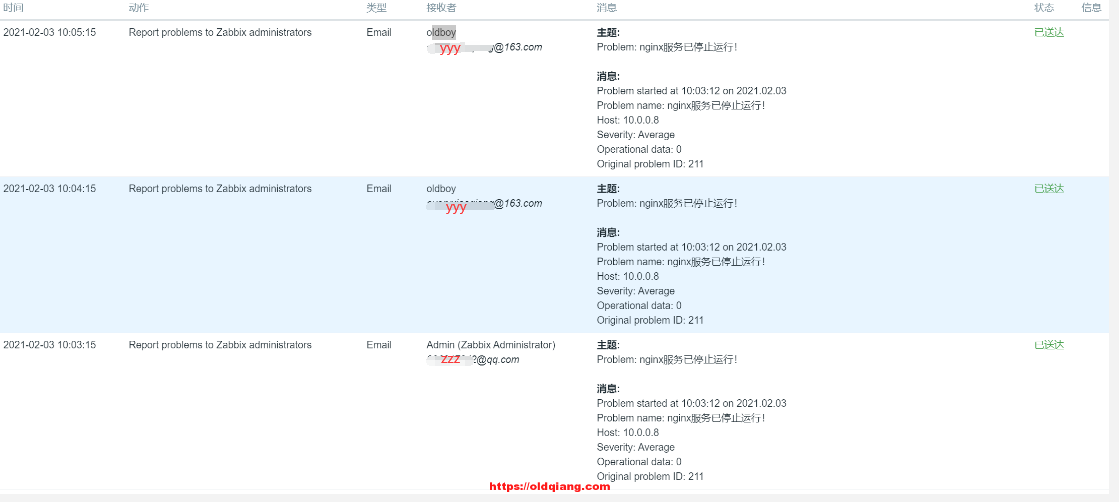
效果
10:自定义图形和grafana出图
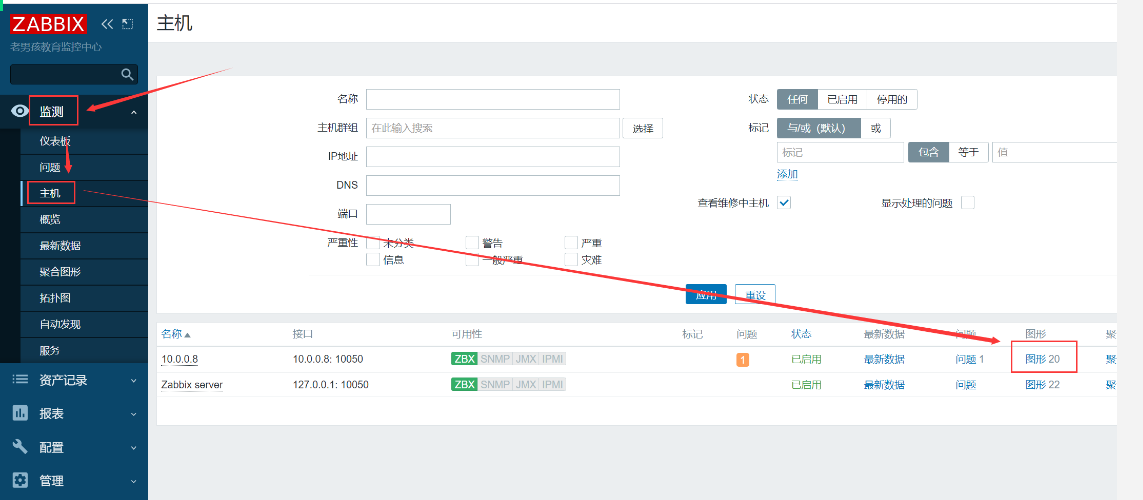
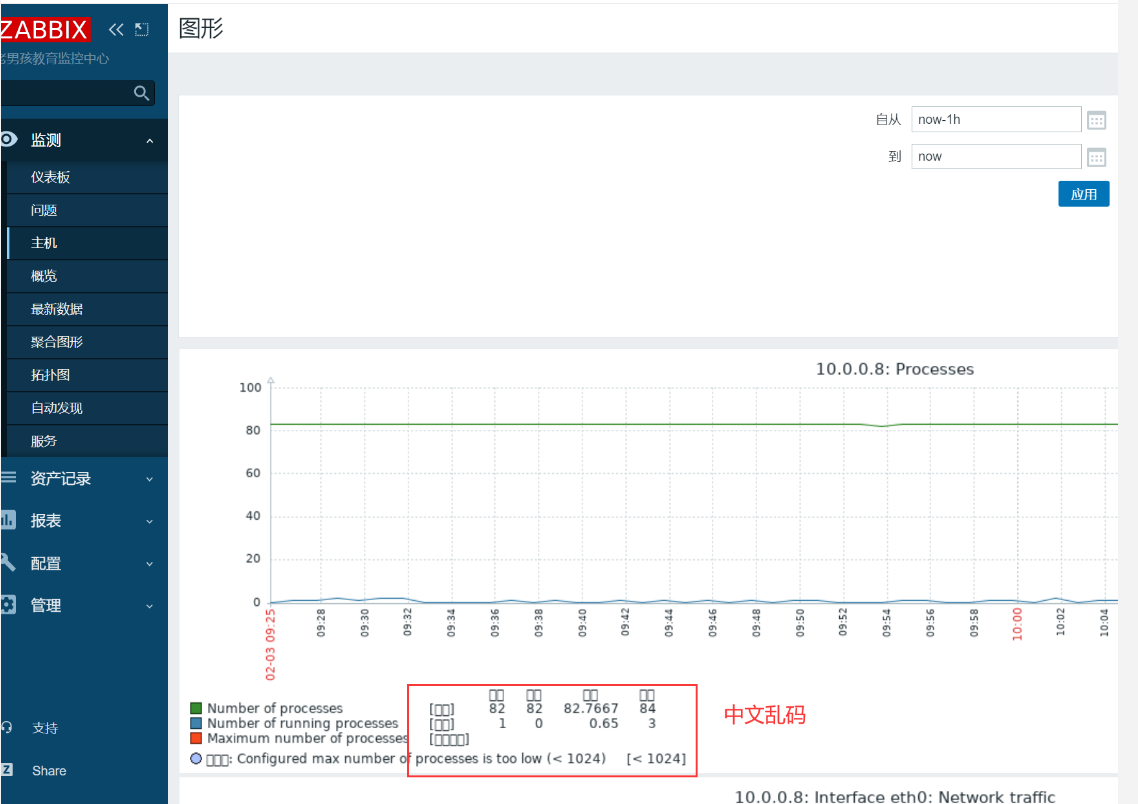
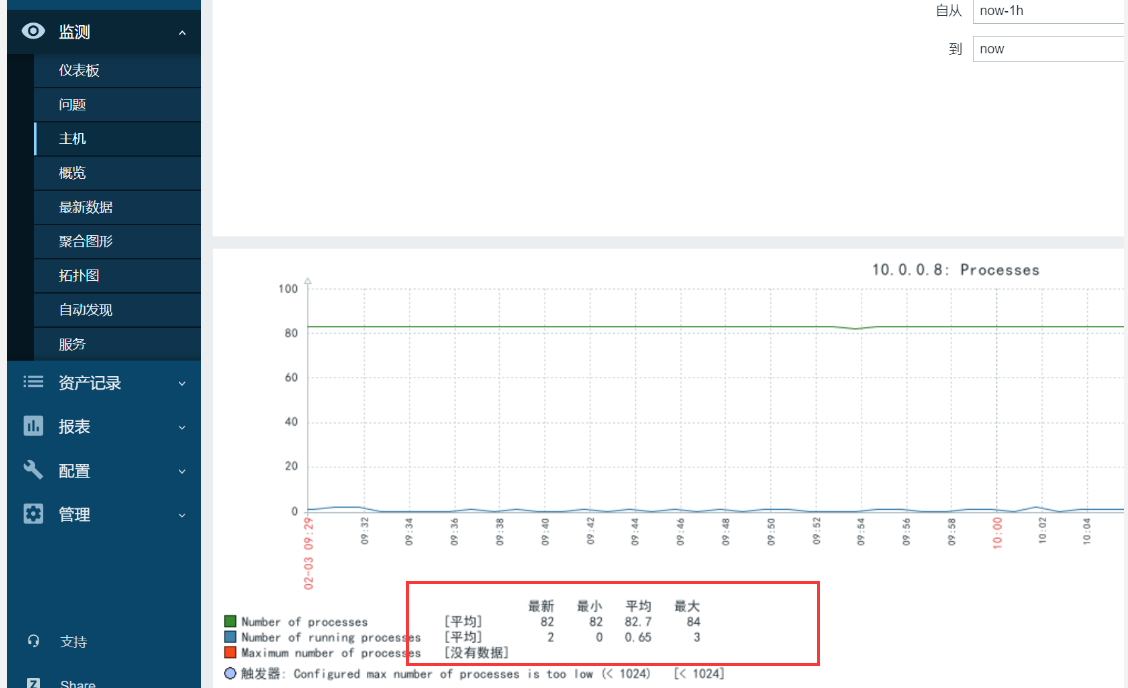
解决中文乱码
cd /data/zabbix
cd assets/fonts/
#上传中文字体
rz -E

[root@zabbix-server fonts]# ls
DejaVuSans.ttf  SIMHEI.TTF

mv SIMHEI.TTF DejaVuSans.ttf
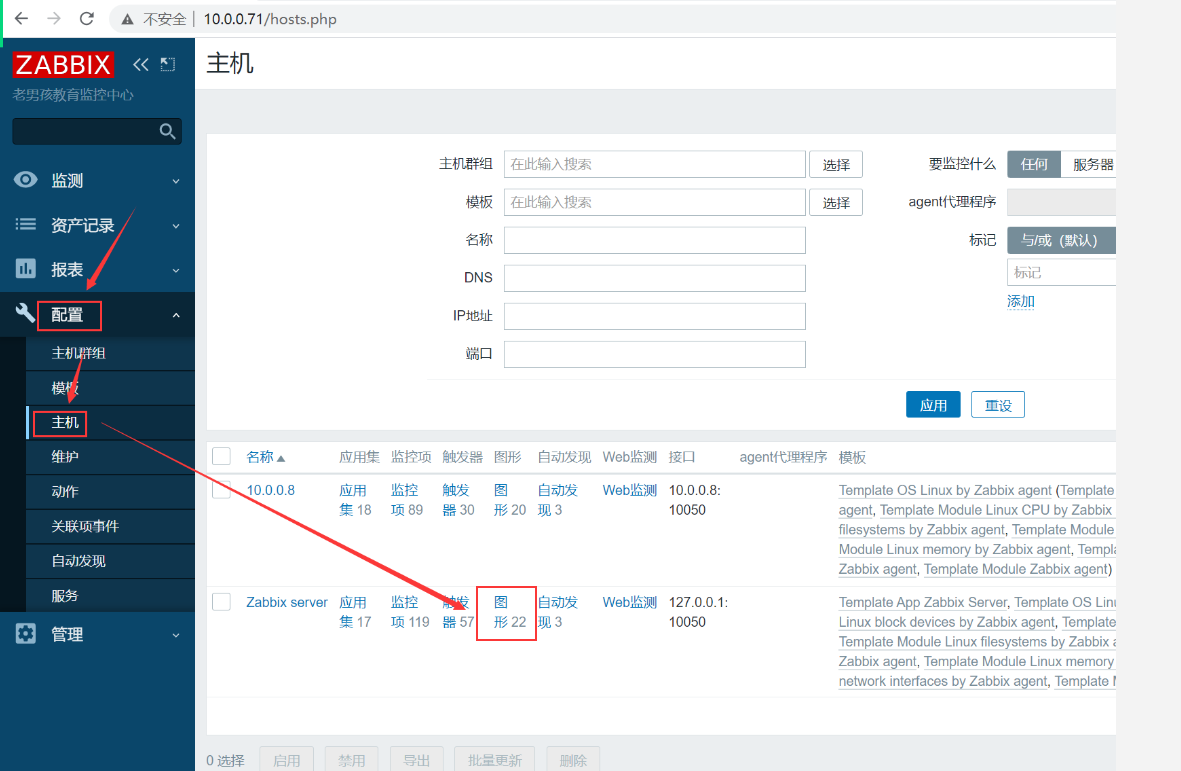
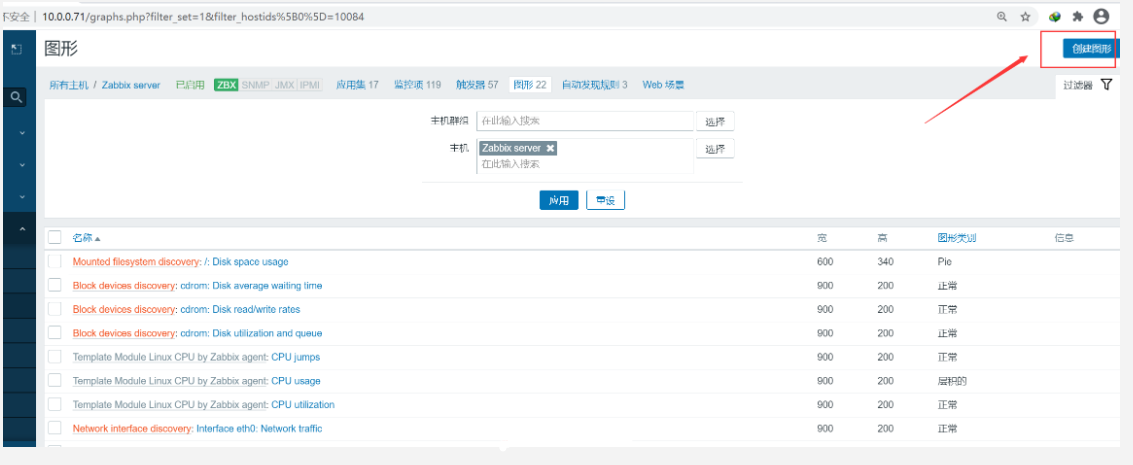
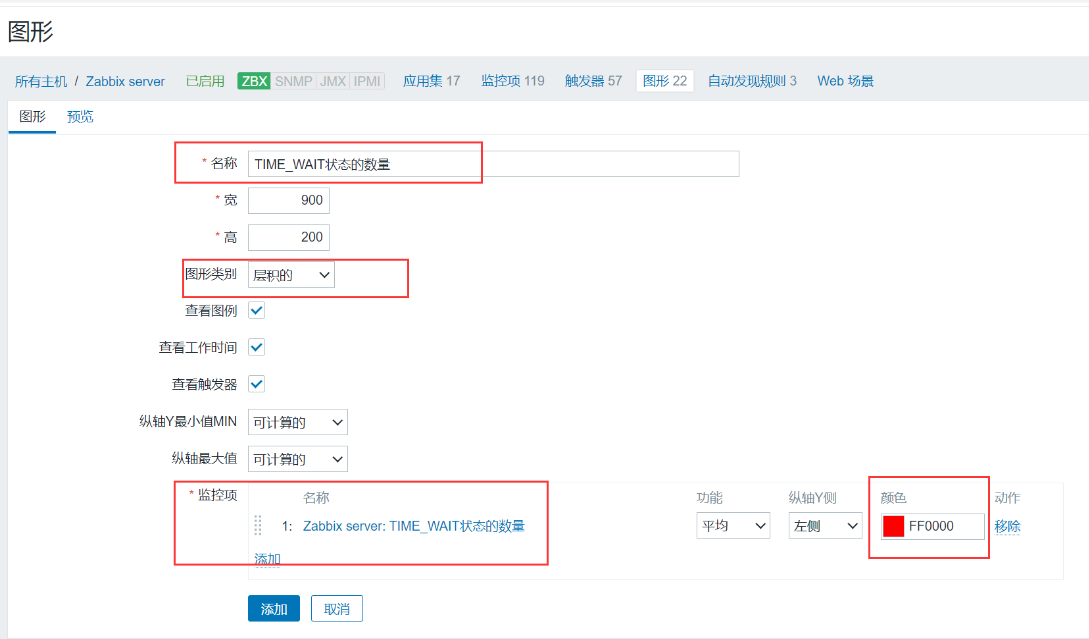
自定义图形
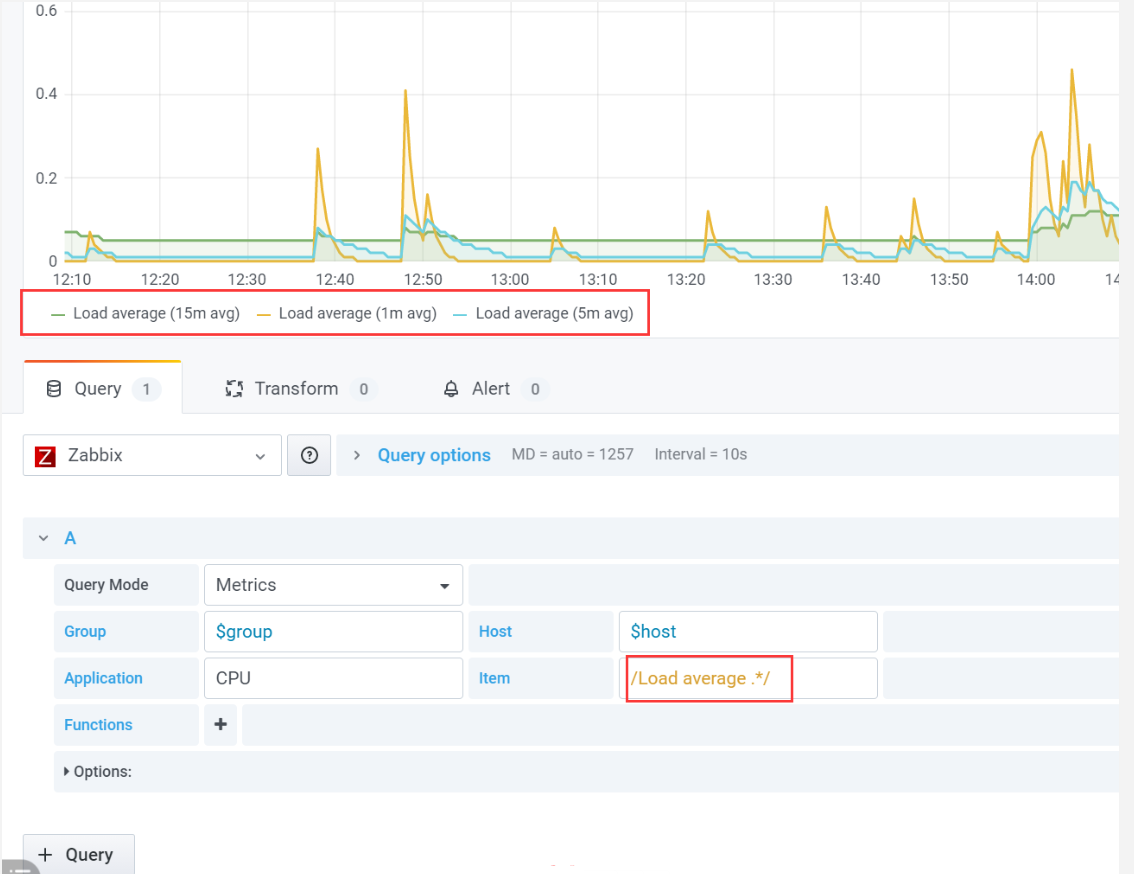
使用grafana给zabbix出图
安装grafana
wget https://mirrors.tuna.tsinghua.edu.cn/grafana/yum/rpm/grafana-7.3.7-1.x86_64.rpm
yum localinstall grafana-7.3.7-1.x86_64.rpm -y
systemctl start grafana-server.service
systemctl enable grafana-server.service

#访问grafana
http://10.0.0.8:3000
默认账号密码:admin/admin
grafana的概念
a:插件,丰富原有功能plugin
b:数据源 datasource
c:dashboard 效果图
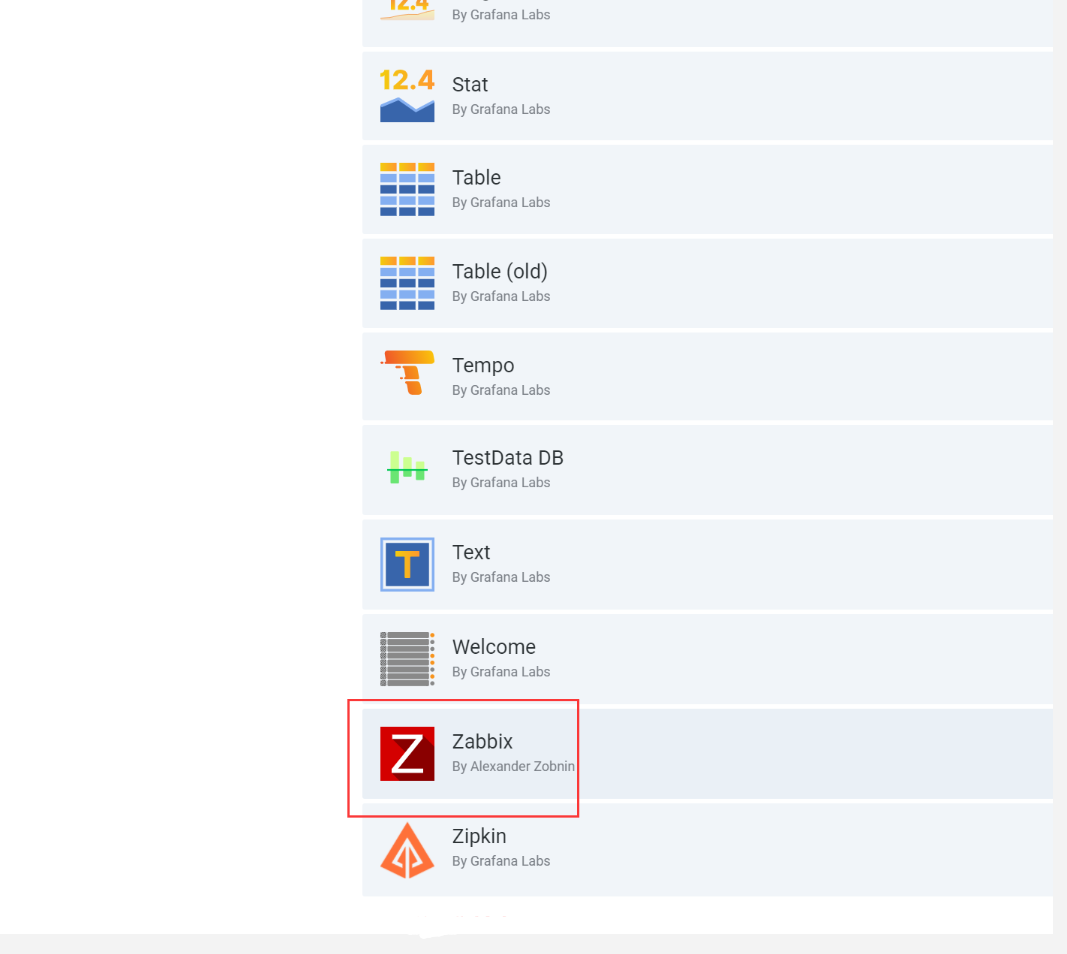
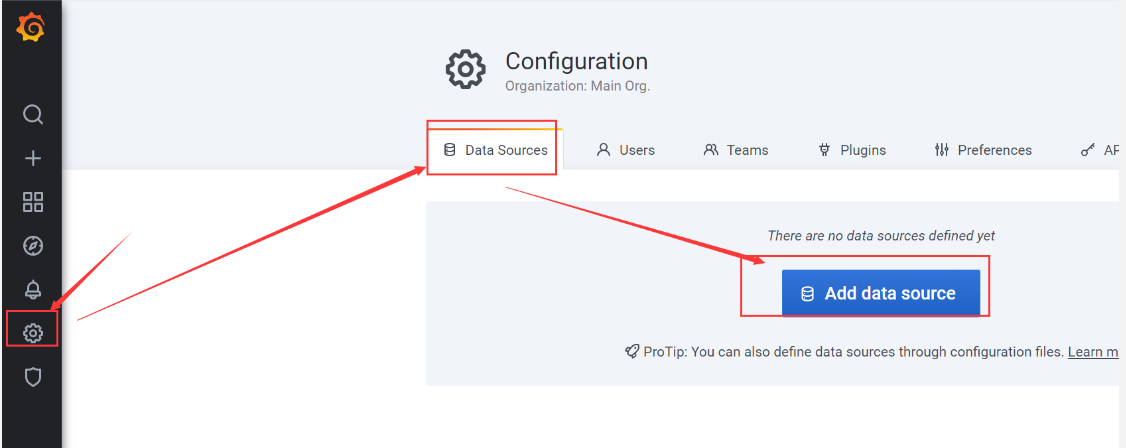
安装zabbix插件
grafana-cli plugins install alexanderzobnin-zabbix-app 4.1.2
service grafana-server restart
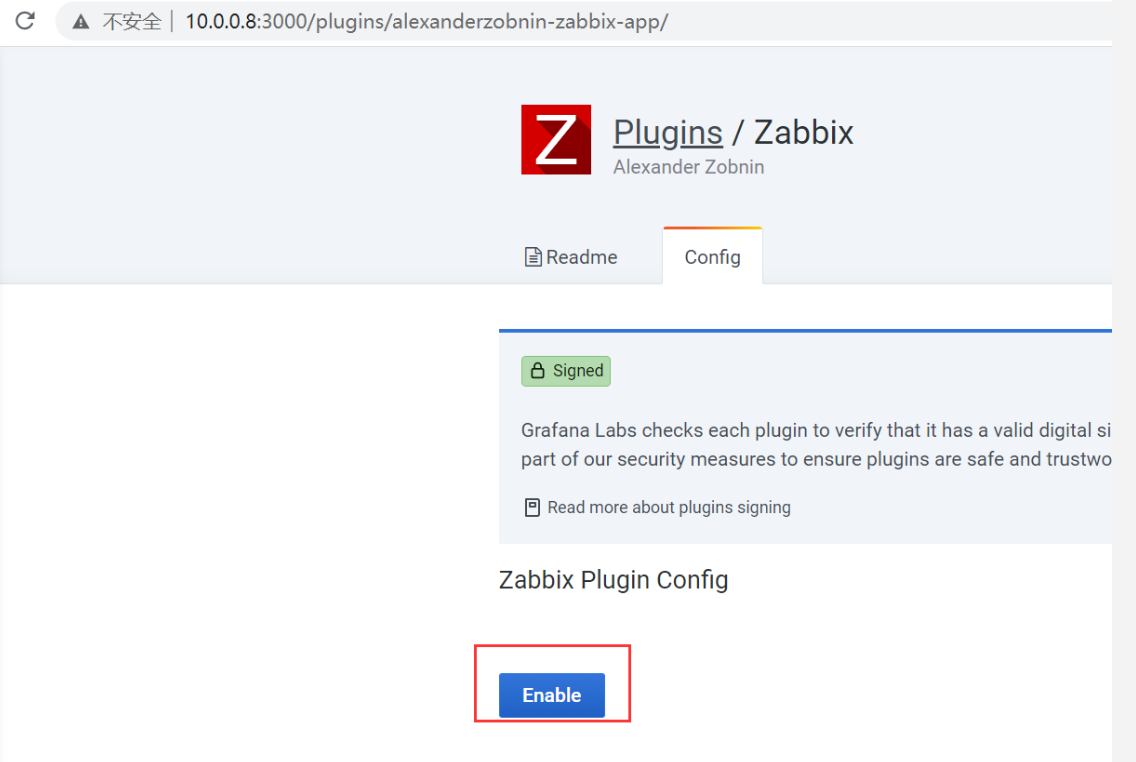
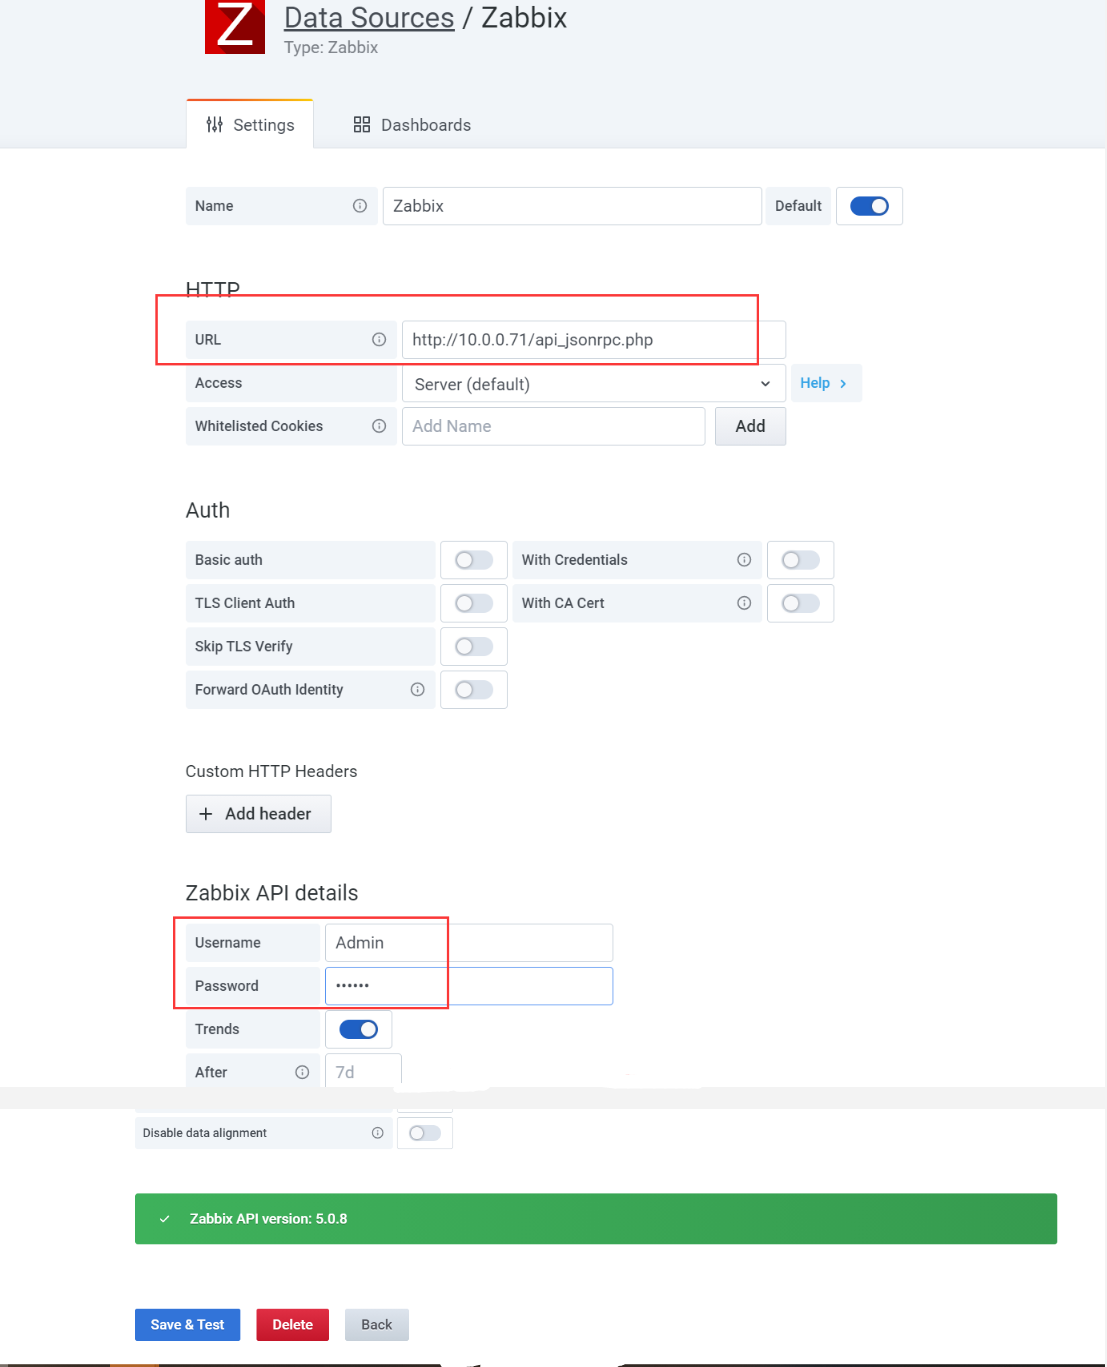
启用zabbix插件
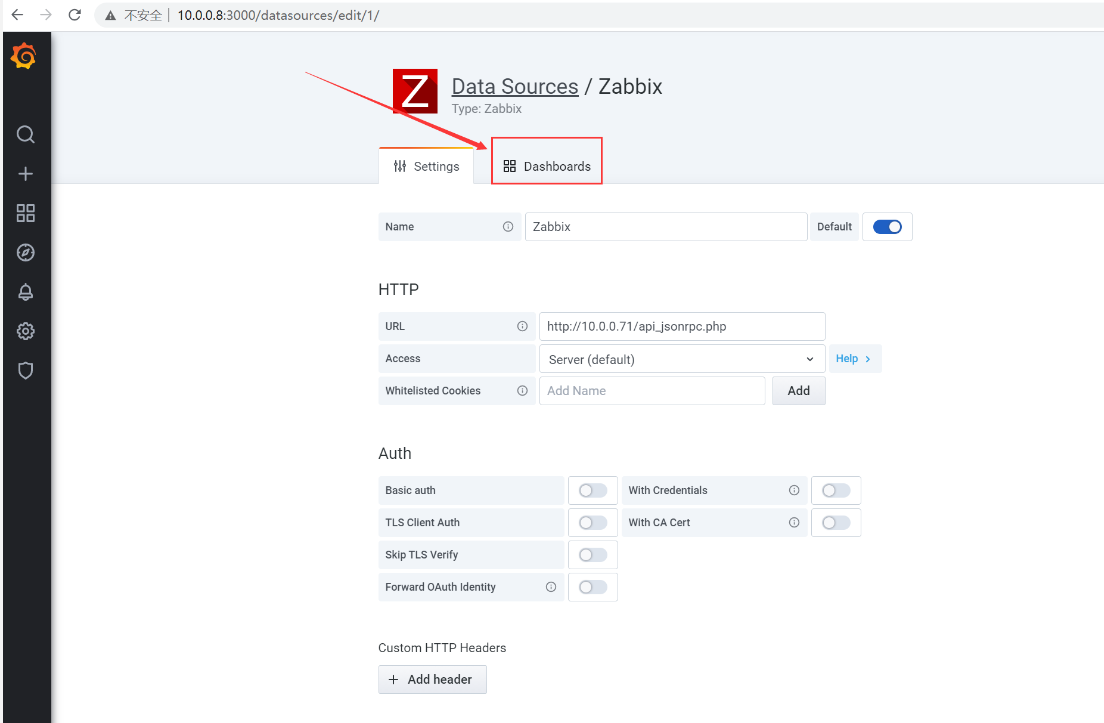
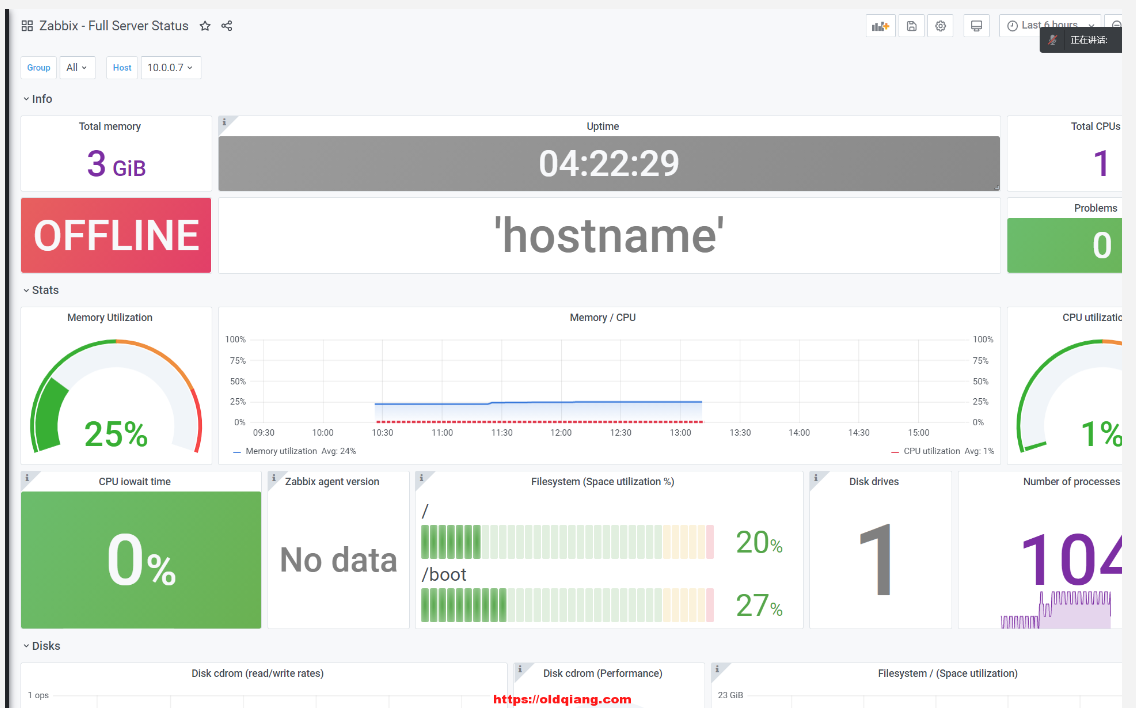
新建zabbix数据源
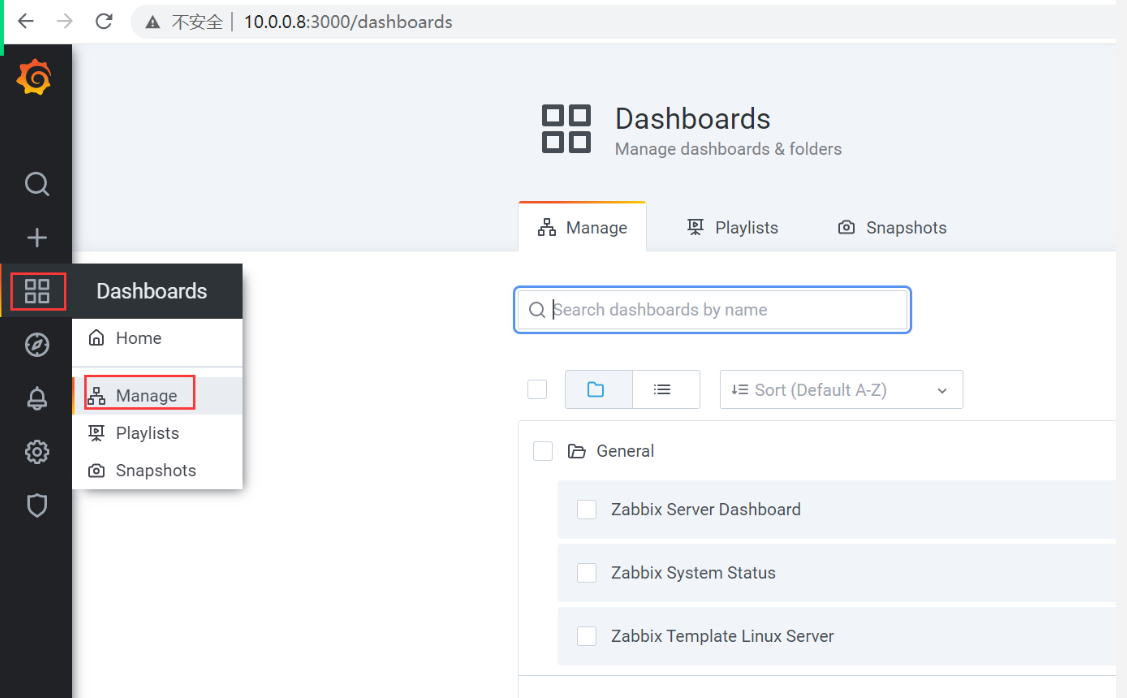
效果
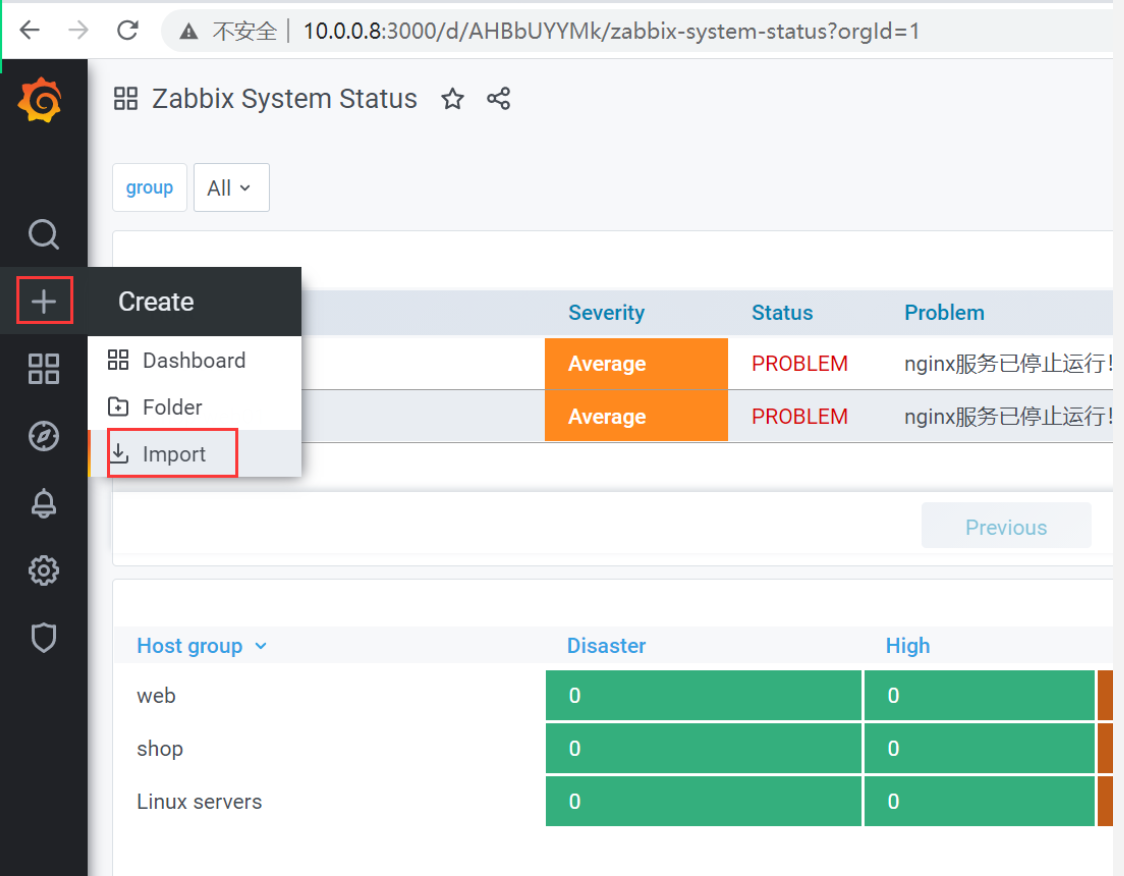
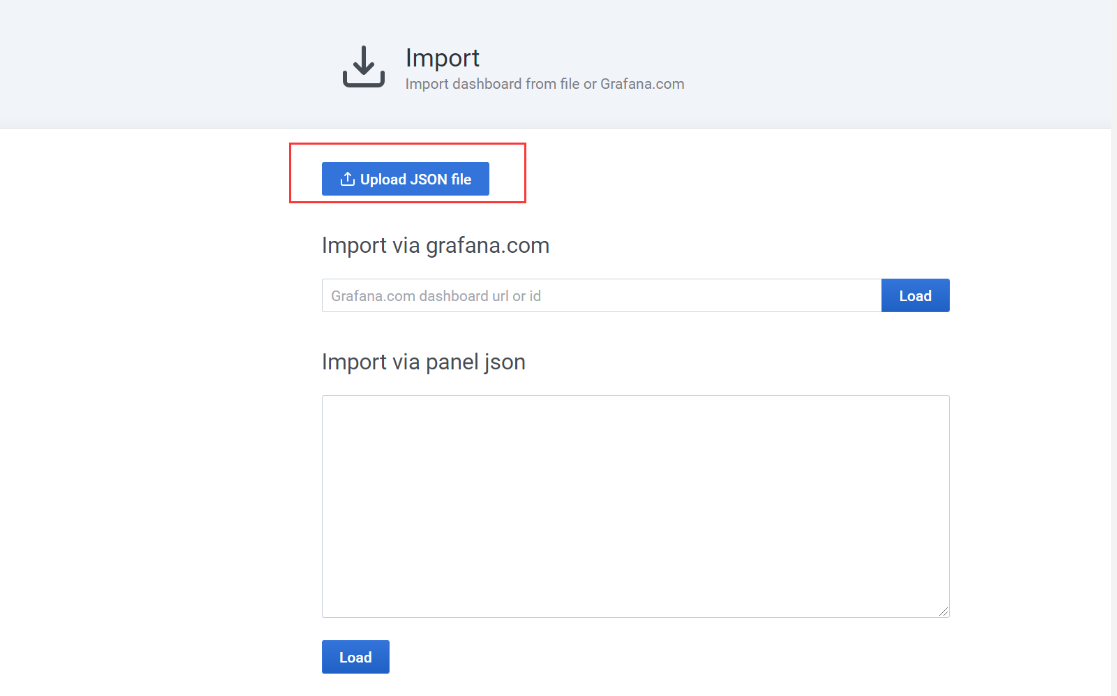
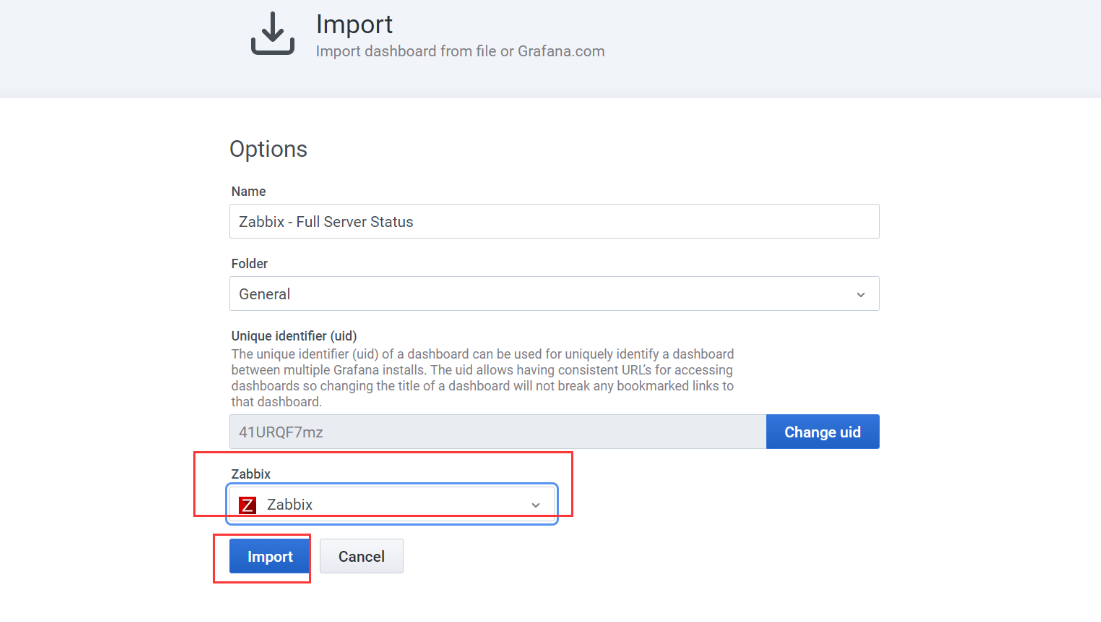
导入dashboard
11∶自定义监控模板
模板:定义好了,一些监控项,应用集,触发器,图形等资源
模板可以包含子模板
模板,可以导入导出,可以分享
自定义模板
#开启nginx监控页面
        location = /nginx_status {
             stub_status;
             access_log    off;
        }

#测试
[root@web01 ~]# curl http://127.0.0.1/nginx_status
Active connections: 1
server accepts handled requests
 7 7 7
Reading: 0 Writing: 1 Waiting: 0

#自定义监控项
[root@web01 zabbix_agent2.d]# cat zbx_nginx.conf
UserParameter=nginx_status,netstat -lntp|grep -c nginx
UserParameter=nginx_accepts,curl http://127.0.0.1/nginx_status 2>/dev/null|awk 'NR==3{print $1}'
UserParameter=nginx_active_con,curl http://127.0.0.1/nginx_status 2>/dev/null|awk 'NR==1{print $NF}'
UserParameter=nginx_Reading,curl http://127.0.0.1/nginx_status 2>/dev/null|awk 'NR==4{print $2}'
UserParameter=nginx_Writing,curl http://127.0.0.1/nginx_status 2>/dev/null|awk 'NR==4{print $4}'
UserParameter=nginx_Waiting,curl http://127.0.0.1/nginx_status 2>/dev/null|awk 'NR==4{print $NF}'
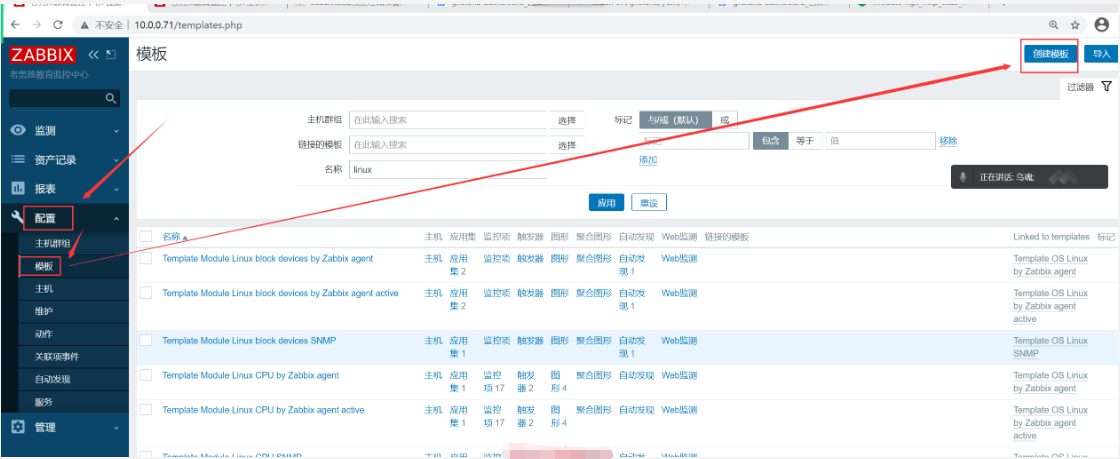
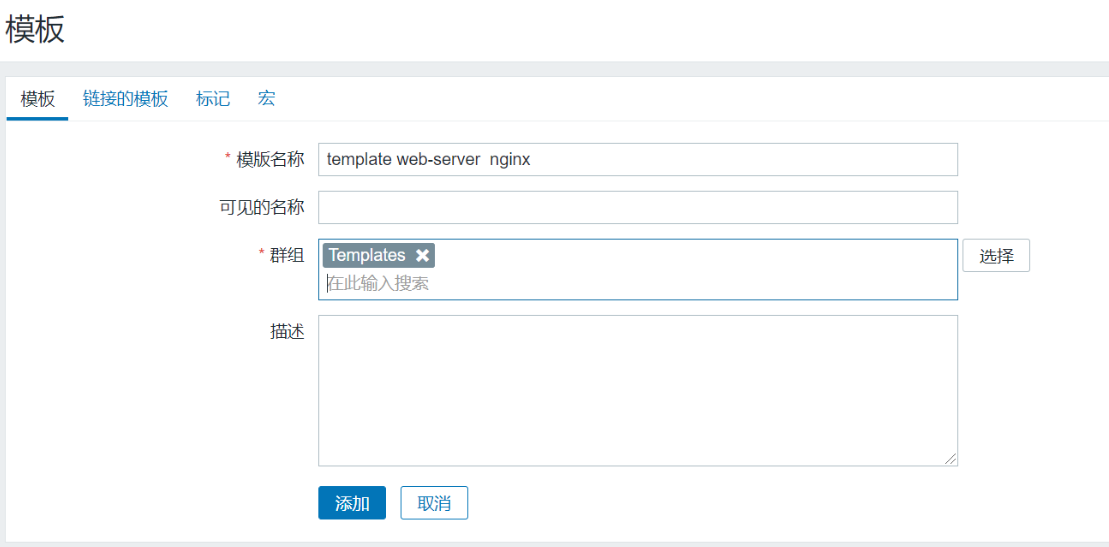
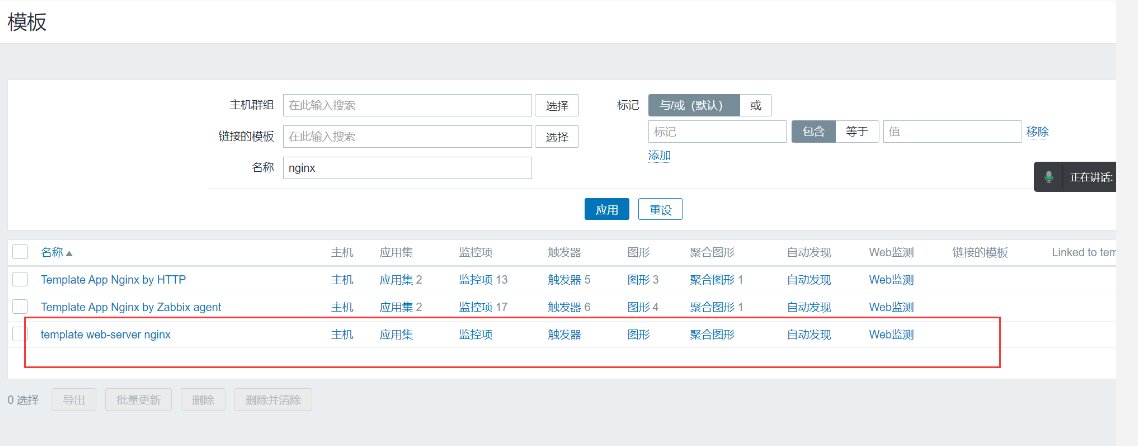
制作模板
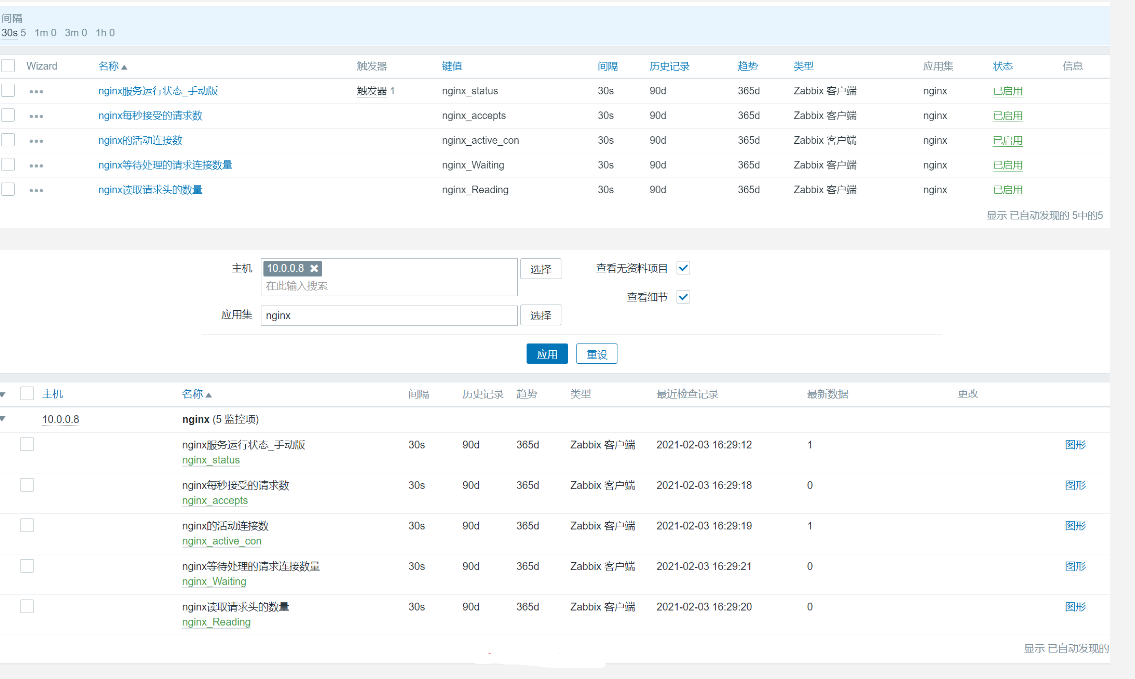
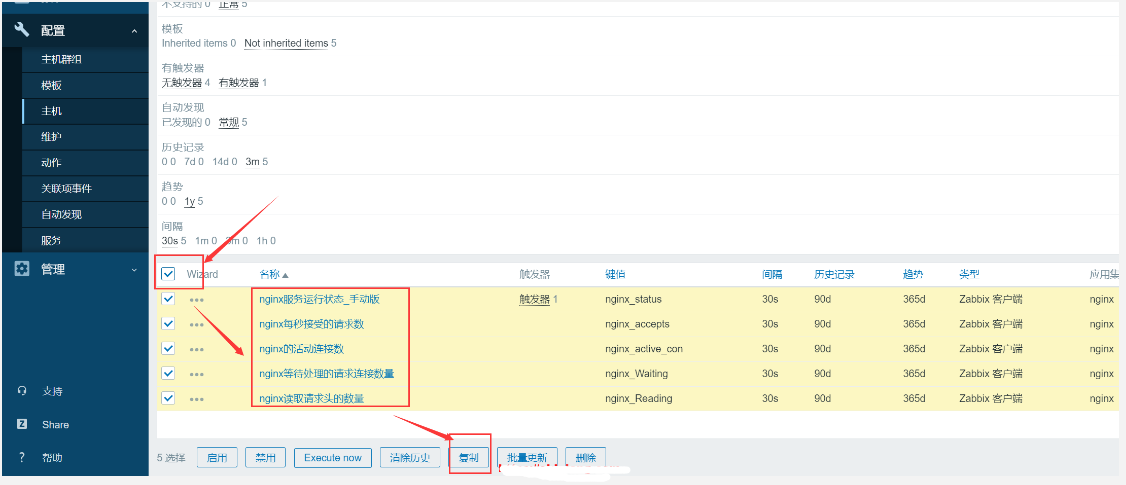
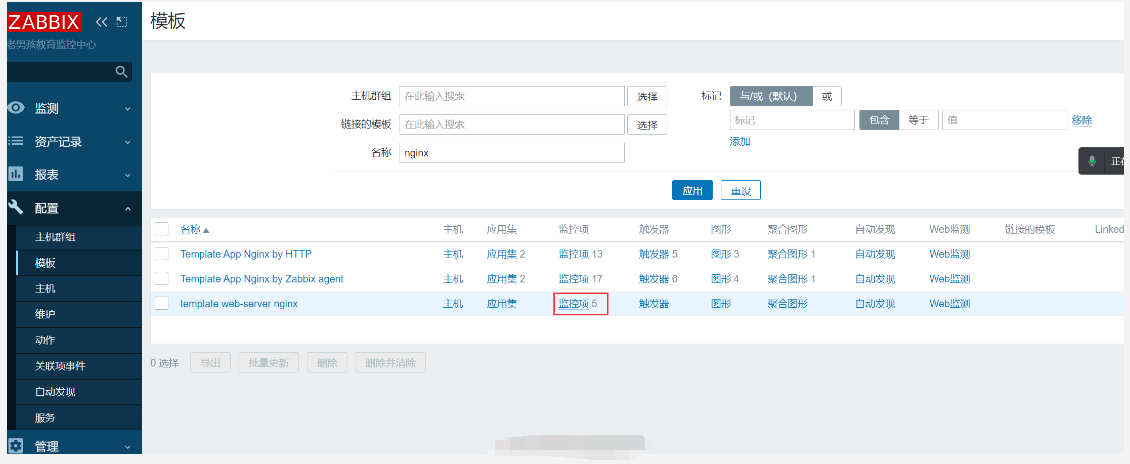
添加监控项
同样的方法,复制触发器,复制图形等资源
使用模板注意事项:
#开启监控页面
#导入模板(兼容性)
#把zabbix的取值配置文件,放入到指定目录/etc/zabbix/zabbix_agentd.d/
#如果有取值脚本,需要把取值也放在对应的目录
#zabbix-get调试取值
#在目标主机链接刚导入的模板
#验证,查看最新数据
12:zabbix监控角度总结
物理层: 物理服务器  物理交换机
物理服务器:cpu温度,主板温度,功率,电压,风扇转速  ipmitool
物理交换机:接口流量 snmp模板

系统层:cpu,负载,内存,磁盘,网络,系统    zabbix自带模板

应用层:nginx/lvs/haproxy/php-fpm/mysql/pgsql/tomcat/nfs/glusterfs...  模板监控

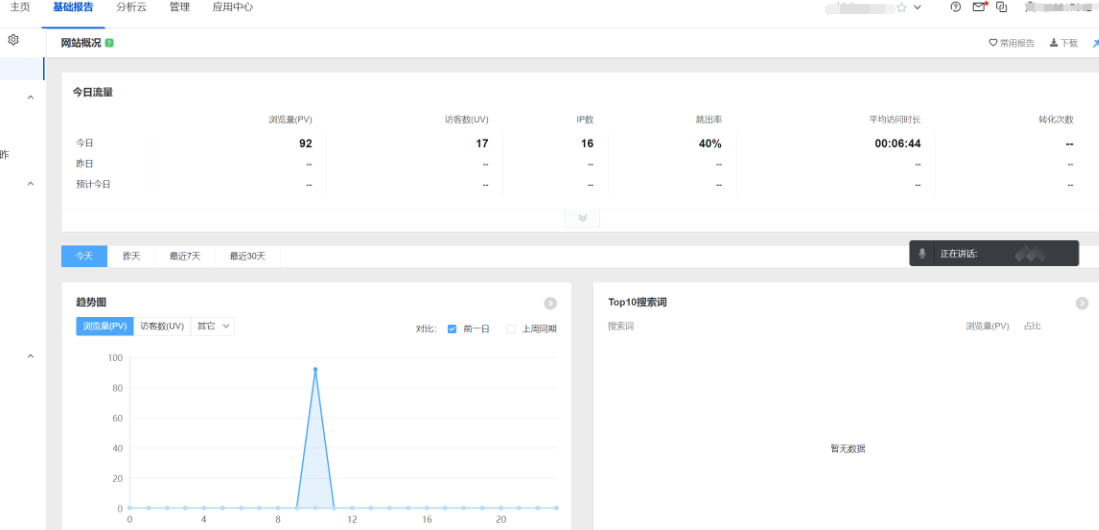
业务层:网站访问速度,用户访问量pv\uv\ip,用户活跃度 日活,周活,月活  订单量,利润
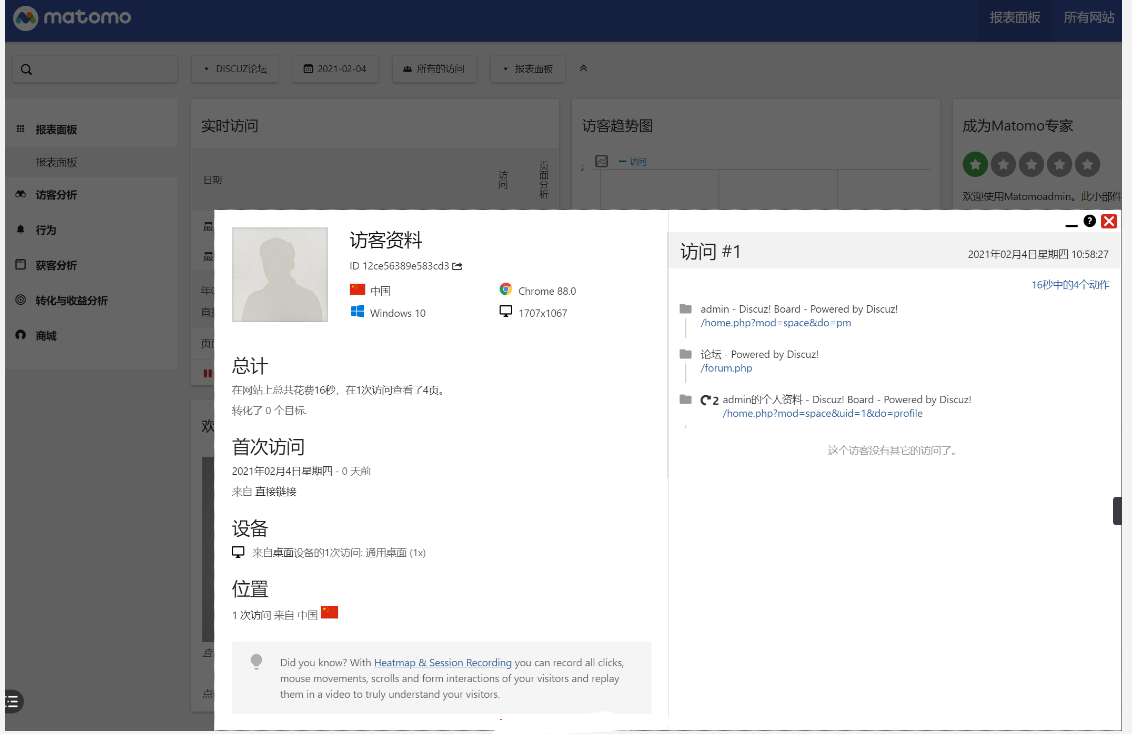
13: 用户访问量监控
使用第三方统计平台
自建统计平台
使用开源的统计平台piwik
14:使用percona插件监控mysql
yum安装的mysql监控方法
#导入模板(兼容性)
#把zabbix的取值配置文件,放入到指定目录/etc/zabbix/zabbix_agentd.d/
rpm -ivh percona-zabbix-templates-1.1.8-1.noarch.rpm
cd /var/lib/zabbix/percona/templates/
cp userparameter_percona_mysql.conf /etc/zabbix/zabbix_agent2.d/
systemctl restart zabbix-agent2.service
yum install php-cli php-mysqlnd -y 或者php72w-cli  php72w-mysqlnd

vim /var/lib/zabbix/percona/scripts/ss_get_mysql_stats.php
数据库账号密码

#zabbix-get调试取值
zabbix_get -s 10.0.0.8 -k MySQL.Open-files

#在目标主机链接刚导入的模板
#验证,查看最新数据
其他方式安装的mysql监控方法
#导入模板(兼容性)
#把zabbix的取值配置文件,放入到指定目录/etc/zabbix/zabbix_agentd.d/
rpm -ivh percona-zabbix-templates-1.1.8-1.noarch.rpm
cd /var/lib/zabbix/percona/templates/
cp userparameter_percona_mysql.conf /etc/zabbix/zabbix_agent2.d/
systemctl restart zabbix-agent2.service
yum install php-cli -y 或者php72w-cli

vim /var/lib/zabbix/percona/scripts/ss_get_mysql_stats.php
$mysql_user = 'root';
$mysql_pass = '123456';
$mysql_socket = '/tmp/mysql.sock';

#zabbix-get调试取值
zabbix_get -s 10.0.0.8 -k MySQL.Open-files

#在目标主机链接刚导入的模板
#验证,查看最新数据
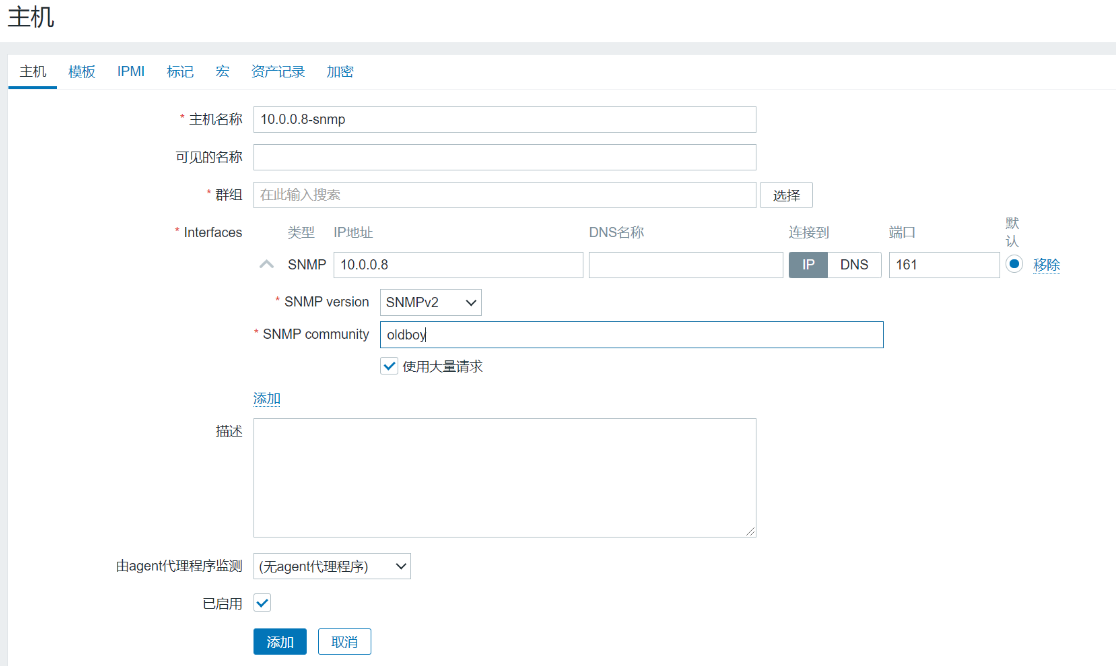
15: snmp监控window和Linux
不能安装zabbix-agent的设备,都可以使用snmp监控
snmp协议: simple network manager protocol
OID:监控标准都有一个唯一的id,object id
总内存oid: .1.3.6.1.4.1.2021.4.5.0MIB:
存储所有oid信息snmp协议版本
v1
v2c  -c commuity 密码,口令
v3
安装snmp服务端
yum install net-snmp -y
vim /etc/snmp/snmpd.conf
#第41行修改为
com2sec notConfigUser  default       oldboy
view    systemview    included   .1

systemctl start snmpd.service
安装snmp客户端,测试取值
yum install net-snmp-utils.x86_64 -y
#snmpget 每次只能取一个值
#snmpwalk 范围性的取值
[root@zabbix-server yum.repos.d]# snmpwalk -v 2c -c oldboy 10.0.0.8 .1.3.6.1.2.1.25.2.2.0
HOST-RESOURCES-MIB::hrMemorySize.0 = INTEGER: 995896 KBytes
新建主机,链接模板
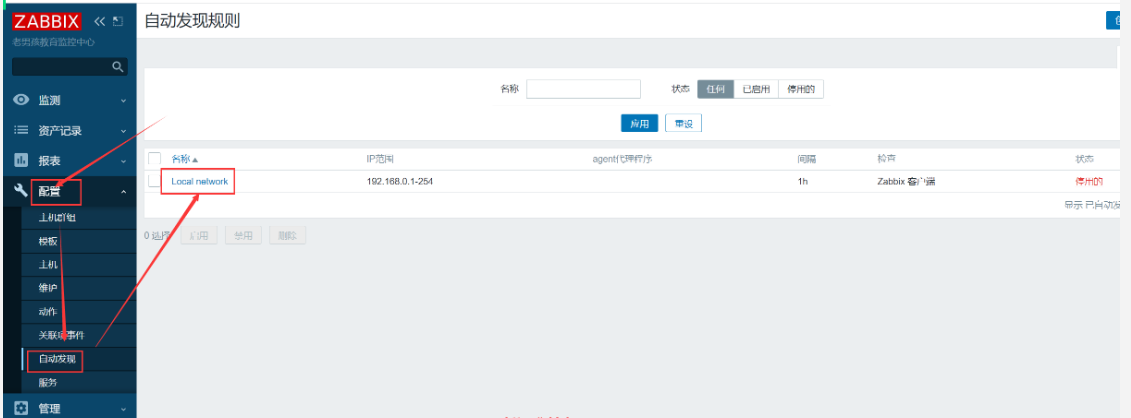
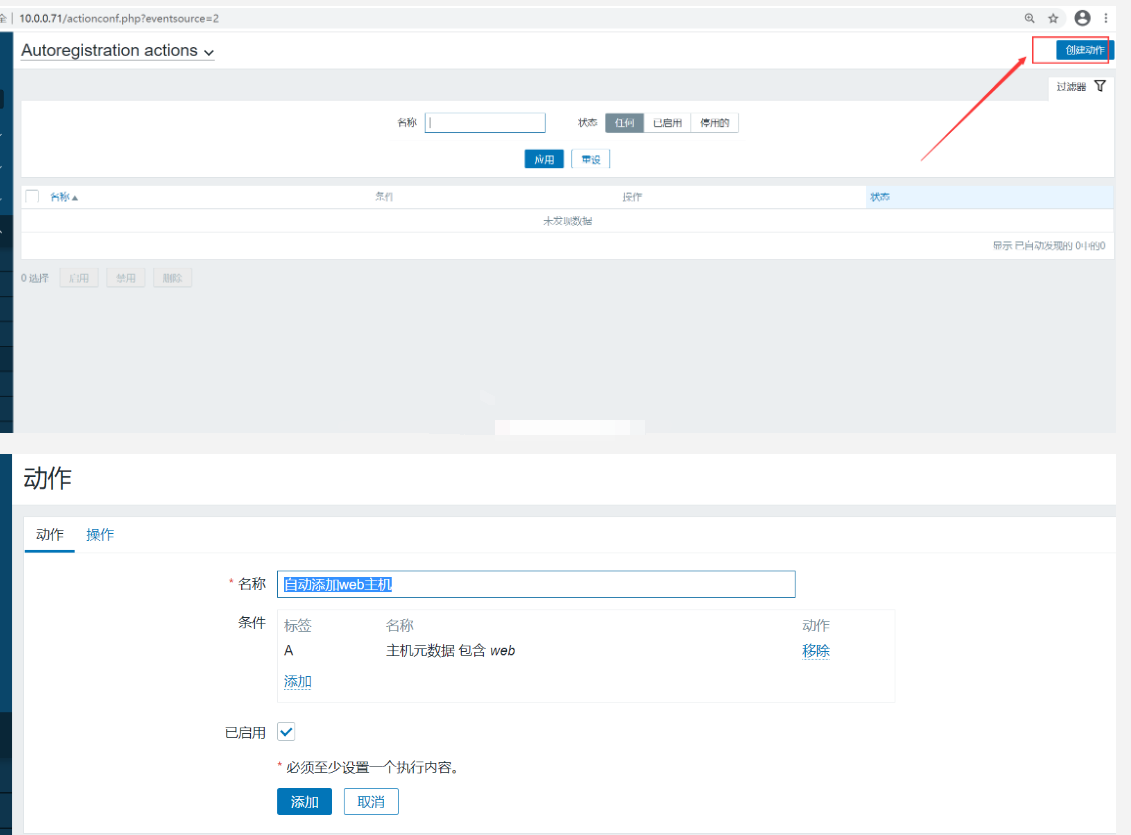
16: zabbix自动发现和自动注册(主动)
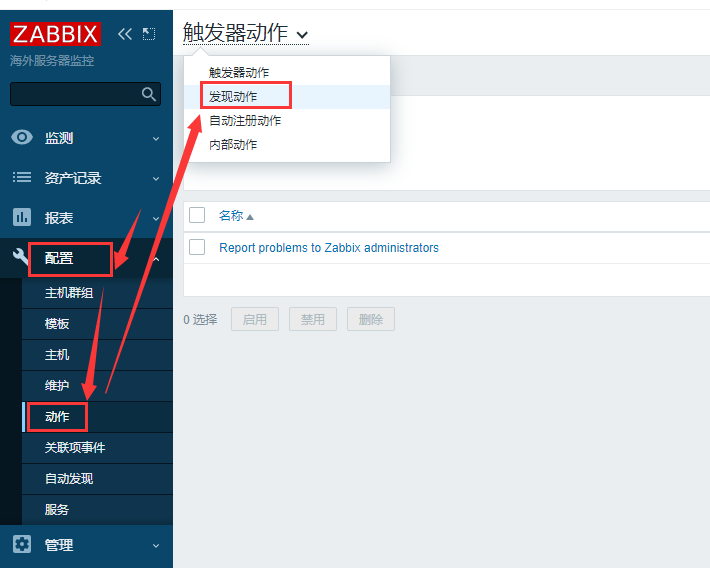
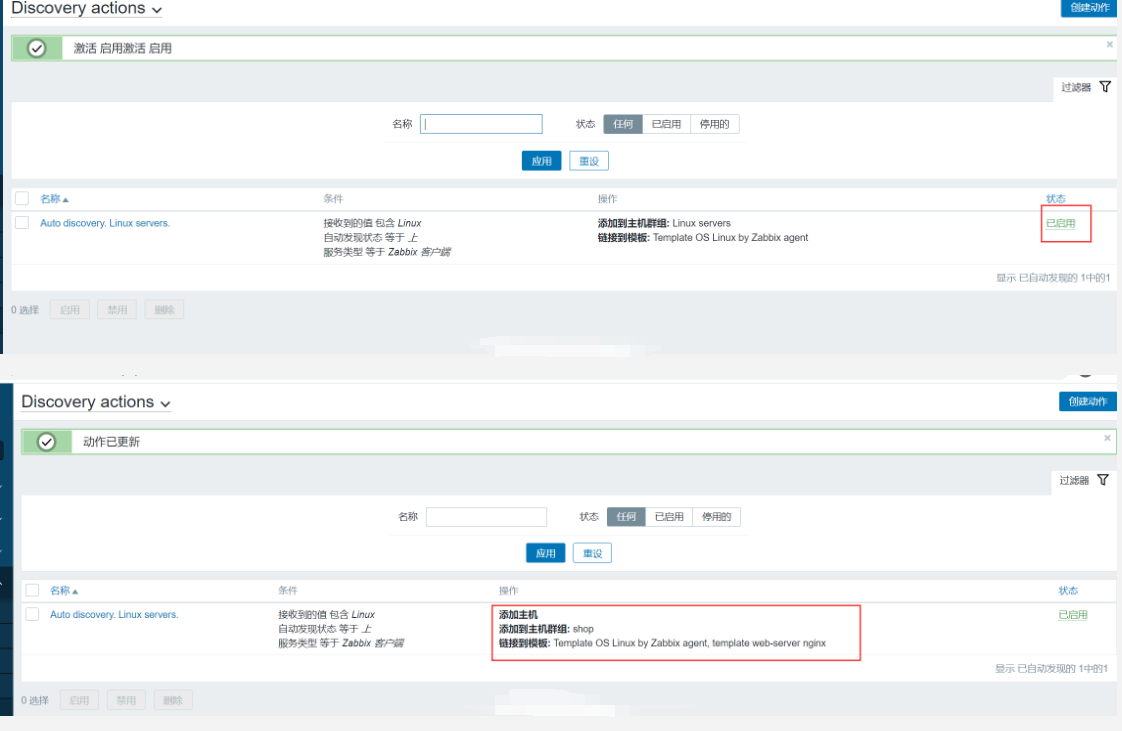
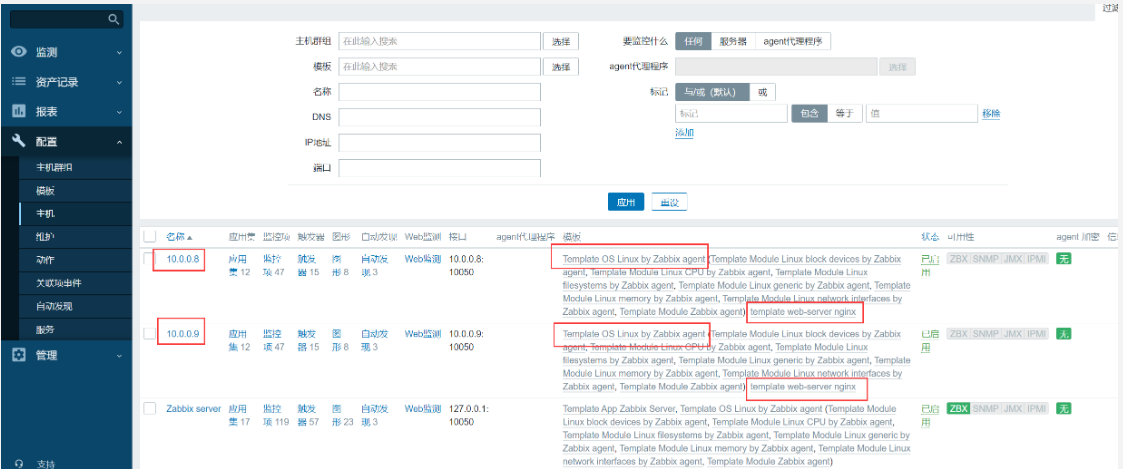
自动发现
添加主机的规则
点击已启用,并添加一个操作【添加主机】
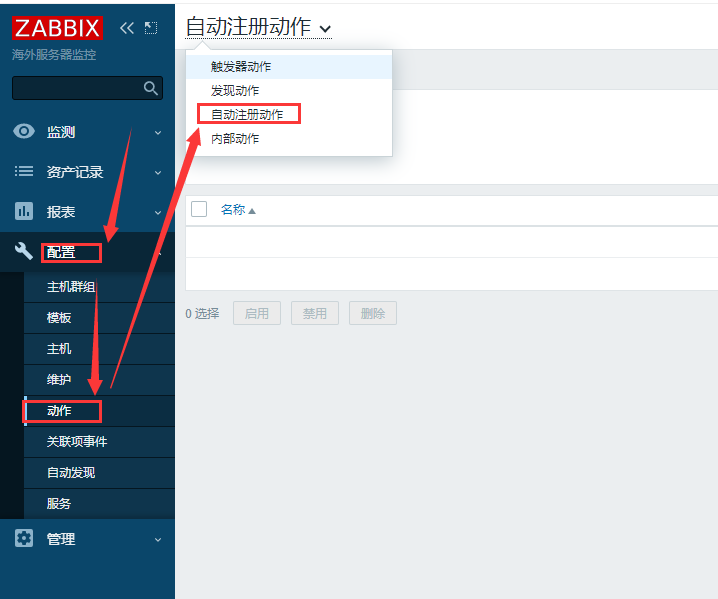
自动注册动作
agent配置
vim /etc/zabbix/zabbix_agent2.conf
Server=10.0.0.71
ServerActive=10.0.0.71
Hostname=10.0.0.8
HostMetadata=web
验证:
systemctl restart zabbix-agent2.serviceagent配置
[root@web02 templates]# vim /etc/zabbix/zabbix_agentd.conf验证:
systemctl restart zabbix-agent.service ansible实现自动注册
[root@zabbix-server ~]# tail -3 /etc/ansible/hosts
[agent]
10.0.0.7  ansible_ssh_user='root' ansible_ssh_pass='123456' HostMetadata=db
10.0.0.8  ansible_ssh_user='root' ansible_ssh_pass='123456' HostMetadata=web

[root@zabbix-server ~]# grep -Ev '^$|#' zabbix_agentd2.conf.j2
PidFile=/var/run/zabbix/zabbix_agentd.pid
LogFile=/var/log/zabbix/zabbix_agentd.log
LogFileSize=0
Server={{ zabbix_server_ip }}
ServerActive={{ zabbix_server_ip }}
Hostname={{ ansible_default_ipv4.address }}
HostMetadata={{ HostMetadata  }}
Include=/etc/zabbix/zabbix_agentd.d/*.conf

#agent2
PidFile=/var/run/zabbix/zabbix_agent2.pid
LogFile=/var/log/zabbix/zabbix_agent2.log
LogFileSize=0
Server={{ zabbix_server_ip }}
ServerActive={{ zabbix_server_ip }}
Hostname={{ ansible_default_ipv4.address }}
Timeout=30
Include=/etc/zabbix/zabbix_agent2.d/*.conf
ControlSocket=/tmp/agent.sock


[root@zabbix-server ~]# cat zabbix_agent.yml
- hosts: agent
  vars:
    - zabbix_server_ip: 10.0.0.71
  tasks:
  - name: Install Zabbix Agent2
    yum:
      name: https://mirrors.tuna.tsinghua.edu.cn/zabbix/zabbix/5.0/rhel/7/x86_64/zabbix-agent2-5.0.36-1.el7.x86_64.rpm
      state: present
  - name: Configure Zabbix Agent
    template: src=zabbix_agentd.conf2.j2 dest=/etc/zabbix/zabbix_agent2.conf
    notify: Restart Zabbix Agent2
  - name: Start Zabbix Agent2
    service: name=zabbix-agent2 state=started enabled=yes
  handlers:
    - name: Restart Zabbix Agent2
      service: name=zabbix-agent2 state=restarted
17: zabbix-agent主动和被动的区别
被动:如果有100个监控项,zabbix-server对agent进行100次取值
主动:如果有100个监控项,agent主动向zabbix-server索要任务清单,根据清单采集所有监控项,一次性发送给zabbix-server
修改客户端配置文件,并重启客户端
[root@web01 ~]# grep -Ev '^$|#' /etc/zabbix/zabbix_agent2.conf
PidFile=/var/run/zabbix/zabbix_agent2.pid
LogFile=/var/log/zabbix/zabbix_agent2.log
LogFileSize=0
Server=172.16.1.61
ServerActive=172.16.1.61
Hostname=web01
Include=/etc/zabbix/zabbix_agent2.d/*.conf
ControlSocket=/tmp/agent.sock

[root@web01 ~]# systemctl restart zabbix-agent2
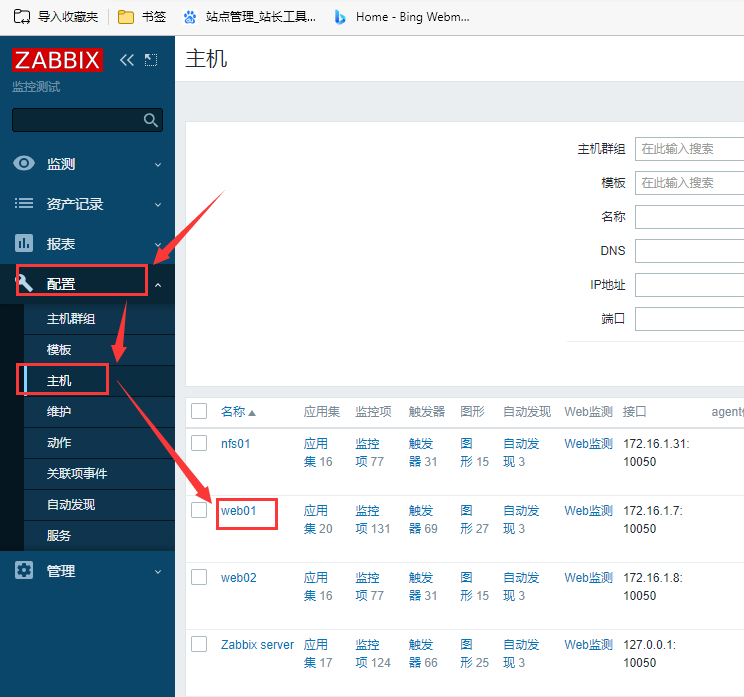
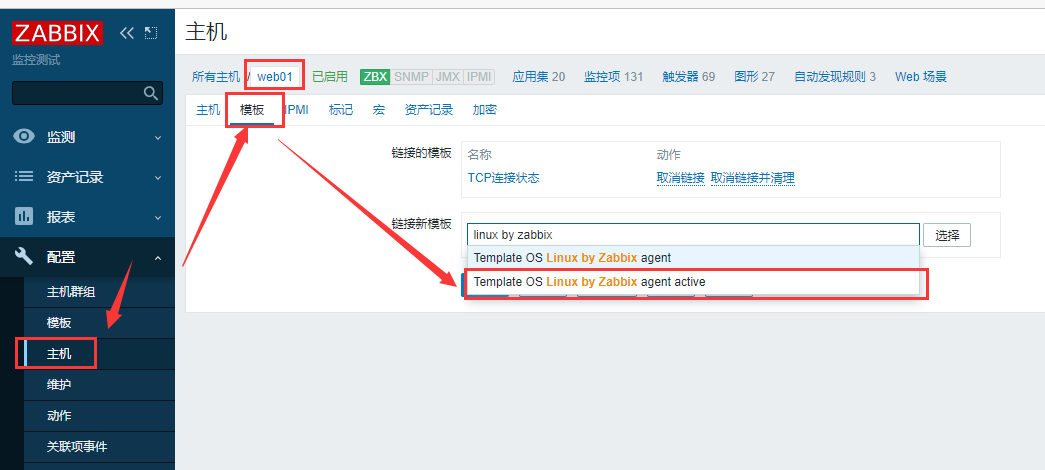
后台还需要修改主机监控模版为主动模式的模版
使用主动模式之前
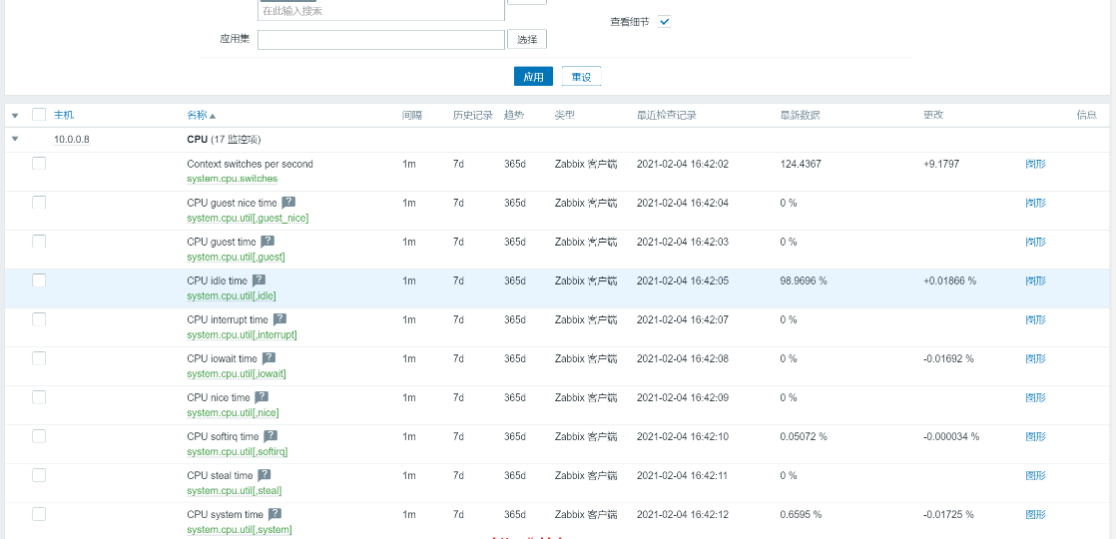
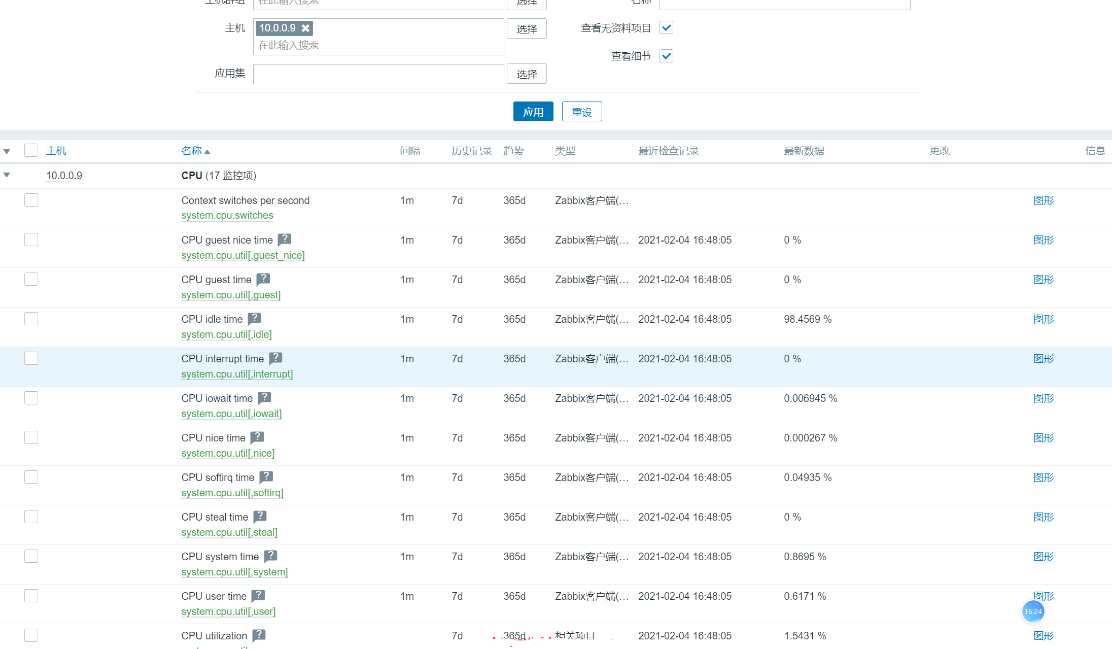
点击监测 - 查看最新数据 使用主动模式之后,他们的区别在于最近检查的记录时间,被动模式时间是不一样的,而主动模式的时间是一样的
18: zabbix版本升级
zabbix不同版本对php的要求
2.2 -->3.0 -->4.0 -->5.0
php5.3 php5.4 php5.4 php7.2
zabbix-server 升级
安装新版本zabbix-release,
安装新版本yum install zabbix-server-mysql -y
重启服务systemctl restart zabbix-server
zabbix-web php版本升级
卸载旧版本yum remove php-* -y
安装新版本
yum -y install php72w-fpm php72w-gd.x86_64 php72w-bcmath.x86_64 php72w-xml.x86_64 php72w-mbstring.x86_64 php72w-ldap.x86_64 php72w-mysqlnd.x86_6419: zabbix分布式监控proxy
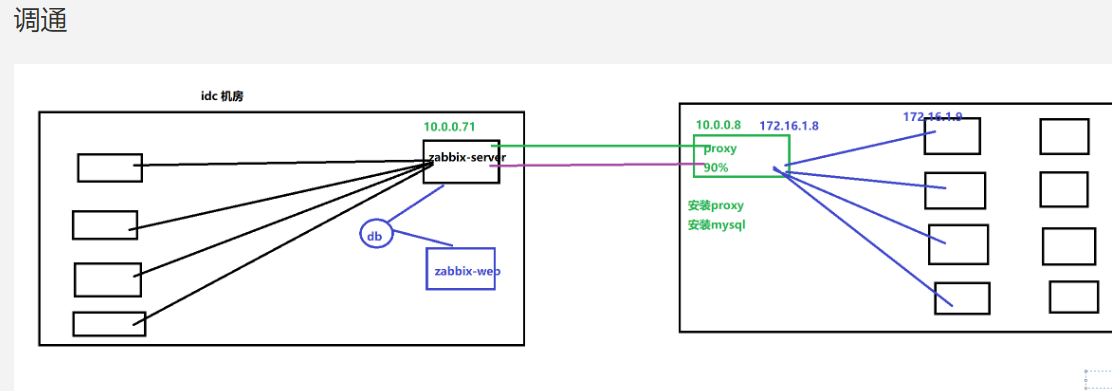
安装proxy
#创库
create database zabbix character set utf8 collate utf8_bin;
grant all on zabbix.* to zabbix@localhost identified by '123456';
#安装proxy
rpm -ivh https://mirrors.tuna.tsinghua.edu.cn/zabbix/zabbix/5.0/rhel/7/x86_64/zabbix-release-5.0-1.el7.noarch.rpm
sed -i 's#http://repo.zabbix.com#https://mirrors.tuna.tsinghua.edu.cn/zabbix#g' /etc/yum.repos.d/zabbix.repo
yum install zabbix-proxy-mysql -y
#导入表结构
zcat /usr/share/doc/zabbix-proxy-mysql-5.0.8/schema.sql.gz |mysql -uzabbix -p123456 zabbix
#配置
vim /etc/zabbix/zabbix_proxy.conf
Server=10.0.0.71
ServerPort=10051
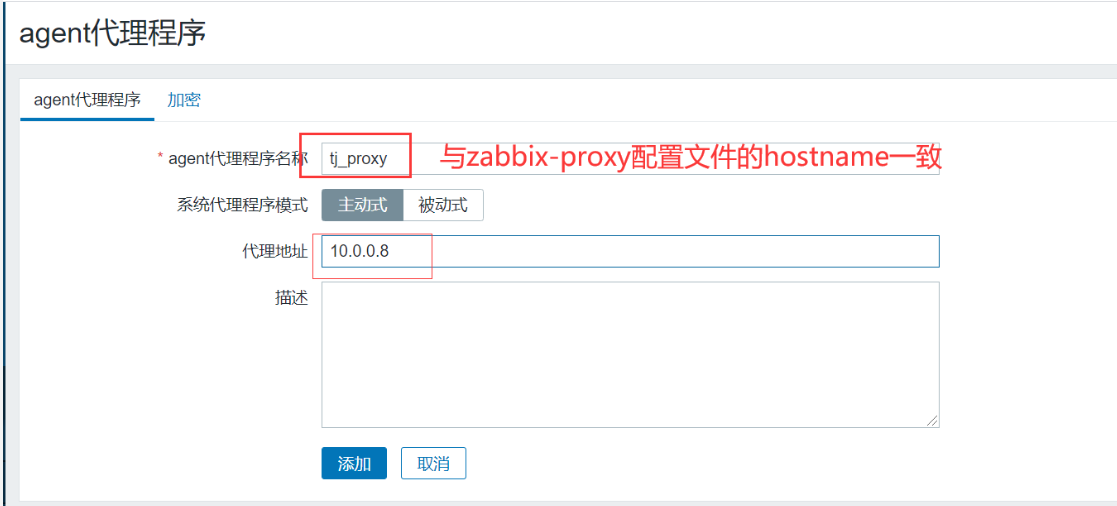
Hostname=tj_proxy
....
DBHost=localhost
DBName=zabbix
DBUser=zabbix
DBPassword=123456
#启动
systemctl start zabbix-proxy.service
systemctl enable zabbix-proxy.service
#检测
[root@web01 ~]# netstat -lntup|grep 10051
tcp 0 0 0.0.0.0:10051 0.0.0.0:* LISTEN 96337/zabbix_proxy
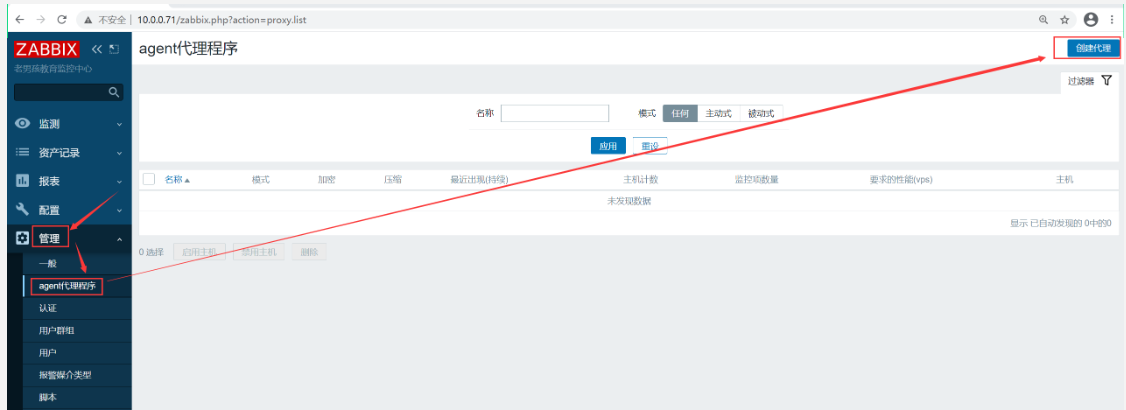
tcp6 0 0 :::10051 :::* LISTEN 96337/zabbix_proxy 创建代理
agent配置
vim /etc/zabbix/zabbix_agentd.conf
Server=172.16.1.8
ServerActive=172.16.1.8
Hostname=172.16.1.9
systemctl restart zabbix-agent.service20: zabbix监控java jvm原理
tomcat weblogic jboss resin
tomcat:
开启监控接口
#安装tomcat
rpm -ivh jdk-8u102-linux-x64.rpm
mkdir /app
tar xf apache-tomcat-8.0.27.tar.gz -C /app/
/app/apache-tomcat-8.0.27/bin/startup.sh
#增加一行
vim /app/apache-tomcat-8.0.27/bin/catalina.sh
CATALINA_OPTS="$CATALINA_OPTS -Dcom.sun.management.jmxremote -Djava.rmi.server.hostname=10.0.0.8 -Dcom.sun.management.jmxremote.port=12345 -Dcom.sun.management.jmxremote.ssl=false -Dcom.sun.management.jmxremote.authenticate=false"
#重启生效
/app/apache-tomcat-8.0.27/bin/shutdown.sh
/app/apache-tomcat-8.0.27/bin/startup.sh
#检验
[root@web01 opt]# netstat -lntup|grep 12345
tcp6 0 0 :::12345 :::* LISTEN 100141/java 安装zabbix-java-gateway来监控jvm
yum install zabbix-java-gateway.x86_64 -y
systemctl start zabbix-java-gateway.service
systemctl enable zabbix-java-gateway.service
修改zabbix-server的配置文件
vim /etc/zabbix/zabbix_server.conf
JavaGateway=127.0.0.1
JavaGatewayPort=10052
StartJavaPollers=3
systemctl restart zabbix-server.service
添加监控
21: zabbix性能优化
性能不足的时候:经常出现误报,断图,还有其他报警
优化:
数据库优化:业务类型 写多读少
存储引擎:innodb --> tokudb
版本  mariadb 5.5 --> mysql 5.7
存储:机械硬盘--->固态硬盘
去掉无用的监控项
增加取值间隔,建议60s
减少数据的保留周期,重要监控项保留90d,其他的一律3d
mysql的分区和分表
zabbix-server服务优化
进程数
缓存大小
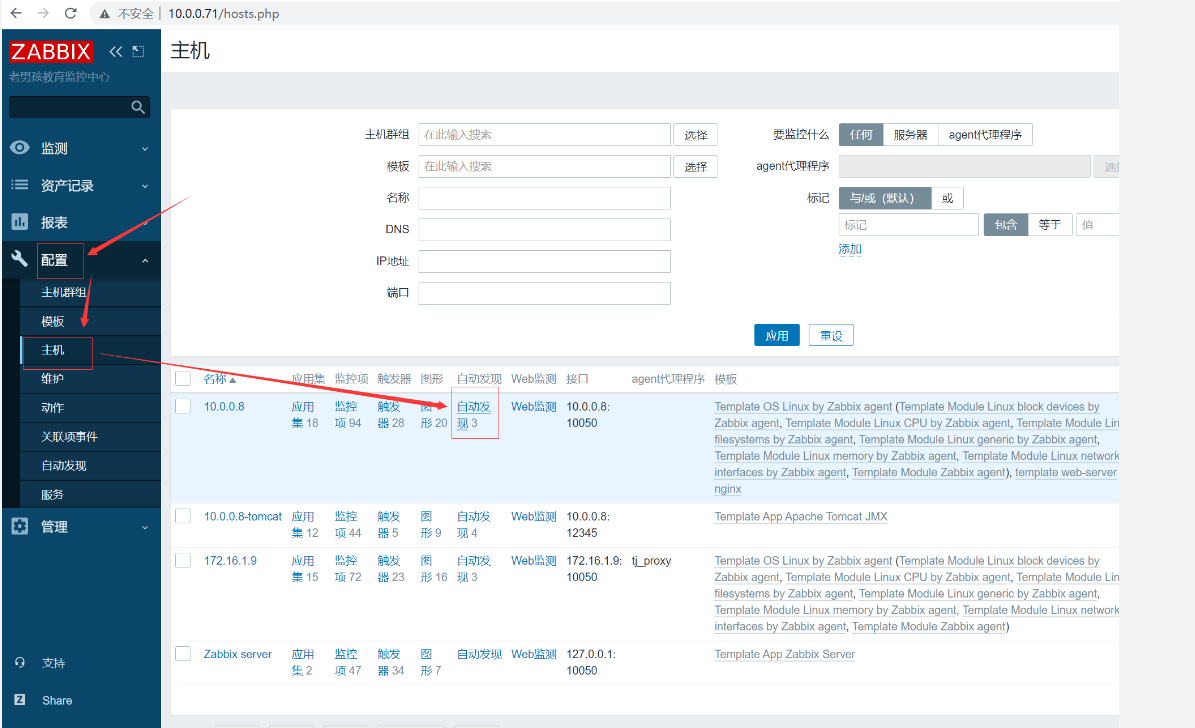
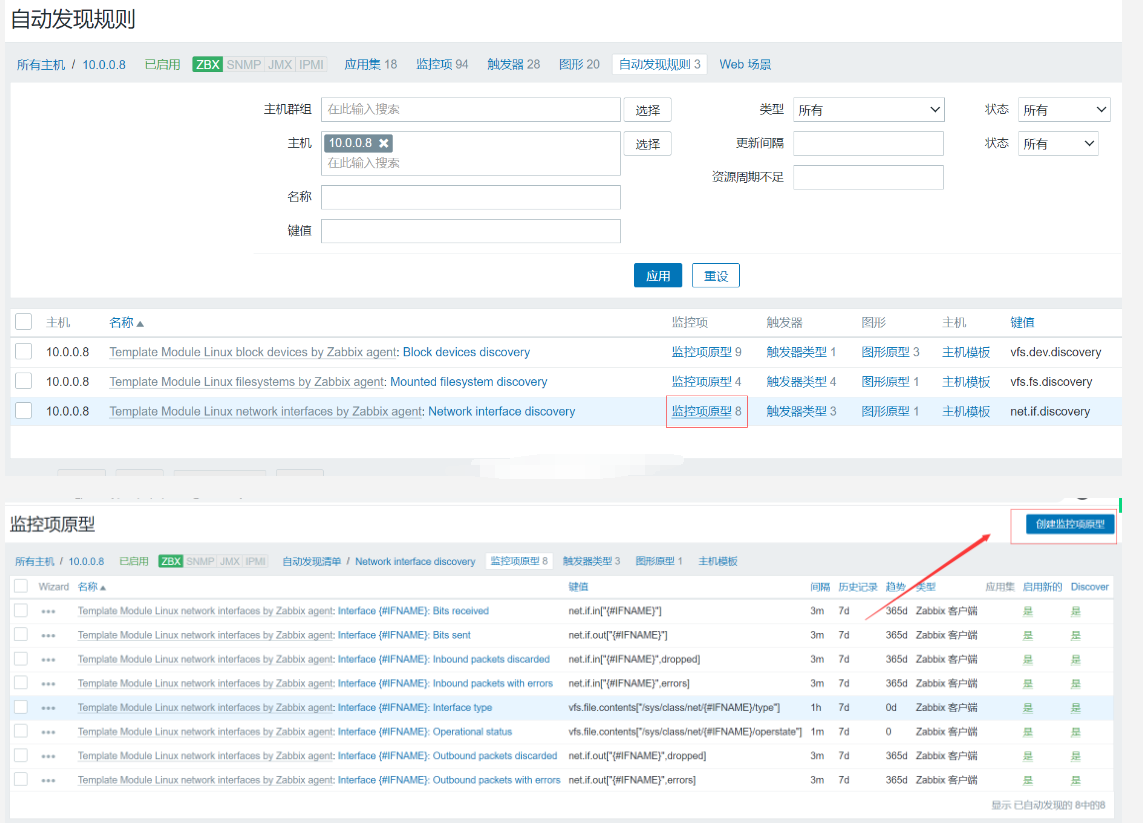
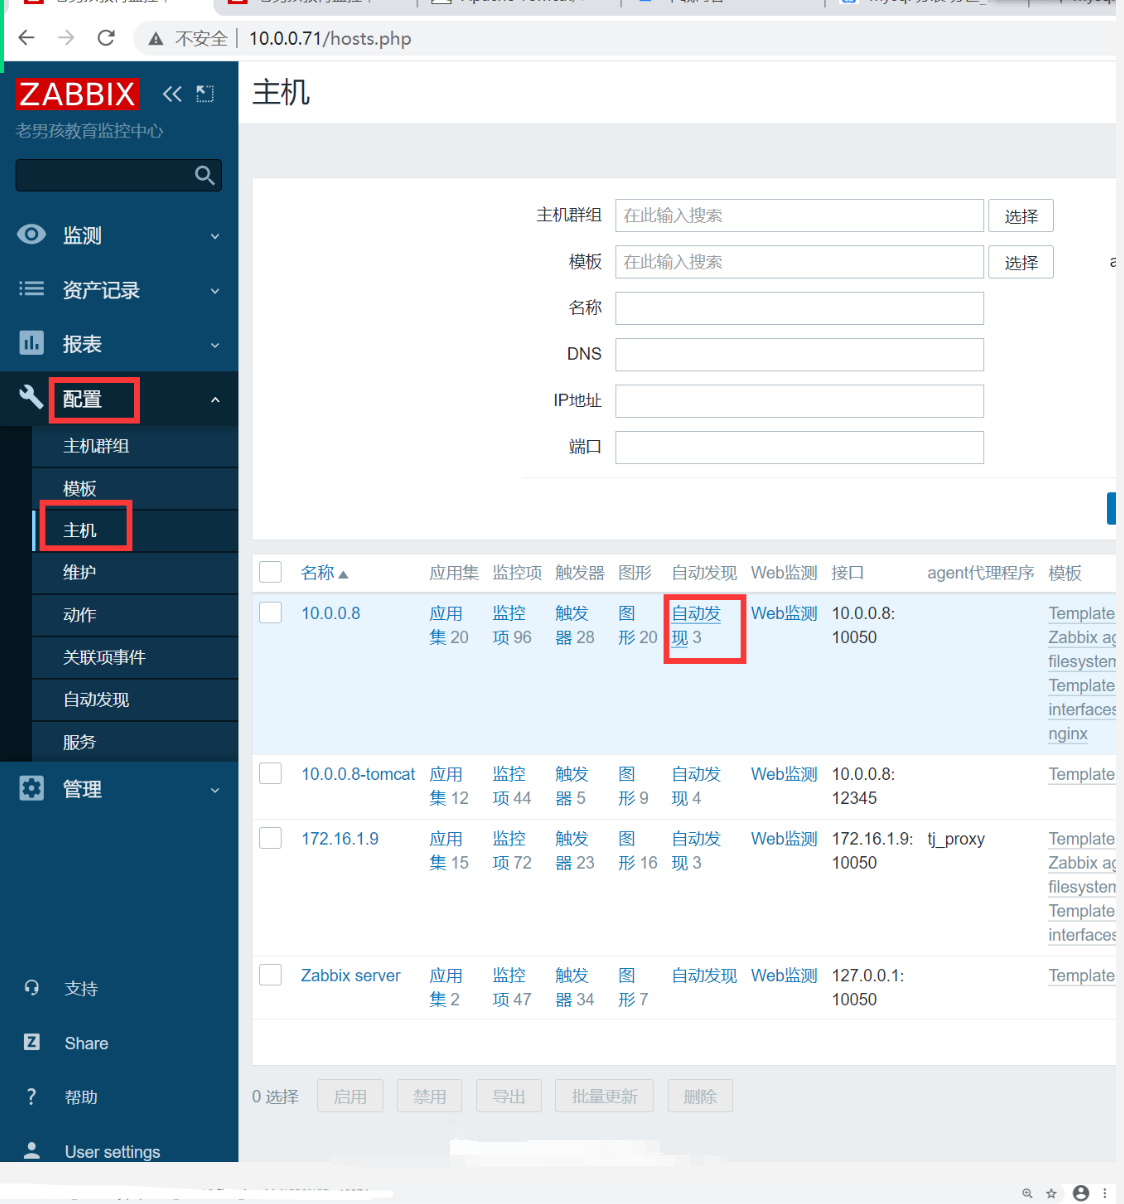
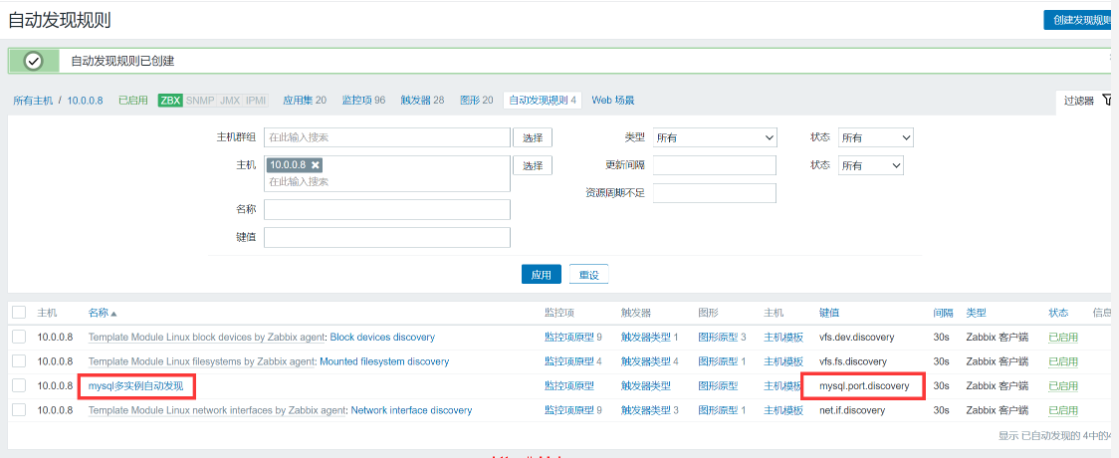
22: zabbix低级自动发现
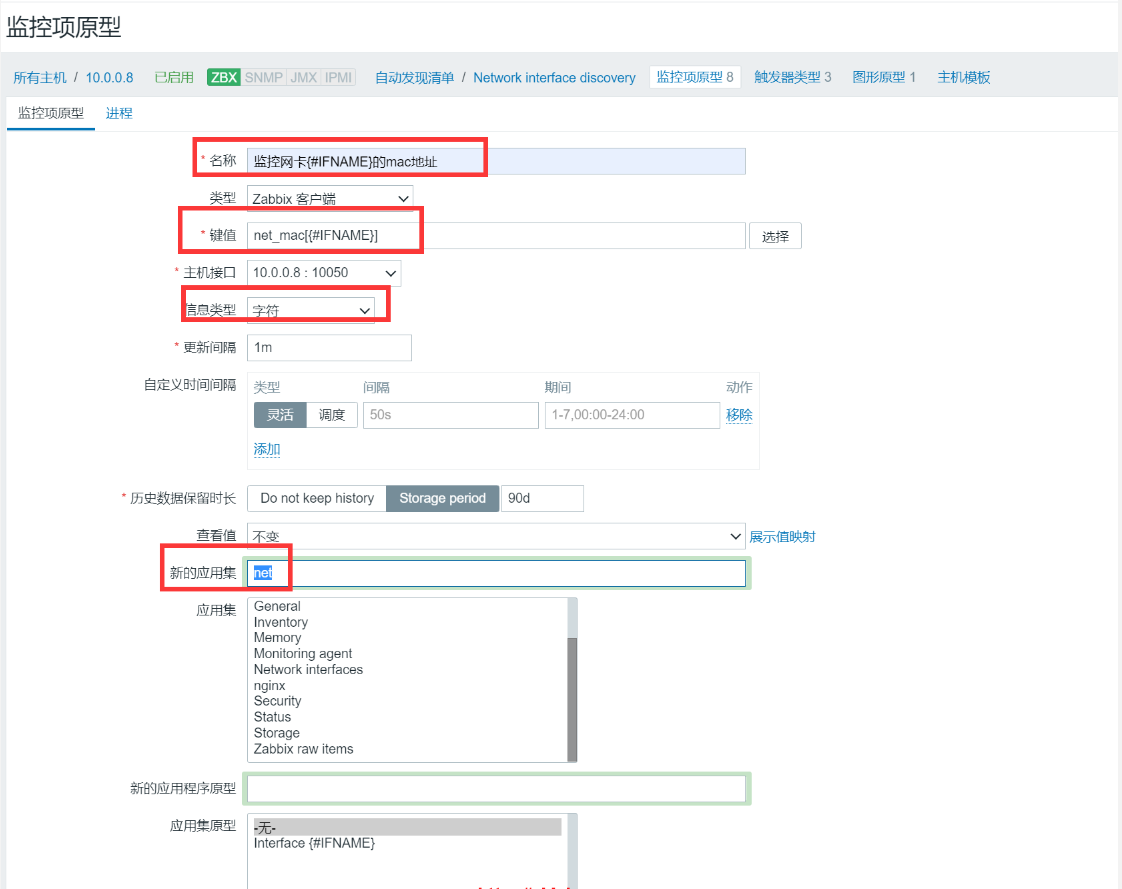
新增一个监控项原型
增加一个UserParameter=xxxx[*],cmd $1
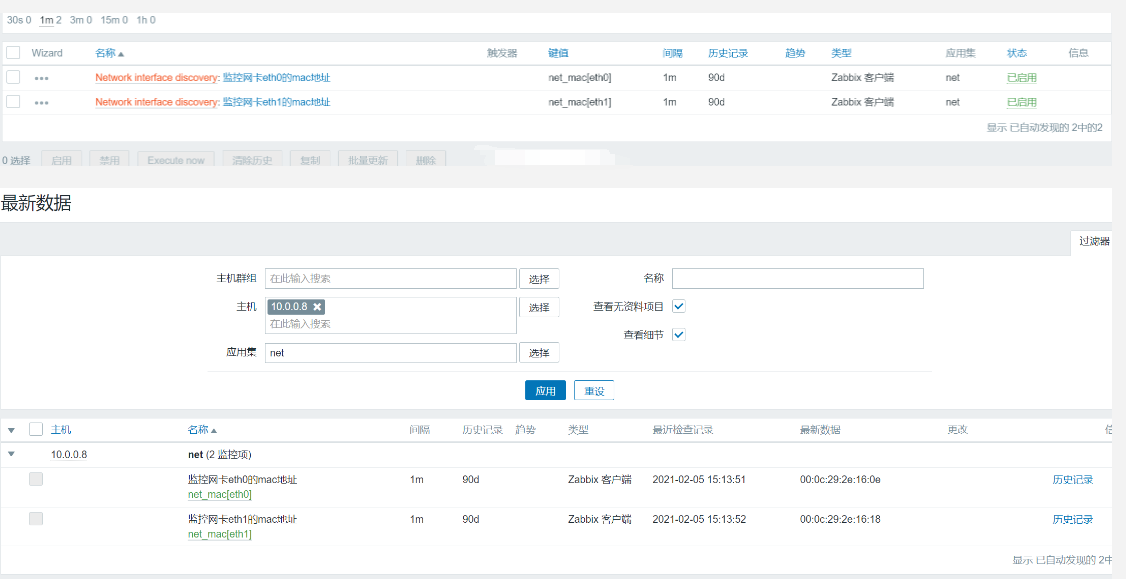
监控每块网卡的mac地址
[root@web01 zabbix_agent2.d]# cat zbx_net.conf
UserParameter=net_mac[*],ifconfig $1|awk '/ether /{print $$2}'
[root@zabbix-server ~]# zabbix_get -s 10.0.0.8 -k net_mac[eth1]
00:0c:29:2e:16:18通过低级自动发现监控mysql多实例
准备环境mysql多实例
cp /etc/my.cnf /etc/my3307.cnf
vim /etc/my3307.cnf
[mysqld]
datadir=/data/3307/
socket=/data/3307/mysql.sock
port=3307
user=mysql
symbolic-links=0
[mysqld_safe]
log-error=/data/3307/mysqld.log
pid-file=/data/3307/mysqld.pid
sed '/^$/d' /etc/my3307.cnf
sed -i '/^$/d' /etc/my3307.cnf
cp /etc/my3307.cnf /etc/my3308.cnf
sed -i 's#3307#3308#g' /etc/my3308.cnf
cat /etc/my3308.cnf
mysql_install_db --user=mysql --defaults-file=/etc/my3307.cnf
mysql_install_db --user=mysql --defaults-file=/etc/my3308.cnf
mysqld_safe --defaults-file=/etc/my3307.cnf &
mysqld_safe --defaults-file=/etc/my3308.cnf &
mysqladmin -uroot -h 127.0.0.1 -P 3307 password '123456'
mysql -uroot -p123456 -h 127.0.0.1 -P 3307
mysqladmin -uroot -h 127.0.0.1 -P 3308 password '123456'
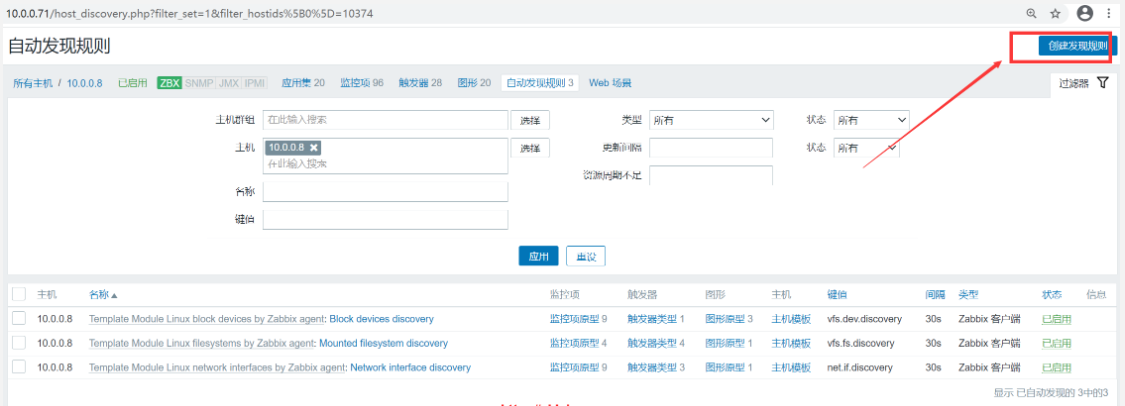
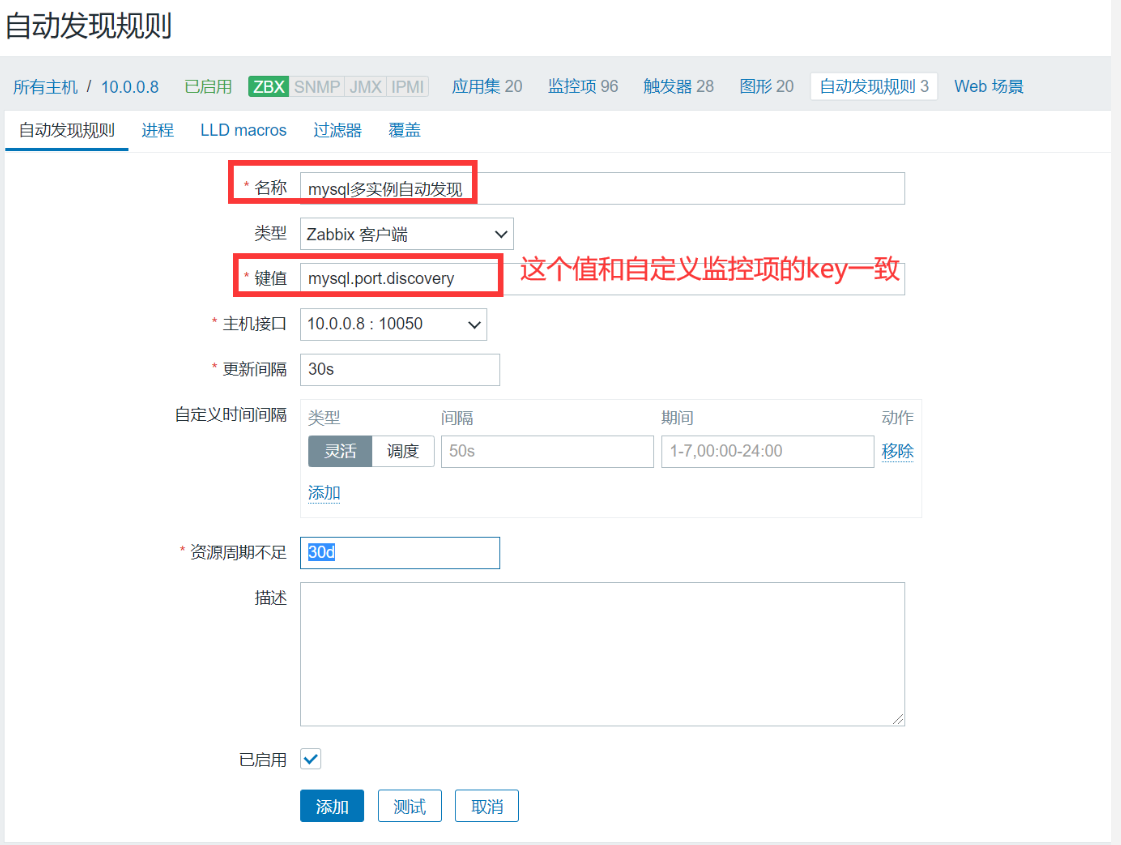
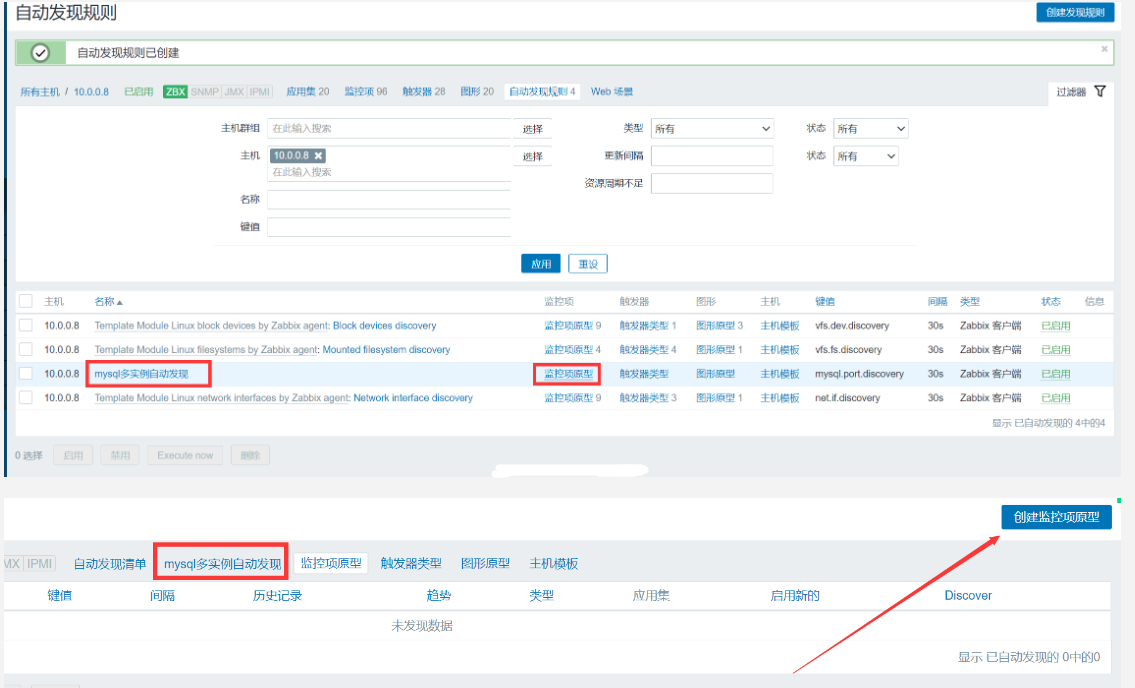
mysql -uroot -p123456 -h 127.0.0.1 -P 3308创建低级自动发现规则
#自定义规则的监控项
vim /etc/zabbix/zabbix_agent2.d/zbx_mysql.conf
UserParameter=mysql.port.discovery,/bin/bash /server/scripts/mysql_port_discovery.sh
#脚本
vim /server/scripts/mysql_port_discovery.sh
#!/bin/bash
#mysql low-level discovery
res=`netstat -lntp|awk -F "[ :\t]+" '/mysqld/{print$5}'`
port=($res)
printf '['
for key in ${!port[@]}
do
   if [[ "${#port[@]}" -gt 1 && "${key}" -ne "$((${#port[@]}-1))" ]];then
   printf '{'
   printf "\"{#MYSQLPORT}\":\"${port[${key}]}\"},"
   else [[ "${key}" -eq "((${#port[@]}-1))" ]]
   printf '{'
   printf "\"{#MYSQLPORT}\":\"${port[${key}]}\"}"
   fi
done
printf ']\n'
#重启
systemctl restart zabbix-agent2.service
#测试
[root@zabbix-server ~]# zabbix_get -s 10.0.0.8 -k mysql.port.discovery
[{"{#MYSQLPORT}":"3306"},{"{#MYSQLPORT}":"3307"},{"{#MYSQLPORT}":"3308"}]
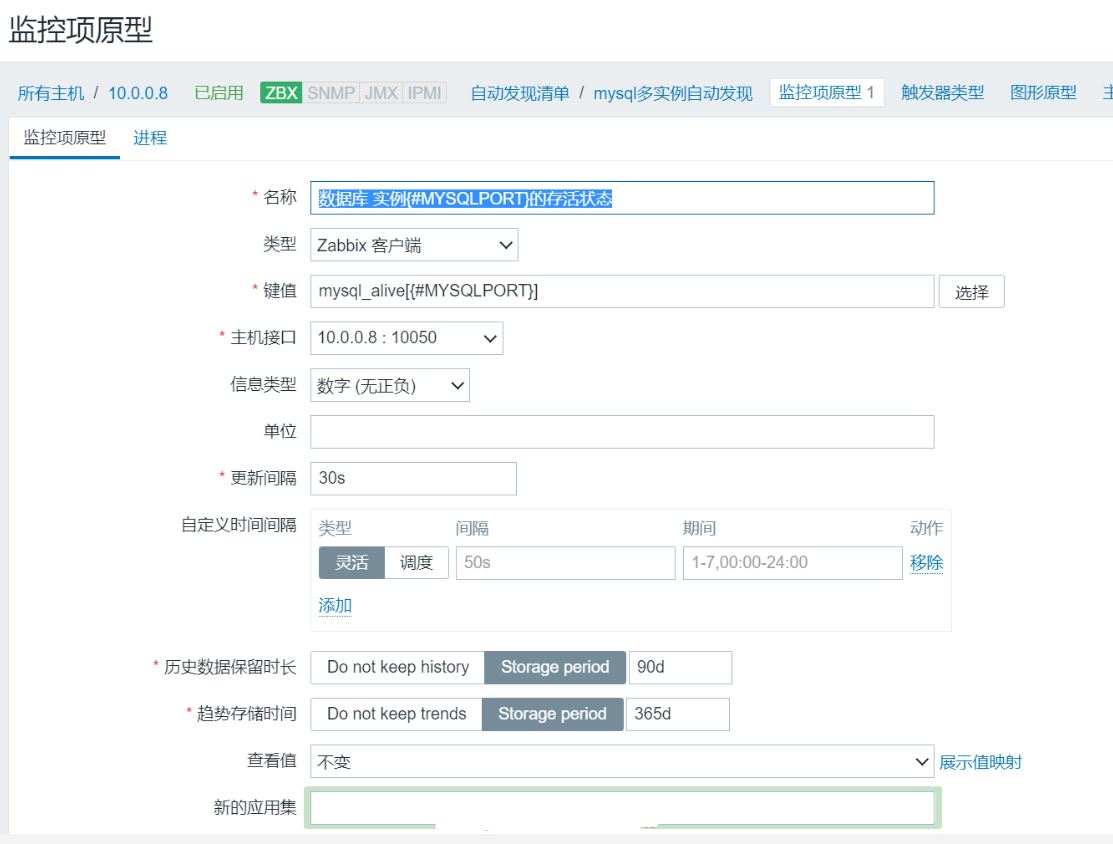
创建监控项原型
vim zbx_mysql.conf
UserParameter=mysql_alive[*],mysqladmin -uroot -p123456 -h 127.0.0.1 -P $1 ping 2>/dev/null|grep -c alive
#测试
[root@zabbix-server ~]# zabbix_get -s 10.0.0.8 -k mysql_alive[3307]
123: zabbix api
api:应用程序接口
什么是调用api
怎么调用api,常见的调用api,就是发起一个http请求
curl "http://apis.juhe.cn/simpleWeather/query?city=昌平&key=3dae6629acd8689e9b12f8bb4f"
{"reason":"查询成功!","result":{"city":"昌平","realtime":{"temperature":"13","humidity":"15","info":"晴","wid":"00","direct":"西风","power":"2级","aqi":"67"},"future":[{"date":"2021-02-05","temperature":"1\/13℃","weather":"晴","wid":{"day":"00","night":"00"},"direct":"西风转西北风"},{"date":"2021-02-06","temperature":"-3\/13℃","weather":"多云","wid":{"day":"01","night":"01"},"direct":"西北风转南风"},{"date":"2021-02-07","temperature":"-5\/5℃","weather":"晴","wid":{"day":"00","night":"00"},"direct":"东南风转北风"},{"date":"2021-02-08","temperature":"-5\/5℃","weather":"多云转晴","wid":{"day":"01","night":"00"},"direct":"东南风转西北风"},{"date":"2021-02-09","temperature":"-3\/9℃","weather":"多云转晴","wid":{"day":"01","night":"00"},"direct":"东南风转西北风"}]},"error_code":0}
调用zabbix-api
获取token
curl -X POST -H 'Content-Type:application/json-rpc' -d '
{
    "jsonrpc": "2.0",
    "method": "user.login",
    "params": {
        "user": "Admin",
        "password": "zabbix"
    },
    "id": 1,
    "auth": null
}'  http://10.0.0.71/api_jsonrpc.php
返回结果;
{"jsonrpc":"2.0","result":"6d33c0a88b0d55d7860eea70005c5b5b","id":1}
token='6d33c0a88b0d55d7860eea70005c5b5b'
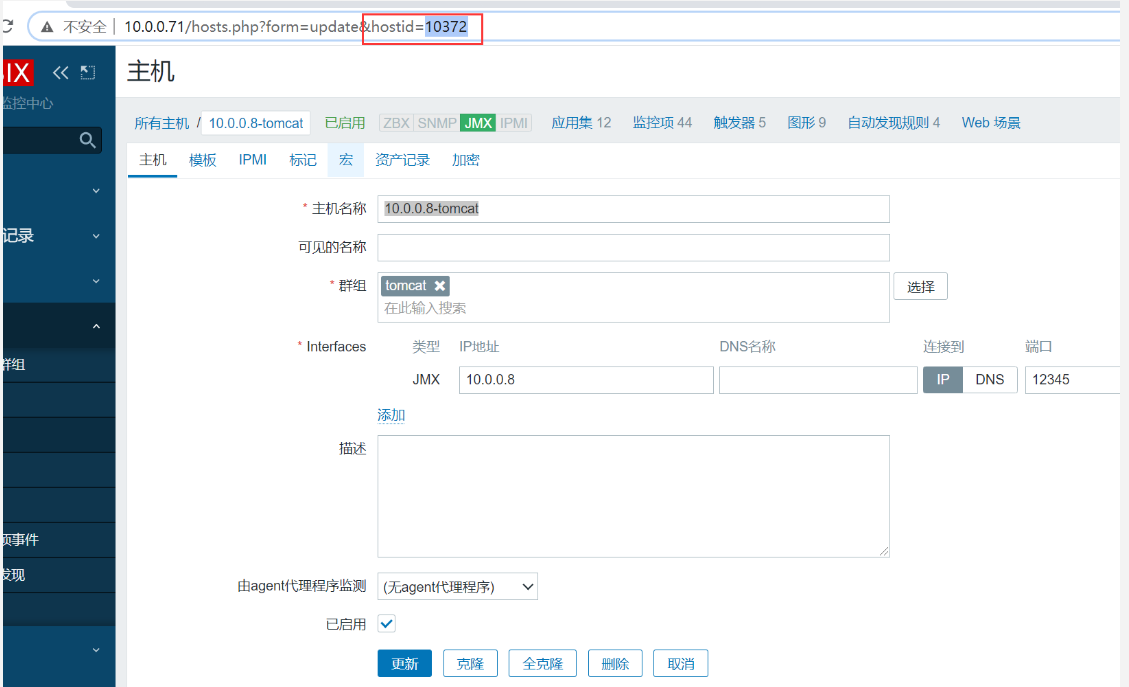
删除主机
curl -X POST -H 'Content-Type:application/json-rpc' -d '
{
    "jsonrpc": "2.0",
    "method": "host.delete",
    "params": [
        10372
    ],
    "auth": "'$token'",
    "id": 1
}'  http://10.0.0.71/api_jsonrpc.php
返回结果
{"jsonrpc":"2.0","result":{"hostids":[10372]},"id":1}
创建主机
curl -X POST -H 'Content-Type:application/json-rpc' -d '
{
    "jsonrpc": "2.0",
    "method": "host.create",
    "params": {
        "host": "10.0.0.8",
        "interfaces": [
            {
                "type": 1,
                "main": 1,
                "useip": 1,
                "ip": "10.0.0.8",
                "dns": "",
                "port": "10050"
            }
        ],
        "groups": [
            {
                "groupid": "17"
            }
        ],
        "templates": [
            {
                "templateid": "10357"
            }
        ]
    },
    "auth": "'$token'",
    "id": 1
}'  http://10.0.0.71/api_jsonrpc.php
返回结果:
{"jsonrpc":"2.0","result":{"hostids":["10377"]},"id":1}
批量创建主机
[root@web01 ~]# cat piliang_create_host.sh
#!/bin/bash
token='6d33c0a88b0d55d7860eea70005c5b5b'
for n in `echo 10.0.0.{50..100}`
do
curl -X POST -H 'Content-Type:application/json-rpc' -d '
{
"jsonrpc": "2.0",
"method": "host.create",
"params": {
"host": "'$n'",
"interfaces": [
{
"type": 1,
"main": 1,
"useip": 1,
"ip": "10.0.0.8",
"dns": "",
"port": "10050"
}
],
"groups": [
{
"groupid": "17"
}
],
"templates": [
{
"templateid": "10357"
}
]
},
"auth": "'$token'",
"id": 1
}' http://10.0.0.71/api_jsonrpc.php
done
